
Like other Londoners, I am now utterly dependent on the weather app on my smartphone. Sunshine can turn suddenly into dark rain clouds that let loose their furies within a matter of minutes. Similarly temperatures can halve or double in a day, and you can find yourself inappropriately dressed.
You may find that a cursory glance at the predicted weather throughout the day will help you better lay out your schedule, especially if it includes outdoor activities like choosing when to take the dog on a walk or pop to the shop for milk or whether to bike to work. The app will lay out the forecast hour by hour, tell you the exact time for sunrise and sunset for your location, rate air quality and even tell you the intensity of drizzle to expect over the next hour.
Even if you live somewhere with predictable weather, it can be handy to check the current climate where friends and family live or a destination for an upcoming trip. No longer do you need to depend on scrolling through columns of city names in the newspaper or even do an internet search.
The weather app should come as standard on your smartphone. If not, it is easy to install a free version.
To check whether it’s already installed, unlock your smartphone to see the home screen (all your apps). From the middle of your screen, pull down to access the search bar for your home screen (see screenshot below):

Type in “weather”, and it should pop up. The appearance of yours may vary; mine looks like this: ![]()
If it doesn’t appear, you can go into the App store/Google Play to download a free version for iPhone or Android.
Finding your city/town
If the app has access to your location, you will see “My Location” as the first option, as shown below.

If you don’t see this, you can either manually add your city or allow the app access to your location by popping over to Settings on your home screen. 
To add your or any city or town manually, within the weather app, simply tap on the search (magnifying glass) icon at the bottom right of the screen. See yellow squared area above. Type in the name of the place and choose from the drop-down menu. For example, if you type in “San Jose”, you will see a selection of cities by that name in California, Costa Rica, Uruguay, etc., so you’ll want to be sure you select the intended one. If your thumb slips, and you’ve chosen the wrong one, simply select the “x” and choose again.
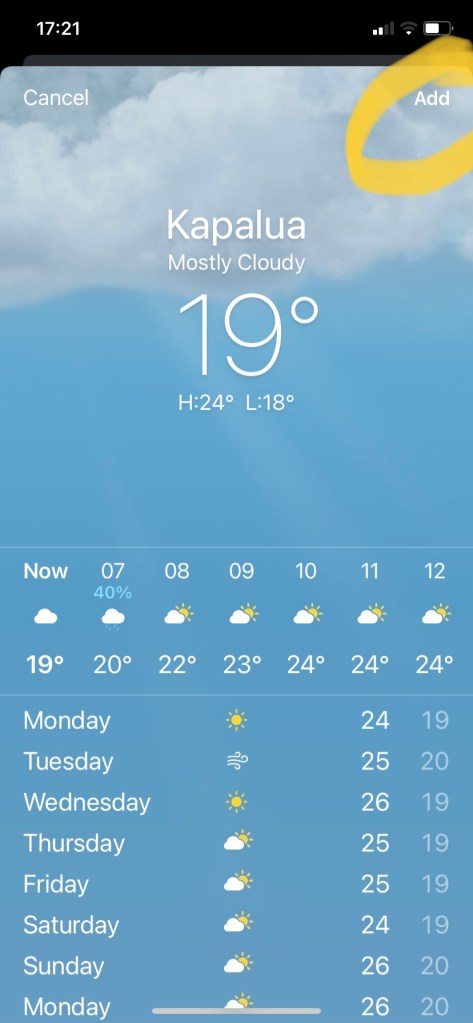
Once you’ve got the right town (why not make yourself jealous with Kapalua Maui, Hawaii?), be sure to select “Add” which is in top right:
At a glance
Once you have several locations added, when you open the app, it will default to showing you the details of your location. As you can see below, you’ll get in large print the current temperature and underneath the high and the low for the day. In the next section, you’ll get an hour-by-hour forecast for the next 24 hours. So if you are looking for detail for a period less than 24 hours away, you’ll find it here rather than by looking in the section below, which shows a daily recap (high/low/precipitation) for the following 7-8 days.
Staying on this screen, if you scroll down further you’ll see the air quality reading (in this case air pollution, so “low” is good). Some locations show actual air quality so “low” would be bad. You’ll also see sunrise and sunset times and other information like amount of precipitation, wind direction, etc. Very handy is the UV index which indicates how much sun exposure you’ll have and if you’ll need sun protection. (Experts and mothers will tell you it’s always best to use it!)
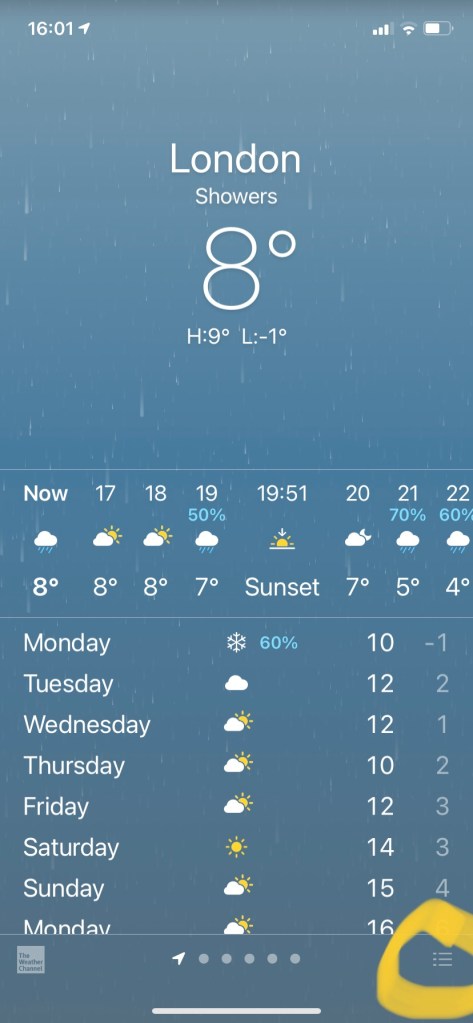

If you want to see at a glance the weather summary for all the places you have loaded, simply tap the menu at the bottom right of this detailed page. See image above, circled in the screenshot on the left.
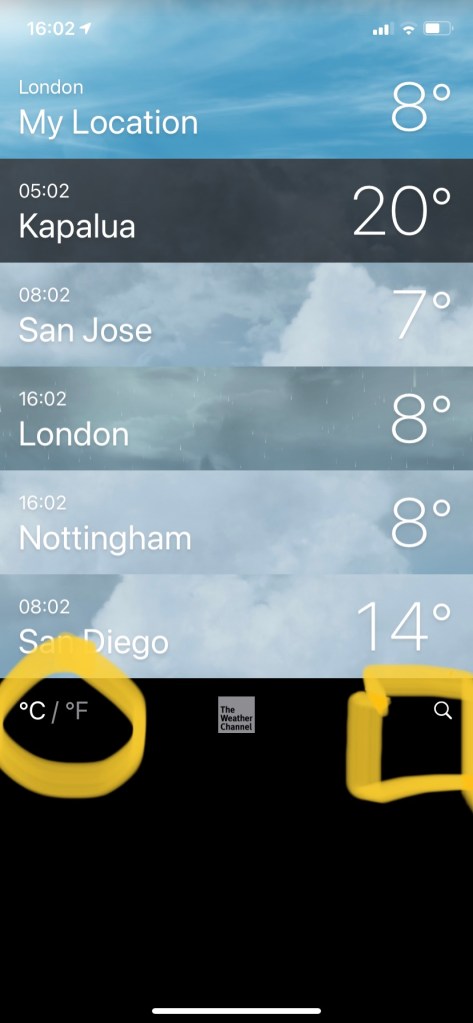
Whether you prefer to see the temperature in Celsius or Farenheit, you can make the choice from the summary screen by tapping on the C/F icon on the bottom left (see area circled on lower left in screenshot repeated below):
Deleting a town
When you want to delete a city/town, simply go to the summary page (as above). Place your finger on the town to delete and then slide it to the left until you see a red “Delete” bar appear on the right. Release than tap “Delete”, and the entry will disappear. If you’ve made an error, before hitting “Delete”, simply slide the town back to the left and “Delete” disappears.

Don’t worry if you’ve actually deleted in error or change your mind, simply follow the steps above in Finding your city/town to re-add it using the search (magnifying icon) and typing in the name again.
You should now have the world’s weather at your fingertips!
Never miss another Gransplain tip when you subscribe for free. You’ll automatically receive our tips each week, and we promise to keep your email just between us.
