It’s easier than you might think to take as screenshot or “screen grab” to save a record of whatever is showing on your screen. We’ll take you through several ways you can do so. Two methods will allow you to grab and save just what is visible on your screen, and we’ll also go over ways to take a screenshot in one go of the entire page (what you would see if you scrolled from top to bottom, rather than just what is visible on one screen without scrolling).
Take a Screenshot using 3 Shortcut Keys
The advantage of this method (vs using the Print Screen button) is that you won’t have to crop the shot after taking it. Instead you will choose only what you want to capture right from the start. Here’s how…Position what you want to record so you can see it from start to finish. If it doesn’t fit in one page, not to worry as you can either take multiple screenshots or use a tool suggested later in this post. In that case, ensure you can see the top/start of what you want to capture.
Hold down the Windows key on your keyboard. It looks like one of these:  or
or 
Whilst holding it down, also hold down the Shift key and press the “S” key. This is easy as they are all found in the lower left section of your keyboard. Release all keys. Your screen should go grey and you will see at the top of your screen a row of icons, as per below:
You will almost always want to take a rectangular screen grab or “snip”, so choose the first icon on the left. Now, with your mouse or tracker, position the cursor (which is in the shape of a “t” ) in the upper corner of the area you want to record. Now hold down the left click of the mouse as you move down and across the page until you have highlighted everything you want to record. Then release the left click. (This is the same movement you would make if you were highlighting text in a document.) If you make a mistake and release the left click too soon, you will need to start over with the three shortcut keys (Windows, Shift, “S”). Don’t worry, I often take 2 or more attempts until I get exactly right what I want to save. Remember, if you want to record more than can be seen on one screen of your computer, you will need to take multiple screenshots or better yet, use a different program to record it all at once (see below section).
Using your Screenshot
If you want to paste this somewhere (an email, a Word doc), you can go immediately to the place you want to paste it and do so as you would normally. For example you can right click and select “Paste” or use the shortcut keys Control + “V”.
Your screenshots may or may not already have been set up to automatically be saved in a file called “Screenshots”. You can check this a bit later. For now presuming you have Windows 10, you can find your latest several screenshots on your Clipboard. To access your Clipboard, use the shortcut keys (WIndows) + “V”. Select the screengrab and Save to whichever folder you’d like (or paste it to a document).
Other Shaped Screenshots
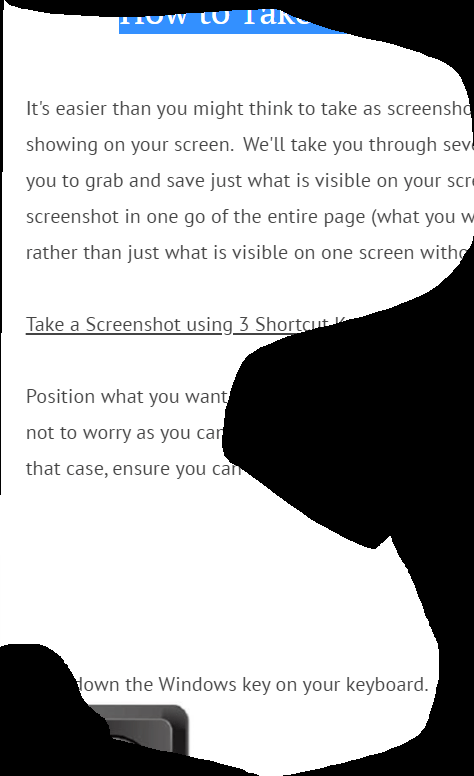
If for some reason you do not want a rectangular-shaped screen grab, then you can use the second icon from the left (see above) to “draw” your own outline. Below is an example of a freeform shaped screen shot of this page:
Where’s My Screenshot?
Wouldn’t it be nice if the screenshots automatically saved in a folder called, say, “Screenshots”? Well depending on the default on your computer, they may already be doing so.
If you’ve taken screenshots in the above “3 Shortcut Keys” method (ie Windows/Shift/S) then:
1. Open your File Explorer (the file folder icon).
2. Once you’ve opened the Explorer, click on “This PC” in the left sidebar, and then “Pictures.”
3. In “Pictures,” locate the folder called “Screenshots.” Open it, and any and all screenshots taken should be there.
However if there isn’t a folder called Screenshots, you can set one up. Do so by hitting just the “Print Screen” button on your keyboard (aka “PrtScn” usually upper row on right). You will be prompted to save onto your OneDrive file. Follow the prompts, and you will then be able to find the folder as per the 3 steps above. Note only the screenshot you just took will be in the folder. If there was not previously a folder set up, any screen grabs you took before that will only have gone onto your Clipboard and then have disappeared as you filled the clipboard with new screenshots.
How to set up the default location of your screenshots
- Firstly, use the File Explorer to navigate to the place where you want your screenshots to be saved. It can be anywhere, including your desktop. Once there, create a folder called “Screenshots.”
- Now, repeat the previous section’s steps to reach the “Pictures” folder.
- Right-click on the folder that reads “Screenshots” and then open the “Properties” of the folder.
- In the “Properties” for the Folder, click on the “Location” tab. You’ll see the folder’s current location. Now click the “Move” button.
- In the new window that opens, find the new “Screenshots” folder you made earlier and select it. Once there, click “Select Folder” on the bottom right.
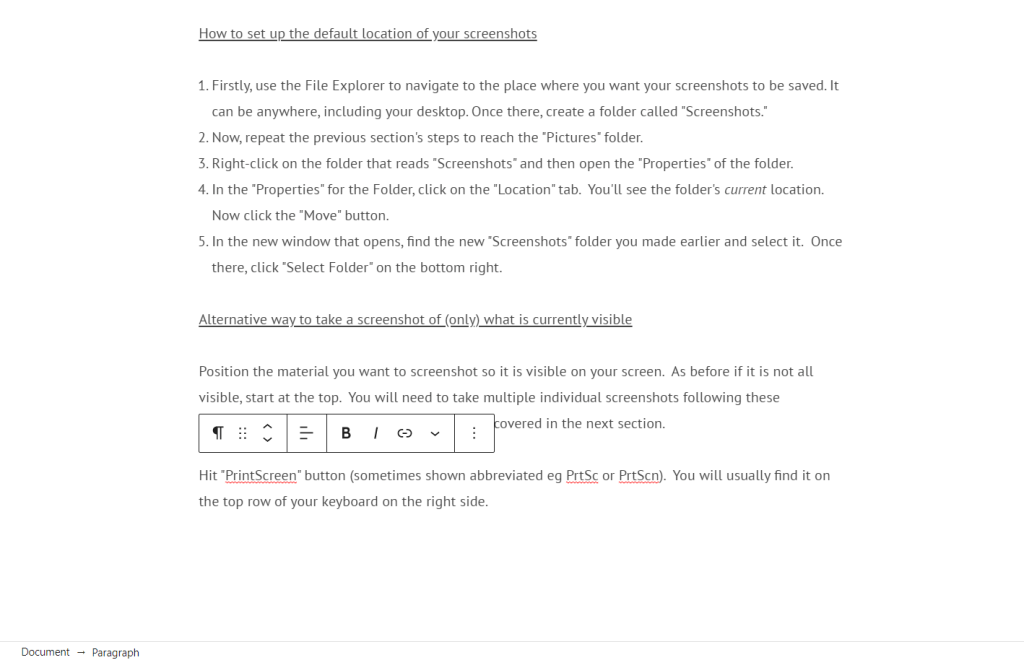
Alternative way to take a screenshot of (only) what is currently visible by using PrintScreen button
Position the material you want to screenshot so it is visible on your screen. As before if it is not all visible, start at the top. You will need to take multiple individual screenshots following these directions or you can use the full page method covered in the next section.
Hit “PrintScreen” button (sometimes shown abbreviated eg PrtSc or PrtScn). You will usually find it on the top row of your keyboard on the right side.
Unlike using the snip method above, this will simply take a snapshot of everything currently visible on your screen. So all the open tabs, any sidebar information, ads, etc. See an example of what I received when I took a screenshot of this page using PrintScreen:

If you prefer, you can crop the screenshot before pasting or sending it so that you show only what you want to show. Whichever program you’re using, go to “Edit” then look for “Crop”, which may be shown as an icon similar to these: 

![]()
Here is the above once I cropped out the top and sidebars, which weren’t needed:
What to do if I want a screenshot of the entire page, vs. just what I can see at the moment?
There are free tools you can use that will take a single screenshot of the entire page you are on. I have been using Go Full Page happily for many years. You add it as an extension on your Chrome browser. You can find that here: https://gofullpage.com/ Extensions are simply tools that are compatible with your browser and can be added on to “extend” its capabilities. Always check that an extension is safe and highly rated before adding it. If you change your mind, you can always delete any extension later.
Where’s my extenstion?
Once you’ve installed this (or any Chrome extension), look for this icon to the right of your address bar (the bar where you type in the web address where you want to go). It looks like a puzzle piece: ![]()
Tap on the icon, and a menu will drop down showing all the extensions you have installed. Choose the GoFullPage one. (If you are prompted, choose “Allow”. ) If no prompts are shown, in tapping the GoFullPage, a screenshot of the entire page will take place automatically. You’ll see a small box briefly appear on the upper right of your screen showing a partial circle and the words “screen capture in progress”.
The resulting screen capture will appear as a new tab (see below):
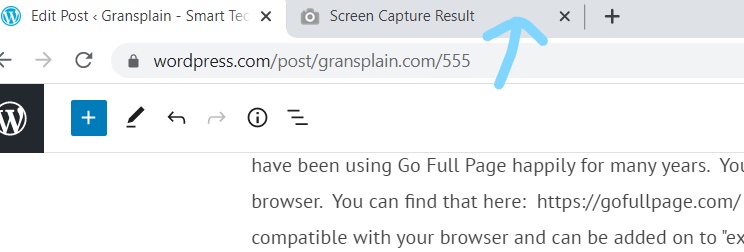
Open that tab, and you will find the actions you can take on the top bar:
If you’re looking to attach or embed it in an email, then download first, save as file name of your choosing then attach or embed in your email from your saved files. You can download as a pdf or use the download icon to the right of the pdf download icon in order to save as a different type of file. Most email and other programs should accept a pdf without hassle, so it’s the easy choice.
That’s it, you now know various ways you can take a screenshot and how to use it. It’s especially handy if you are asking for someone’s help in guiding you through a process online. You simply take a screen grab showing where you got stuck and send it to them.
How to get more helpful tips on Screenshots and other tricks
If you subscribe to our blog, you’ll automatically get access to our next post “How to Take a Screenshot on your iPhone” as well as all our free future tutorials. Simply subscribe by inputting your email address and hitting “Subscribe” below. We will use your details only to send you updates and promise not to share them with others.
This was a long one. Let us know if you liked this post by giving us a “Thumbs up”.

2 thoughts on “How to Take a Screenshot on your Computer”