
Your iPhone makes it easy to take interesting photos beyond the standard options. For example, you can capture the entire sweep of your favorite beach or a stunning view from a vantage point. (If you’re looking for the basics on taking standard photos in your iPhone, you’ll find those in the previous post, with the link here.)
The Basics of Taking Photos Using Pano
With traditional film and digital cameras you used to need a special panoramic lens in order to capture “Panos” or panoramic images. This ability now comes standard with your iPhone.
As with all Photos, begin by opening your Camera app. ![]()
On the bottom of the screen you’ll see the menu of different photo/video choices. Select “Pano” (circled in image below).

A large white arrow and thin yellow line will appear in your main screen. These indicate the direction and path you should take when moving your iPhone (camera). This will always be left to right, so start your image on the far left of what you’d like to capture.
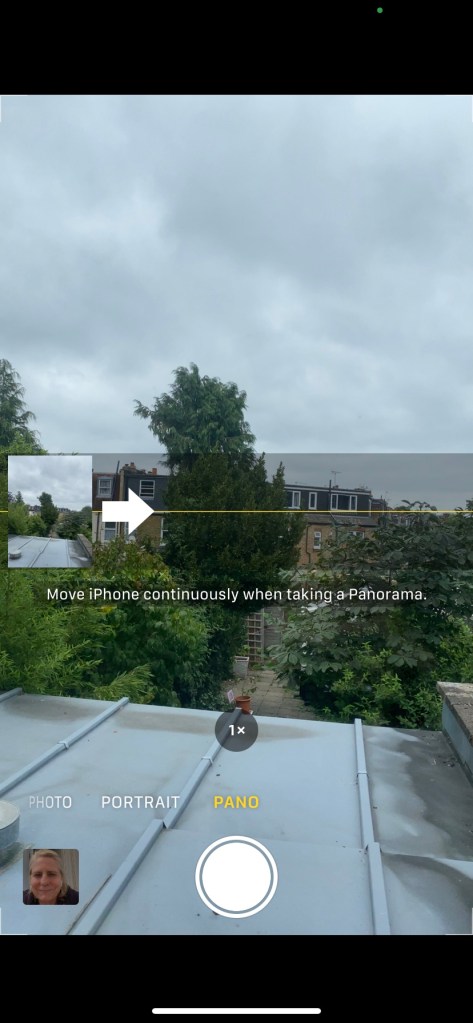
A message will appear to “Move iPhone continuously when taking a panorama”. If you move your camera too quickly, you’ll see a message to slow down, so it’s best to be slow and accurate. You should aim to keep the point of the white arrow on the thin, yellow line. Don’t worry about small transgressions which shouldn’t affect the outcome. However if you accidently mess up with a significant judder (it happens…), then it’s best to end that take and send it to the bin in order to start over. You are limited to taking the image holding the camera (iPhone) in the upright position vs landscape. But of course the resulting photo will be in landscape. 🙂
NB. simply ignore that embedded static image that appears in the lower left corner of your screen; it’s simply the previous image that you took.
Pano mode operates like a video in that you have to press the shutter button (large solid white circle, see image above) once to begin to capture the scenery (the solid circle will turn hollow with a smaller white rectangle in the center) and again when you’re finished (when the circle will be shown as solid white once again).
Your resulting photo will often appear in a pronounced arc especially if you are trying to capture something that’s somewhat arched (like a sea cove) along a straight line. See examples below of 2 photos taken of the same beach at the same time in regular photo vs pano. And below these, the full panoramic photo.


Here’s a helpful tip I only learned after having taken numerous panoramic pics on my iPhone… You don’t actually have to follow the yellow line to the end! So many times I lamented having captured the “boring” end of a cliff or having to capture some less scenic elements like a main road. Well you don’t have to! Simply end the picture wherever you wish by tapping the shutter.
If you’ve found these tips helpful, please hit the ![]() . And if you’d like to automatically receive further tips on taking photos using your iPhone (including our next instalments on Portrait, Video, Slo-Mo and Time-lapse photos), you can subscribe for free by dropping your email in the box below and hitting the “Subscribe” button. We guarantee privacy and won’t share your details with anyone.
. And if you’d like to automatically receive further tips on taking photos using your iPhone (including our next instalments on Portrait, Video, Slo-Mo and Time-lapse photos), you can subscribe for free by dropping your email in the box below and hitting the “Subscribe” button. We guarantee privacy and won’t share your details with anyone.
