How to Multi-task on the Internet

Often you will find that a task you need to complete has several steps, and this can also be the case when using the Internet as the most efficient way to complete the task. 

Using the Internet to complete a task has many similarities to the way we (used to) do things offline.  Only it’s faster and easier.  However you may have realized that the Internet doesn’t come with an instruction manual, which makes it hard for those without the opportunity to learn tricks and tips from colleagues to capture the full efficiency it offers.  Hopefully the tips below will help increase your familiarity and productivity when looking for answers online.

When advising people who haven’t had a lot of experience using Search (eg “Googling”), I’ve found it’s useful to have them think about this in a way that’s similar to how they would have done research before the Internet.  It’s helpful to think of opening new tabs whenever you would want to take out a fresh page of paper or draw a line to indicate a new bit of information.  And bookmarking tabs when you’d want to flag a page with a post-it note in the offline way of researching.  And highlighting when you’d, well, use a highlighter pen on paper.

Let’s take a look at examples of these productivity hacks.

Say we want to find a shop selling bikes near you.  Open your preferred search browser (eg Google Chrome, Safari, Explorer, etc.)  If the browser wasn’t already open, you should see one blank tab ready for you to type your question.  You can do this directly in the blank field at the top.  It is not necessary to select an option for Google, for example, in mid-screen.

If you already have your search browser open, you may have one or more tabs already in use.  On your PC, to the right of the last tab you should see a “+” which is a blank tab.  See picture below. Tick on the “+” to open a fresh “sheet” and then type your query at the top. 

Note: as search engines work off the basis of key words, you do not have to type in full sentences and should not punctuate.  So in this example simply type something like “bike shops near me”.  You will quickly see from the results if the search function is reading your current location.  Or “bike shops near XYZ postal code/ ABC City/ XYZ neighborhood” if you want to know about options in an area other than where you are currently located or want to be precise as to your desired location. Happily, search functionality has been fine-tuned over recent years, and if you look at your screen as you type you’ll probably notice that Google (or other search engine like Bing) has already predicted what you are probably going to type and is proposing the full search option in a drop-down menu. If so, you can simply use the mouse/trackpad to select that phrase and the search engine will get right to work bringing up the corresponding search results. Of course if your search is really individual or customized, you’ll want to complete the search query by typing the specifics before hitting “Enter”.

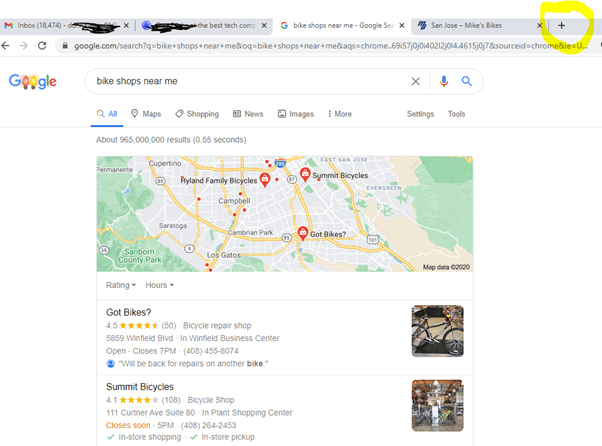
Depending on your search query, the results at the top may be indicated on a map with summary information corresponding to each of the listings indicated on the map.  You will discover that on the map, the listings are not exhaustive and often include paid listings to the detriment of more convenient and appropriate listings for you.  I usually skip down the page past the map and the paid ads (Indicated by the icon “Ad” before the listings) to get to the best generic (unpaid) results.  Note that even if a company has paid for an ad, they will still come up again as a generic listing, so don’t feel like you may be missing the best results by skipping the ads.

Often after a few listings, partway down the page, you may see a list of related questions that have been popular with other searchers (see pic below).  You may find that one of these is a better version of the question that will lead to the information you’re looking for (eg. you forgot to add “cheap bikes” and are looking for discount options).  You can see the results to those searches by selecting the drop down arrow to the right of the question.  Feel free to ignore that section if you think you’ll find the information you’re after with the query you typed in.  Scroll down to see a quick summary of each search result.

If you’d like to see more information (for example location of the bike shop), you can click on the link, which is indicated with blue underlined font.  Here’s where it’s helpful to know the following tip:  If you want to avoid having to use the “Back” button multiple times or worse, having to retype your query over and over as you sift through the results, instead of simply clicking on the link, use the mouse or trackpad to right click on it.  Then choose “Open link in a new tab”, which is the first option that appears.  The website corresponding to the link you chose will come up on a new tab to the right of your current tab.  In this way you can then browse the site to determine if it has the information you want.  If not, simply close the new tab by clicking on the “X” on the right of the tab at top and you will still have your original search results in the tab which remains to the left of the closed tab.

In this way you will easily be able to return to your original page of search results to choose another link to follow in the same way without having to hit “Back” to return to it.  Simply scroll down the results page or choose “Next” page to continue to review search results.  Remember search engines return results in order of how closely the web page matches the key words in your query, so you are best off searching in order (page 1, 2, 3) or trying other terms in a new search query if the results weren’t so relevant.  For example if you were seeing lots of results for bike repair shops instead of retail sales, simply modify your search query by putting in relevant terms like “buy”, “retail” or “NOT repair” if you want to avoid all websites also offering repairs.

Digging Deeper on Your  Search Results

If you’d like to get more information on the business whose webpage you have open or independent information (eg consumer or expert reviews) on a specific product you found on the business webpage, you can open a new tab (again the “+” symbol at top, to the right of the open page).  From there search for reviews of the business or product.  You can do this by going to a trusted review site (for example Trustpilot for reviews by website) or by entering a search (Googling) phrases like “consumer reviews of Schwinn XYZ model bicycle”.  When you’re ready to proceed with the original website, simply tick the corresponding tab (left of the new tab you’ve opened).  If you’ve decided it’s not for you, then clicking the “X” will close the tab.

Just like in paper filing, it’s good management to get rid of files when they are no longer of use.  You can do this on your browser by closing the “X” to any tabs you no longer need.  Unlike paper files, however, you can always get the electronic files back by launching the same search again.

Having many websites open at the same time will tend to slow down your computer, so it’s good practice to close what you don’t need.

Tab management on the iPhone

Start your search as you would on a PC by opening your browser of choice and inputting your search query on the search field (see below left). 

If you already have one or more tabs open, you can open a blank page ready for a new search by ticking the “+” at the bottom of the screen (see below right).

When finished with pages, you can simply tick the “X” on the upper left corner of each tab.  The process to close all tabs at once is not intuitive, so the tip below may help.  Hold down the “Done” button found on bottom right of the screen (see picture below, left).  An option should then appear to close all tabs (see picture below right).  If you do want to close all, just tap to select.

Never miss another Gransplain tip when you subscribe for free. You’ll automatically receive our tips each week, and we promise to keep your email just between us.

How to Share your Location on iPhone

There are numerous situations where you may want to temporarily share where you are (or at least where your iPhone is)… when you are enroute to meet up with someone, you’re expecting to be out alone late at night or anytime you want to avoid the need to send updates as to your location. 

The iPhone has made this simple and stress-free without the need to interrupt what you’re doing to inform others of your whereabouts.  The person or people you elect to see your location must also be iPhone users.  You choose with whom to share your location, and this is not automatically reciprocal.  They must in turn choose if they want to share their location with you.

Rest assured they won’t receive unwanted notifications updating them of your whereabouts.  Rather they will need to check the “Find My” app in order to see where you are on a map. The “Find My” app comes as standard on iPhones and looks like this:

If you can’t see it on your home screen, you can search for it by gently pulling down from anywhere in the middle (not top corners) of your home screen to get the Search text field.  If instead you see your notifications, you’ve swiped from the top vigorously.  Swipe back to home screen and try again more gently from further down the screen.

In the Search bar, type “Find My”.  Tick on the “People” tab (see bottom of screen).  You should see a list of the people whom you are following (because they gave you permission).  Below the list you should see a “+ Share My Location” in blue text.  Tap that gently and a list of your frequent contacts should appear.  You may either choose people from that list or add someone by tapping the “+” icon on top right, whereby your complete address list should appear.  You can also type in the name or a mobile phone number into the field to add.

Once you choose a contact with whom to share your location, you will be prompted to choose for how long to make your whereabouts visible to them.  Your choices are:

Share for One Hour

Share Until End of Day

Share Indefinitely

Select “OK”.

You are able to turn off the share feature at any time, so if you are unsure for how long you will want to share, simply choose “End of Day” or “Indefinitely” and then remember to turn off when no longer desired.

If you want to stop sharing your whereabouts, go to Find My, select the person, then toward the bottom of the screen choose “Stop Sharing My Location”.  This will keep them on your list so that you can easily re-enable sharing with them in the future. Alternatively you can also remove that person from your list if you won’t be sharing with them soon or ever.

Never miss another Gransplain tip when you subscribe for free. You’ll automatically receive our tips each week, and we promise to keep your email just between us.

Finding and Listening to Podcasts

You can find podcasts covering nearly every area of interest including life stories, sports, business, politics, spiritualism and lots of other topics. Handily, you can access and listen to podcasts from a number of devices and platforms (directories).

Choose your Device(s)

The device(s) you choose will depend in part on where you like to do your listening.  Your computer is great if you will be stationary and has the advantage that other people in the room will be likely to tell that you are engaged so will refrain from interruptions.  However playing on your computer will preclude you from walking around your home/office or out and about. 

Listening on your smartphone gives you the advantage of mobility.  You can use Wifi or your data allowance to stream your program, just as you can listen to music.

What’s the difference between streaming and downloading programs? Streaming is watching a program online either live or on demand. Downloading is saving the program to your device temporarily and watching it when you’re not connected to the internet.

Listening to a podcast will use on average 25MB data per hour or about 13MB for a 30-minute show.  You will use up about the same amount of data whether you download the show to listen to directly from your device or stream it (play it from source).  However you can avoid using data altogether by ensuring your WiFi is on when streaming or downloading.  Once an episode is downloaded to your device, you can listen to it without WiFi nor using data.

Choose a Platform

Occasionally you’ll come across a podcast that is exclusive to a single platform.  One example is The Michelle Obama Podcast, which is exclusive to Spotify, so you won’t find it on any other platform.  In these exceptional cases the hosting platform may sponsor the podcaster with either production support (eg providing recording and editorial support), paying a fee to the podcaster or both.  However this is the exception and most podcasts are available on a wide range of platforms because the creators are interested in reaching as many listeners as possible.  What this means is that you can choose your preferred platform or directory and remain confident you’ll be able to access a very wide variety of podcasts. 

Choosing one go-to platform will make it easier for you to take up where you have left off in the series as the platform will show you where you are in a sequence, which are as yet un-played and how many minutes remaining of any to which you’ve partially-listened.

How to Find a Podcast

Open your platform of choice (see below a list of some of the major ones).  Find the Search bar.  Normally this will be at the very bottom or very top.  Look for the magnifying glass.  Select it and start typing the name of the podcaster (speaker) or name of the podcast (program).  Options should start to come up below, and you can click on the one you’re after. 

Nearly all podcasts are now free.  If the one you’re after is not, don’t worry, you won’t be caught out nor charged without several confirmation steps first required to purchase it.  It will show the (one-time subscription) cost and include a clearly-marked “Buy/Purchase” button. On the iPhone purchases then need to be confirmed again, for example by double-clicking on the side button.

If you can’t find the podcast you’re after on the platform, it may just be a matter of the search functionality being not robust enough and you’ve got a misspelling.  You can go out of the platform and open your search engine browser (eg Chrome, Edge, Explorer, etc) and search there for the podcast.  For example “Michelle Obama Podcast” or “Squiggly Careers Podcast”.  You will then be able to see the exact name, which you can copy and paste into your podcast platform search bar.  If it still doesn’t come up, it’s probably not available on your platform.  The result from your browser search should lead you to the information where it is available, and you can choose to go to that platform to listen.

Alternatively, you may prefer to browse to see what might catch your fancy.  Most directories will helpfully divide shows by genre (eg Comedy, News, Health, Sports) and popularity (eg Top 20, trending). 

I often discover podcasts if a guest I have enjoyed on a show to which I already subscribe mentions they also have a regular podcast, in which case I search on their name on my preferred directory.

How to Subscribe to a Podcast

Once you find a podcast you like, bring up the series (not a specific episode) by selecting on the podcast’s image/icon in the platform search results. 

Then you should see a prominent “Subscribe” button. 

Major Podcast Platforms

Here are the most used platforms in which to find and play podcasts (2020 figures, source: Chartable):

Apple Podcast (over 60% of all downloads are from this directory, available for iphone, ipad or Apple Watch but not standard Mac computers).  On your iPhone this normally comes as a pre-installed app.  Look for a purple icon like this:  

  • Spotify (11% of all downloads).  You may already have this installed if you listen to music.
  • Castbox (4%)
  • PodcastAddict (3%)
  • Overcast (2%)
  • Stitcher (2%)
  • Google Podcasts (1%)
  • iHeartRadio (1%)

Almost 11% of downloads are done elsewhere (not via a platform), mostly directly from the web browser/search results.

Listening

You can easily adjust the volume of the show as you would music or videos on your chosen device.  On a computer, the quickest way is to find the volume up/down buttons on the keyboard.

Alternatively you can bring up the volume control on the screen.  If not on your lower bar, look for the inverted “V” usually in the lower right corner;  click on it to bring up hidden icons and look for the speaker icon. Select it and slide your volume left or right accordingly with your mouse (or touchscreen).

Many ear buds, including official Apple buds (that come as standard with your iPhone) will include a quick access volume control on one of the cords about 5 inches below the bud.  Click on upper part for volume up and lower part for down.  On your smartphone you can also adjust volume as you normally would with the buttons on the side of the phone or with a slider on the app.

Many podcast platforms also include the option to fast forward 30 seconds and rewind 15 seconds.  This is ever so convenient if you prefer to skip the ads.  You can click multiple times in succession, too.  If you find you forwarded too much, simply click rewind to go back 15 seconds at a time until you are where you want. This button is also very helpful when you’ve had an unplanned interruption as you won’t have to scramble to find the “stop/pause” button as you can simply click “rewind” one or more times once you manage to pause.

Some platforms additionally include an option to play at half speed, 1 ½ or double speed.  Look for the icon shown as “1x” (ie normal speed).  Tapping repeatedly will bring you through the options.  If you find the narrator is suddenly talking at hyper speed or like she’s drunk, you’ve probably inadvertently tapped this icon and you can easily put things to right by tapping it again until “1x” shows.  See yellow circled area (example shown as appears on Apple Podcasts)

Advanced Listening:  How to Find and Make Other Customisations

This will vary by player platform.  Normally you will find a number of ways you can customise how you interact with each podcast series to which you subscribe by selecting the series then selecting “Settings” or the 3 horizontal dots as shown in yellow squared area above.  Options you will be able to customise may include:

  • Sort “Un-played” or All Episodes newest to oldest or vice versa
  • # of Un-played episodes kept
  • Manually or Automatically download new episodes
  • Manually or automatically delete played episodes when completed or 24h after completion (don’t worry you can always search for them if you want to retrieve)
  • Delete Podcast
  • Download an episode (to store on your device)
  • Upload/Share an episode. 

Never miss another Gransplain tip when you subscribe for free. You’ll automatically receive our tips each week, and we promise to keep your email just between us.