How do I Turn Ringer On or Off on my iPhone? How do I adjust the volume on my iPhone?

Here you’ll find how to ensure the phone is at your desired settings in terms of volume On/Off and High/Low.

It’s probably happened to all of us at least once that we are sure we had our iPhone ringer set to “On” and volume audible, but we miss a call that took place with the phone well within earshot.  What’s happened?

Most likely, the On/Off button has been toggled to the “Off” position without you realizing it.  It’s easily done.  And easy to rectify, too.

Ensuring the ringer itself is enabled

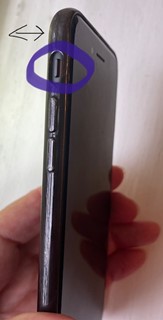
On the thin left edge of your phone, you will find 3 control buttons.  And by “edge” we mean the thin surface that is not the screen nor back of the phone.  The tiny button nearest the top edge is the Ringer On/Off button.  See picture below.  When the button is slid toward the back of the phone, the ringer is off and you may notice a small red dot is now visible. 

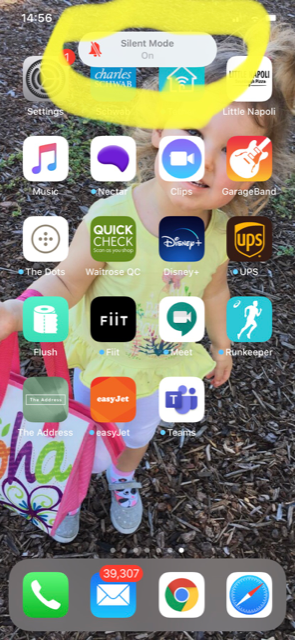
You normally need to use your nail to slide the button back and forth as it’s quite small.  As you change its position to ringer off, you can see on the top of your screen, a message will flash up momentarily that the Silent Mode is On.  See picture below. If you can’t quite made out the faint “On”, look for the red ringer (bell) symbol with a line through it vs a grey bell and volume slider.

Checking and Adjusting the Volume Level

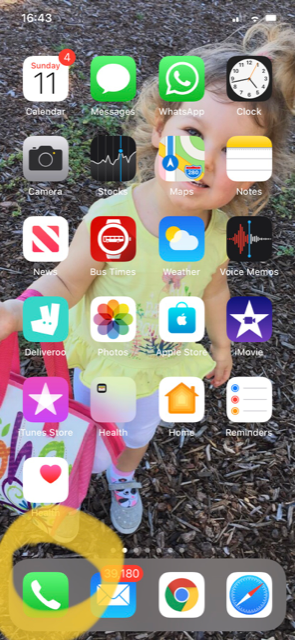
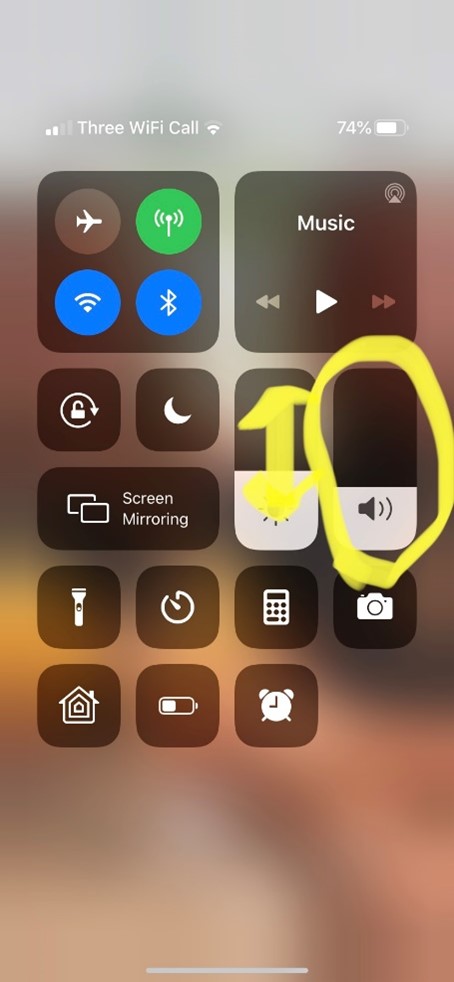
The quickest way to check and adjust the volume level on your iPhone is by using the pull down quick menu that appears when slide your finger downward starting from the top right corner of your screen.  (See pic below, left).  Be sure to start from the corner, as starting more from the top middle of your screen will instead bring up the recent notifications. The quick menu will appear as shown in the picture below on the right.  The ringer volume is circled, and you can adjust it by sliding up or down with your finger.  Note, it will demonstrate the volume by playing louder or softer your chosen ringtone, so you might want to avoid doing this when you might disturb others.

Alternatively, you can also quickly adjust the volume of your ringtone by using the two buttons on the left edge of the iPhone (see pic below). 

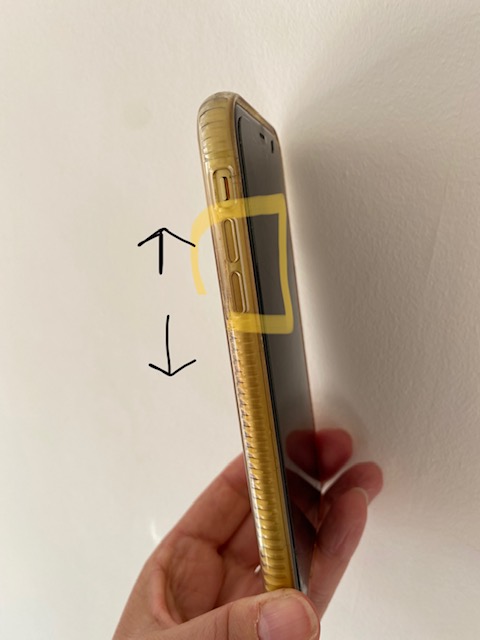
These are the raised buttons found beneath the ringer on/off toggle button. Note that these buttons will simultaneously adjust the volume of anything you play on the phone (music, videos, voice volume on a phone call).  It’s easy to remember that the upper button increases volume and the lower one lowers it.  You will probably need to press the corresponding button more than once to notice a marked difference.  At the same time you can see a volume slider appear on the left side of your screen with the volume adjusted according to the number of times you push the button.

Does your volume keep adjusting itself?

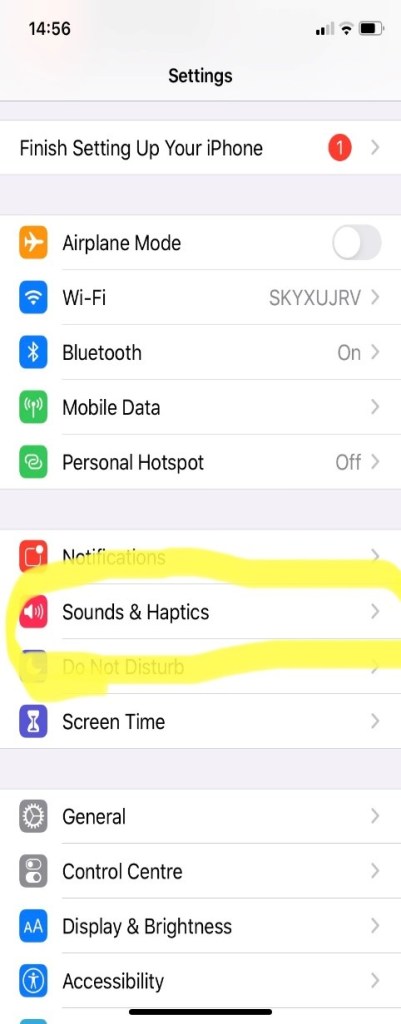
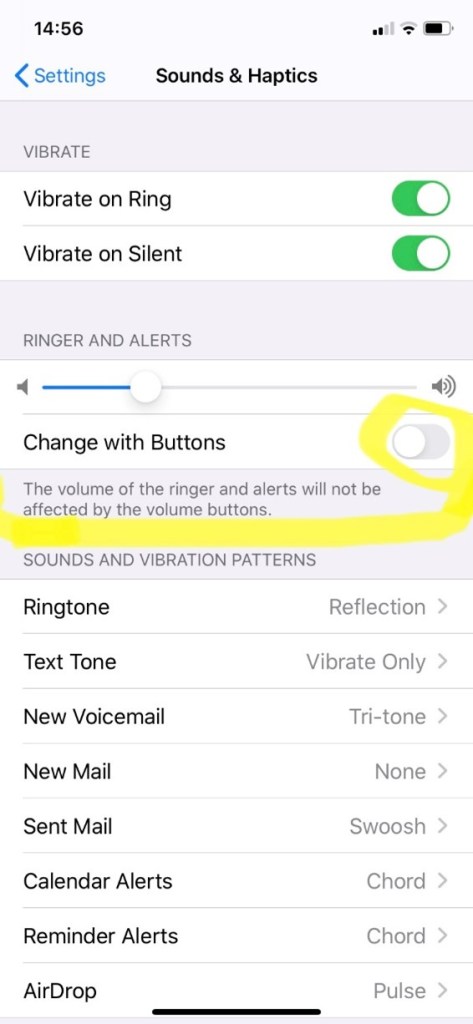
If you find you keep inadvertently adjusting the volume simply by keeping the phone in your pocket or purse, this is probably due to grasping the edges tightly whilst using it for other things. You can temporarily disable the buttons.  Do this by going into Settings from your main screen.  Look for this symbol.

Then scroll down to “Sounds and Haptics” (see below left) and select by tapping.  Look for the option “Change with Buttons” (see below right).  If there is no green showing on that button, the ringer volume will not be affected by pushing the volume buttons on the left edge of the phone. If you do want to adjust the ringer volume with the side buttons, simply tap once on the “Change with Buttons” option, and you will see the green appear.

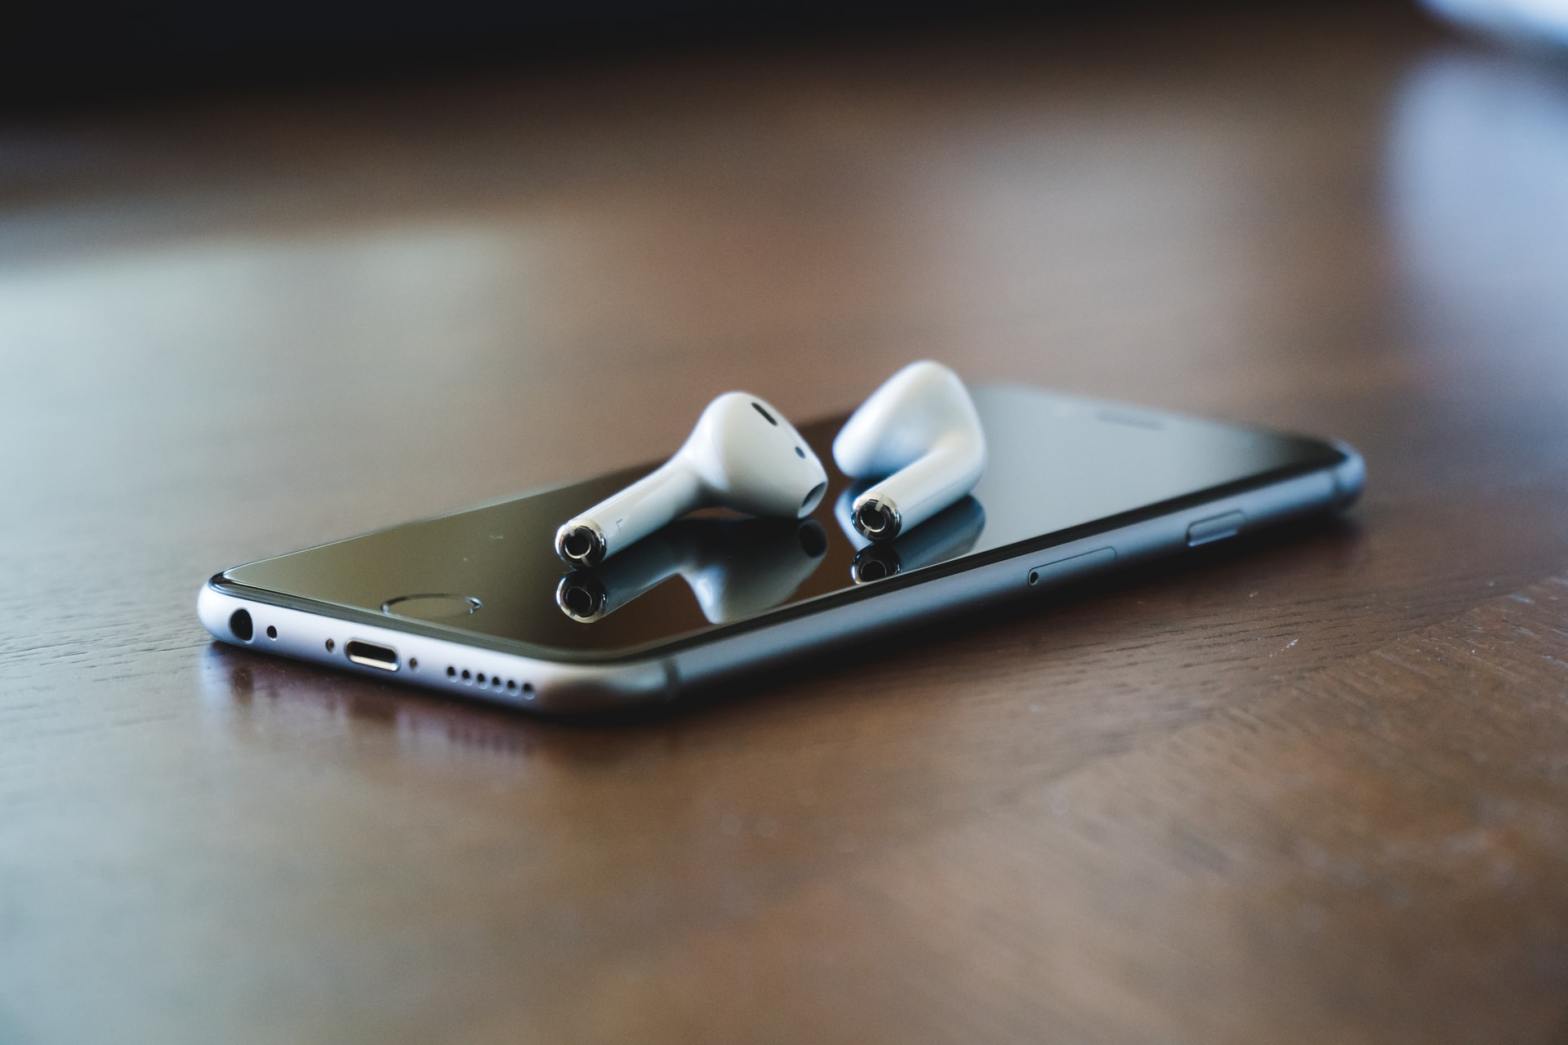
Adjusting volume when using Apple earbuds

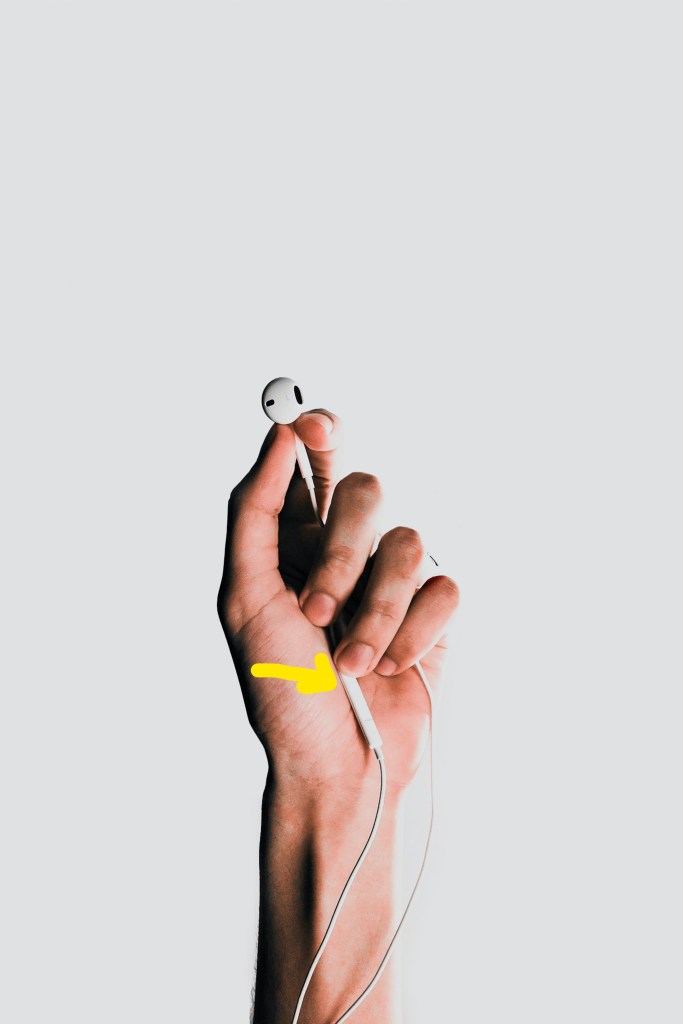
Do you use the Apple ear buds (earphones with wires connecting to your iPhone) that came with purchase of your smartphone? If so, they offer an alternative quick way to adjust the listening volume, whether music or voice.

Simply squeeze the “+” or “-” buttons on the microphone. This is the slim rectangle about 3 inches below the right ear bud. It may be difficult to see the pale grey markings, but volume up is always above the divot and volume down is below when the earphones are in place. See image below.

With 3 ways to adjust the sound, you’ll be in complete control to get your desired volume no matter the ambient noise.

Never miss another Gransplain tip when you subscribe for free. You’ll automatically receive our tips each week, and we promise to keep your email just between us.

How to Block and Unblock a Caller on your iPhone

If you’ve ever been interrupted by a nuisance call or text on your smartphone, you’ll understand the satisfaction that can be had by subsequently blocking that number from ever calling or texting you again.

Whilst it doesn’t mean you’ll forever be free from every robo-call, scammer or pushy salesperson, you can reduce the number of nuisance contacts by blocking the number they’ve called or texted from.

Likewise in the event someone in your contacts has gone all stalkerish on you, harassing you with unpleasantries, you can block that person from calling or texting you without deleting their contact details.  That way you still have the option to unblock them should they return to polite behavior.

How to block a caller from calling or texting your smartphone

If the number you’d like to block has recently called you, you can find them by going to your “Calls” and selecting “Recents” (see below circled at bottom, left).  Find the number in your call list (it will be at the top if they were the last call), and tick the “I” to bring up the details. 

Scroll down until you find “Block this Caller” (below left, circled) and select it.  There is no extra step such as “Save”.  You can be sure you have blocked them because now the option will read “Unblock this Caller“.  If the person you want to block is already in your contacts, you can also get to this screen by finding them in your Contacts list.  As before, scroll down until “Block this Caller” appears and select.

If you want to Unblock a caller, if for example you have done this in error or you think your contact has come to their senses, simply tick that option again until it reads “Block this Caller”.  Then exit out of the screen by using the back arrow at top left or swiping up from the solid bottom bar at the bottom of your screen.

What happens when someone I’ve blocked tries to text or call me?

If someone you’ve blocked tries to text you, the text will go into thin air.  It will show on their screen but not appear on yours.  You will not be notified that they’ve texted.  They will only realise their text to you was not seen, if they notice it does not say “Delivered” on their screen.   See below a string of (fictional) texts.  Below the middle string of texts in blue bubbles you’ll see the word “Delivered”.  Then the recipient blocked the sender’s number and the last text in a blue bubble does not include the “Delivered” confirmation below (see arrow points to no confirmation message).  

Of course having been blocked is not the only reason someone would see a lack of confirmation.  It could be due to insufficient reception.  So the sender may believe they’ve been blocked but won’t know for sure.

A blocked caller who subsequently tries to call you will get a single ring and then it will go to your voicemail.   Again they can’t be sure they’ve been blocked because this would also occur if you are already speaking on the phone to someone else or you have diverted all calls to voicemail.  When listening to your voicemails, you can easily delete messages from an unwanted number without listening to them. 

We hope the ability to block (and unblock) contacts will give you peace of mind that you’re in control when it comes to using your smartphone.

Never miss another free tip to using your smartphone and other technology. By adding your email address and hitting the “Subscribe” button, weekly updates will go automatically to your inbox. And we’ll never share your details without your express permission.

Drift off to Sleep

Do you like to be lulled off to sleep listening to music or watching a calming video? The downside can be having whatever is playing wake you back up when there’s an unexpected change in tone or volume. Or if you’re like me, the simple act of turning off whatever is playing on your device once you’re sufficiently sleepy can be enough to bring you out of your soporific state to wakefulness. If so, this simple tip should help solve the dilemma.

You can use your iPhone’s timer to automatically stop whatever music or video you have playing in however long you choose. In this way you can greatly reduce the risk you’ll be jolted out of sleep by the very media that was meant to help you drift off.

Here are the simple steps:

  1. Go to Clock

2. Select Timer

3. Set your desired number of hours and/or minutes (or seconds if you are a sleep champion!). You can do this by scrolling or spinning the selected column up or down.

4. Scroll down to select “When timer ends…”

5. Scroll to the bottom (past the alarm melody choices) and choose “Stop playing”

6. Choose “Set”

7. Finally hit “Start” to begin the timer

The music or video will simply stop, and no alarm will sound.

If you’re playing music on an app like Spotify for example, you can set the timer either before you start the music or once the music is already playing. If you’re watching a video on YouTube, for example, you can do either, however the video will automatically stop when you toggle over to your clock/timer app, so you’ll need to toggle back to video anyway to re-start it once you’ve set the timer.

Why not run a little test now? Set some music to play then set the timer for 30 seconds or a minute and you’ll see for yourself that it shuts off at the end of the time without an alarm and helpfully holds your place on the song or video (should you need more time). By trying it out now, you’ll build muscle memory so when you do want to use this trick to fall asleep you won’t have to head back over to Gransplain to brush up on the steps….they’ll be second nature to you.

Sweet dreams!

Never miss a helpful post again. Simply drop your email address in the box below and hit the blue “Subscribe” button, and the new post will go out to you via email automatically.

Putting consumer review sites to work for you

Have you considered ordering a product or service from a shop or site you’ve never used before but want reassurance you’ll be getting the quality you’re expecting?  A quick check on relevant customer review sites can save you hassle and money by making you aware of the frequent positives and negatives in using the merchant.

Some sites, like Amazon.com include an unbiased* customer review feature built right in.  However other sites either include no reviews or heavily curate them to show you only the comments from highly satisfied customers. 

*Beware however of small numbers of reviews as the product sellers often start things off by “seeding” favorable reviews by compensating reviewers either with free product or money. A good rule of thumb in Statistics is that 36 or more reviews can be considered more reliable as a few outliers (like a handful of fake reviews) won’t unduly influence the overall score.

If you want unbiased views, we recommend you hop onto sites like Trustpilot.  Trustpilot.com or Trustpilot.co.uk gather customer reviews, summarise ratings and make visible the entire comment, good, bad or ugly.  At a glance you can see the distribution of ratings from Excellent to Bad. 

First type trustpilot.com into your web browser.  Once on the site, you’ll find a text box where you can enter the website of the business you want to check on.

In this example, we are checking out Book Depository.  You can type the business name or the web address and the options will pop up in a menu.  Here’s the screen we’ll see:

The business has an average rating of 3.9/5 in the current period (usually 12 months).  Trustpilot shows you the raw score (3.9) as well as the star count (4 of 5 stars) and rating in a word (“Great”).  Before diving into the details, you should note if there are very few reviews in total.  In this case there are 8,316 – that’s a lot of reviews!  If there are only a handful (under 36), you should consider the ratings directional rather than definitive as people do tend to make the effort to give a rating when it’s either very high or very low, making the total susceptible to this bias if there are few ratings in total. 

The comments are shown below the summary chart and are in order of most recent first.

Next I do like to take a couple minutes to see what is driving any poor ratings, so I know if it’s something I should be concerned about.  By clicking on the corresponding bar (“Bad” in this case), only the comments scored as 1-star are shown, again in order of most recent first.  

It’s worth taking a few minutes to skim through these to see any themes as to what the company has been seen to do poorly on.  Sometimes you may find that it’s something essential to you – for example, the items are taking twice as long to arrive as promised when you’ll need your item for a specific occasion.  In this case, you may opt to look to another supplier for the gift.  Other times you’ll notice a theme that doesn’t pertain to you or you think might be sour grapes.  For example, people may blame the company if they didn’t realise they were going to be charged full price for a subscription after an initial welcome offer but you have understood that and find it clear and acceptable.  Or perhaps there seems to be an issue at a particular store branch that is different to the one where you will shop. 

Sometimes I find a particularly venomous comment and am curious about the poster.  You can see if this is their only review on Trustpilot or if they have reviewed other businesses.  If you tick on the poster’s name, it will bring on screen any other reviews they’ve written on Trustpilot.

In this case, the poster (“Manu”) has written reviews for 8 other companies besides this one.  By ticking on the words “9 reviews” they will all come up, and you can see in this case that he or she has written reviews ranging from 1 to 5 stars and everything in between and has been very specific what was good and what was not, so we can be reasonably sure this person is a fair reviewer.

Often I discount a scathing review if I see the reviewer never seems to be happy, even with businesses I love.   Just remember, as with all customer review features, they should be used to see broadly what can be expected; there will always be outliers of giddy fans and curmudgeons who will never be satisfied, so best to leave those to the side.  On the other hand, I take it as a sign of good faith if the company takes the time to respond to the negative review and attempts to sort the problem out, as per the above example. NB I have used Book Depository 3 times and have always been satisfied.

If the company doesn’t have a listing on Trustpilot or there aren’t sufficient reviews, it’s still worthwhile doing an Internet search for the site or product. For example, Search (Google) “consumer reviews of ___Company Name___”. Best to skip down past any paid search results (we’re looking for unbiased opinions after all…) and look for reliable sites like reviews.io, Consumer Reports, Which, Money Saving Expert or other trusted sites or publications.

Leaving your own review

You can also use the site to let others know about your experience.

Bring up the company you want to review, and you’ll find this at the top:

This takes you to a screen where you can rate and comment.  Remember, specific comments (good or bad) are most helpful.

The site will automatically populate the title of the review with your first words, but you can (and usually should) easily adjust the title to one you find most appropriate.

You’ll be asked to verify you are who you say (to prevent fraudulent reviews) usually by Google or Facebook.  Don’t worry, other readers won’t be able to access your accounts.  You will also be given the chance to edit your review (for example if you loved something and it ends up breaking after a short time or the company rectifies to your satisfaction an issue you wrote about).  You can also share and for example show the company on social media what you’ve written about them.  This is an excellent way to get resolution from them quickly!

Finally, you’ll have the option of selecting the box “Yes, update me” (see the yellow “X” alongside the blue box above). Unless you want your inbox filled with frivolous updates on reviews on this company or are hoping to get a response to your review from the company, then I’d avoid ticking this. Note that on Trustpilot, only the company you are reviewing can comment on your review, so no need to worry about random people or rude “trolls” responding to your entry.

Now that you’ve got the gist of searching for reviews, it should only take a couple minutes to check other consumers’ experience before hitting “Buy” yourself. It can be time well spent when you consider the risk in frustration, time and expense of having to chase after an unreliable seller when you haven’t done your pre-purchase check.

It’s good karma to leave reviews yourself, whether good or bad, to help prevent others from having to make a blind faith purchase decision.

Never miss another Gransplain tip when you subscribe for free. You’ll automatically receive our tips each week, and we promise to keep your email just between us.

How to Scan and Sign a Document on your iPhone

When a friend first asked me if I already knew how to scan a document on my smartphone, my first thought was “Why would I need to?”. After all I can take a picture, crop it then send it on. But then I realized that my photography method did not allow me to add a signature without a lot of kerfuffle…usually printing out then re-taking the picture.

I was soon to discover by following Apple’s own instructions (OK a few times, they sounded more straightforward than actually doing them), that even without needing to add a signature, scanning vs photography has several other advantages:

  • automatic, simple cropping
  • ability to save other than as a photo in your album
  • a crisper image

Simple Steps to Scan and Sign a Document with your iPhone

Open your Notes app

Place the document to be scanned on a flat surface in good light.

Tap the Share button 
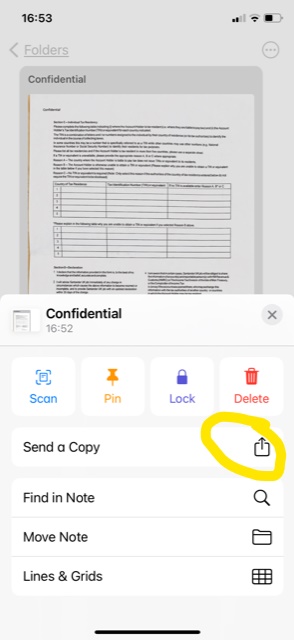
If you cannot see it immediately, you may have to tap the ellipsis (3 dots), which should then bring it up (see below):

You will be prompted to crop the document if needed. You can simply grab the sides/corners and move accordingly until you’re happy you’ve excluded any distracting background from the photo.

Adding a Signature to Your Document Right from Your Smartphone

Choose Markup

Tap the Add button

Tap Signature option

You can create a new signature (simply erase and re-do with your fingertip or a stylus until you’re happy with it) or use one you saved earlier. Once happy, select the chosen signature and it will appear on your document. You will probably need to move position and adjust the size of it. I suggest moving first, by grabbing the middle of the signature box and positioning it over the indicated line on your document. Then you can grab and drag the corner to re-size as needed.

Now, a very important step – Tap “Done” (top left corner, see above, right).

You can save this file as a PDF. You can find it by searching in your Notes.

Once you’ve done it a few times (as I now have), you’ll find it’s a really quick way to scan, sign, file and share documents on your iPhone or iPad without need for a printer.

Never miss another Gransplain tip when you subscribe for free. You’ll automatically receive our tips each week, and we promise to keep your email just between us.

How to Order a Giftcard on Amazon

Ordering an Amazon gift card is a quick and easy way to give a gift that nearly everyone will appreciate as they can use it on its own or top it up with other gift cards (or their own funds) to get a more expensive item. Seeing the joy on my teenage children’s faces can attest that this is truly appreciated and often valued more than a physical gift as it allows them to choose what they really desire, when they want it. I’m not saying cash won’t also be welcome, but it can be more of a hassle than gift cards for the younger generation who prefer to buy online.

Start by typing in “Amazon.com” into your search bar.  Note: If you are ordering a gift card for a recipient living in a an non-US country, see separate instructions in the NOTE at end of this post.  (Gift cards for UK residents should be purchased on amazon.co.uk, for example.)

Find the Gift Card tab.  As shown circled, below, it is found near the top of the screen, just below the type-in search bar. The Amazon homepage changes quite frequently, so it probably won’t have the same images as below, but you should still find the “Gift Cards” tab under their search bar.

Next you will select which form of gift card you’d like to give.  You may choose between a) a physical (plastic) card, which can be mailed directly to your recipient with a note or posted to yourself if you prefer to hand the card to the recipient (for example with a hand-written greeting card or another gift you buy elsewhere).  If you are not sending it to yourself, you will need the recipient’s full postal address.  If you have an Amazon account and have previously sent the recipient any gift from Amazon from this same account, the address information will likely already be stored in your account and accessible from a drop-down menu at a later point in the ordering process.  Of course if they have recently moved, you will need their current address to hand.

b) a paper note that you print at home that includes the unique gift card number. This has the advantage that it’s available to print immediately and makes a good solution to any last-minute gift needs as long as you will be able to hand the voucher in person or post it in time for the occasion. Of course you also need access to a printer.

c) an e-gift card. You will need the recipient’s email address OR mobile phone number.  This option will generate an automatic email to the recipient which includes the unique gift card number for redemption as well as your personalized message.  This is also available immediately if desired. Later in the process you will be able to choose the date the email is sent so no need to worry about ruining the surprise by ordering ahead. 

Next you will select a design, amount, and delivery information.  Below we show the options you will see for an eGift Card (sent by email or text message).

As you will see, the page opens with default options already selected.  Don’t worry, it’s super easy to change these.  First select between an animated (moving) design, one with a photo that you upload or one of Amazon’s many standard (non-animated) designs.  There are several options for most occasions.  If you don’t see what you like in the options on your screen, simply tick the box on the right (circled) that says “See More” and the designs will rotate in a carousel. Once you see one you like, click on it, and it will appear in a larger box on the left.  If you change your mind, simply click on another design from the carousel of options.

  • Now select the amount of the gift card.  $50 is shown as the default amount, but you can either choose one of the other amounts shown by ticking on the box or write in your own amount in the box on the right that says “Enter amount”.
  • Now choose if you want the recipient to receive it via email or as a text message.  Naturally if you choose text message, you will need to provide that number and double-check it is correct. 
  • There may be a default name in the Sender box, but you are free to customize this, for example from “Donna” to “Auntie Donna” or “Your favorite auntie”.
  • You will see there is also a generic default message.  To customize your own, simply put the cursor in the box, erase the existing message then type your own.
  • Make sure the “Quantity” field says “1”, unless you want to send that same person multiple giftcards.
  • Now you can choose the date that they will receive the message and eGift.  Tick the calendar icon (rectangle on the left) and choose a date.  If you need a future month, simply tick on the > arrow (circled), then tick on the desired date.  If you want the gift sent immediately, keep the default option of “Now”.
  • Next, check over everything is as you want, then back near the top of the screen, on the right side, find “Add to Cart” or “Buy Now”.  (Ticking “Add to List” will prompt you to save it to a wish list for a later date rather than buying it now.)  If you want to shop for other items to be sent to the same address, then choose to “Add to Cart” as it’s easier to then continue shopping.  Be aware that Amazon will flood the next page with items to tempt you that are similar to other items you have chosen.  If you are done shopping, then choose “Buy Now”, where you will be taken to payment options.  Be aware that Amazon will encourage you to take up whichever offer they are running.  See below they have offered a $20 gift card for signing up for their own credit card.  Promotions for Amazon Prime (their subscription delivery service) are also common.  Sometimes you will actually have to untick or tick a box if you do not want to buy the subscription!  So please do pay close attention to this screen.

If you already have used one or more payment card options on your Amazon account previously, they should be shown on this page.  Simply tick the one you’d like to pay with and click either of the “Continue” buttons.  If you would like to pay with a different card or method, then select “Add a card” (circled below) under the header “More Payment Options”.

  • Once you hit “Continue”, you may be prompted to re-verify your payment card details.  This is for your own security, but it means you should have your card to hand.
  • Once the payment goes through, you will be shown a confirmation page.  Don’t worry about writing down the long confirmation number as you will also receive an automated email confirmation to your own email tied to your account.  If you don’t want to wait for the email, which should only take a minute or so, you can take a photo or screenshot of the confirmation tab.  If you use a shared computer, it is best to then log out or close the browser page (tab).
  • Congratulations!  You have successfully ordered an Amazon gift card, which should make your recipient both happy and impressed.

NOTE:  If your recipient lives outside the US, check first if the country has its own Amazon site, as you should instead go to that country’s site, especially if your recipient would prefer to shop in their own currency.  For example, if your recipient lives in the UK, go to Amazon.co.uk.  If you’re unsure, do a search query (ie Google) “Amazon in Italy” for example.

Never miss another Gransplain tip when you subscribe for free. You’ll automatically receive our tips each week, and we promise to keep your email just between us.

Double-tap Trick

Here’s a nifty little tip that will save you a few seconds but guaranteed once you try it, you’ll be using it nearly every time you send a message.

Anyone else find it slightly annoying when typing a message that in order to add a period/full stop, you have to shift in order to access the menu with numbers and symbols, tap the ” . “, then shift back to the letters menu to start your next sentence?

Well no more! Simply double tap the space bar, and it will automatically add a ” . ” and a space. In one go. Try it now; soon your muscle memory will make it a habit and you’ll forget you ever didn’t know this trick.

Never miss another Gransplain tip when you subscribe for free. You’ll automatically receive our tips each week, and we promise to keep your email just between us.

How to Create, Edit and Share a Contact from your iPhone

One of the great things about using a smartphone is no longer having to memorize phone numbers nor replace your paper-based address book every few years.  Your contacts information can now be stored and updated directly on your smartphone with this information able to transfer automatically when you change handsets.

There are several ways to create a contact in your phone’s Contacts (phone/address book).

Adding a contact manually

To add a number manually (where you will be typing in the person’s name and number), simply find the phone icon located on your main screen (see yellow circled icon below left). When you select it, your existing contacts list will appear.  In top right of screen, find the “+” button (see yellow circled icon below, right, and please excuse the messy scribbling to obscure full names of contacts)

Once you tick “+”, you will get a screen with blank fields for you to complete.  You only need fill in the fields that you want (see below, left) by ticking on the desired field (eg “First name”) and using the typing bars that pop up.  You can leave the fields blank that you don’t know or care about, but be sure to hit “Done” (see below circled yellow, right) for your changes to be saved!  Top tip:  make searching for your contacts easy by inputting information that you can easily search by.  For example if you occasionally use a dog walker named “Mark” but don’t know or can’t remember his last name, simply put “dog walker” under the Last Name or Company field.  That way later you will be able to search your contacts by typing in “dog walker”.

Saving a contact from your call list or that someone has shared with you

Most of the process will be the same as above, but some of the information will be pre-filled for you if you start from your call list or someone shares a contact with you from their phone list.

When you call someone or someone calls you, you may benefit from adding them to your contacts for ease.  This will allow you both to search for their number easily from your contacts list and also their name will then pop up on your screen if they call you in the future.   In this way you can decide at a glance if you want to answer the call at that moment or not.

To create a new contact from a number you have called or has called you, go into the phone book and select “Recents” (see yellow circled below, left).  Then select the circled “i” to the right of the number you’d like to save (same screenshot, left, mid-screen).

If someone shares a contact with you via text or other messaging app, simply tick on the contact.  Either way your iphone will open up the information in your Contacts and prompt you to add information or save to your list by creating a new contact (see below, yellow circled, right).  It may be that someone has sent you updated contact information for someone you already had in your contacts.  In that case, you would select “Add to Existing Contact” (see choice below yellow circled, right).  If it’s someone you already had in your contacts and you are simply updating, you will avoid having to re-type all the other information, and you will also avoid having duplicate entries for the same person or business, which leads to confusion as you won’t remember which is new.

“Add to Emergency Contacts” (in red text below, right) should be reserved for one or two close friends or family members whom you would want notified if you were unable to call yourself in an emergency.

Sharing your contact with someone else

Grab the contact you wish to share by going into your Contacts list (again start with the phone icon).  If it’s not a true contact but rather a number from your recent calls (incoming or outgoing), simply go to “Recents” (see above left).  Once you have the correct selection, simply choose “Share Contact”  (See above entry above the yellow circle, right).  This will bring up from the bottom of your screen a list of options.  In the first row are recent contacts.  Below that are general options of text messages, email, etc.  You can find more options by scrolling from right to left with your finger over these.  Below are other options, like “Save to Files”. 

So choose first how you’d like to share the contact (eg by text, other messaging app or email) by selecting, then fill in the recipient in the appropriate field as you normally would send a text or email and hit “send”.

Finding a Contact through Search feature

Open your Contacts (look for the phone app).

Now find the Search bar near the top (see yellow highlighted area of image below) and type in whichever part of the person’s or company’s information you can remember. For example if you can’t remember the full name of your favorite nail salon, just type in “nail”, and it should come up as long as you’ve included the word “nail” when you saved the contact.

Now you’re good to go…able to save, edit and share with others important contacts on your smartphone.

Never miss another Gransplain tip when you subscribe for free. You’ll automatically receive our tips each week, and we promise to keep your email just between us.

Weather app

Like other Londoners, I am now utterly dependent on the weather app on my smartphone. Sunshine can turn suddenly into dark rain clouds that let loose their furies within a matter of minutes. Similarly temperatures can halve or double in a day, and you can find yourself inappropriately dressed.

You may find that a cursory glance at the predicted weather throughout the day will help you better lay out your schedule, especially if it includes outdoor activities like choosing when to take the dog on a walk or pop to the shop for milk or whether to bike to work. The app will lay out the forecast hour by hour, tell you the exact time for sunrise and sunset for your location, rate air quality and even tell you the intensity of drizzle to expect over the next hour.

Even if you live somewhere with predictable weather, it can be handy to check the current climate where friends and family live or a destination for an upcoming trip. No longer do you need to depend on scrolling through columns of city names in the newspaper or even do an internet search.

The weather app should come as standard on your smartphone. If not, it is easy to install a free version.

To check whether it’s already installed, unlock your smartphone to see the home screen (all your apps). From the middle of your screen, pull down to access the search bar for your home screen (see screenshot below):

Type in “weather”, and it should pop up. The appearance of yours may vary; mine looks like this:

If it doesn’t appear, you can go into the App store/Google Play to download a free version for iPhone or Android.

Finding your city/town

If the app has access to your location, you will see “My Location” as the first option, as shown below.

If you don’t see this, you can either manually add your city or allow the app access to your location by popping over to Settings on your home screen.

To add your or any city or town manually, within the weather app, simply tap on the search (magnifying glass) icon at the bottom right of the screen. See yellow squared area above. Type in the name of the place and choose from the drop-down menu. For example, if you type in “San Jose”, you will see a selection of cities by that name in California, Costa Rica, Uruguay, etc., so you’ll want to be sure you select the intended one. If your thumb slips, and you’ve chosen the wrong one, simply select the “x” and choose again.

Once you’ve got the right town (why not make yourself jealous with Kapalua Maui, Hawaii?), be sure to select “Add” which is in top right:

At a glance

Once you have several locations added, when you open the app, it will default to showing you the details of your location. As you can see below, you’ll get in large print the current temperature and underneath the high and the low for the day. In the next section, you’ll get an hour-by-hour forecast for the next 24 hours. So if you are looking for detail for a period less than 24 hours away, you’ll find it here rather than by looking in the section below, which shows a daily recap (high/low/precipitation) for the following 7-8 days.

Staying on this screen, if you scroll down further you’ll see the air quality reading (in this case air pollution, so “low” is good). Some locations show actual air quality so “low” would be bad. You’ll also see sunrise and sunset times and other information like amount of precipitation, wind direction, etc. Very handy is the UV index which indicates how much sun exposure you’ll have and if you’ll need sun protection. (Experts and mothers will tell you it’s always best to use it!)

If you want to see at a glance the weather summary for all the places you have loaded, simply tap the menu at the bottom right of this detailed page. See image above, circled in the screenshot on the left.

Whether you prefer to see the temperature in Celsius or Farenheit, you can make the choice from the summary screen by tapping on the C/F icon on the bottom left (see area circled on lower left in screenshot repeated below):

Deleting a town

When you want to delete a city/town, simply go to the summary page (as above). Place your finger on the town to delete and then slide it to the left until you see a red “Delete” bar appear on the right. Release than tap “Delete”, and the entry will disappear. If you’ve made an error, before hitting “Delete”, simply slide the town back to the left and “Delete” disappears.

Don’t worry if you’ve actually deleted in error or change your mind, simply follow the steps above in Finding your city/town to re-add it using the search (magnifying icon) and typing in the name again.

You should now have the world’s weather at your fingertips!

Never miss another Gransplain tip when you subscribe for free. You’ll automatically receive our tips each week, and we promise to keep your email just between us.

Easy Shortcut to correct text typos on iPhone or iPad

You’re about to hit “Send” on your text when you notice one or more typos.  Perhaps it’s auto-correct wreaking havoc again or simply a matter of a clumsy thumb.  Either way you realize you’ll cause more confusion than clarity if you send it as is.

Do you ever struggle getting the cursor to the right spot so that you can erase and re-type the incorrect word?  Sometimes you just need to change one letter, for example making a capital into a lower case….like when my autocorrect keeps changing “May I be frank?” into “May I be Frank?”.  Er, no, I’m not changing name nor gender just now, thank you.

Or annoyingly the cursor seems to be on the offending word, but when you release your thumb, suddenly the cursor is really on the line below.  So you have to start over….

This super quick tip will make it easy for you to clean up your typos before sending a text (or email) on your phone and also allow a more fluid conversation via text as you won’t have long pauses between when you receive a message and are able to reply without typos.

Whilst on your un-sent message, hold down the space bar on your keypad see first diagram below.

When you hold down (not tap) the space bar, the keypad will turn grey (see screenshot below). This is to signal it has become a trackpad!

Using your finger to slide around the trackpad (internal mouse), you’ll easily be able to position the cursor correctly within the text box above.  You may prefer to position the cursor at the end of the mis-spelt word and erase and re-type from there.  Once you release your tracking finger, the trackpad will automatically revert to a keyboard.

Alternatively, you can land the cursor within the mis-spelt word and predictive text feature will propose replacements.  If you find what you’re looking for, as we did in our example, (see diagram below) simply choose it by tapping on it.

With this shortcut feature, you’ll find texting just got quicker and easier.    And bonus, this tip also works when typing an email using your smartphone’s keyboard/keypad!

Never miss another Gransplain tip when you subscribe for free. You’ll automatically receive our tips each week, and we promise to keep your email just between us.