Ever felt that reading your email inbox is like taking an eye exam? Did you know you can make the font size as large as you’d like with a few clicks?
Why struggle when you can easily adjust all the emails in your inbox! It’s now simpler than you might imagine.
Adjusting all emails received using Chrome browser
Chrome is by far the most used browser in which to view emails (Gmail, etc) and it provides the most flexibility in terms of font sizes, so we’ll start here. (If you prefer to change directly in Gmail or use Outlook, you’ll find instructions in the next sections of this post.)
On your computer, open your email program like Gmail or Yahoo.
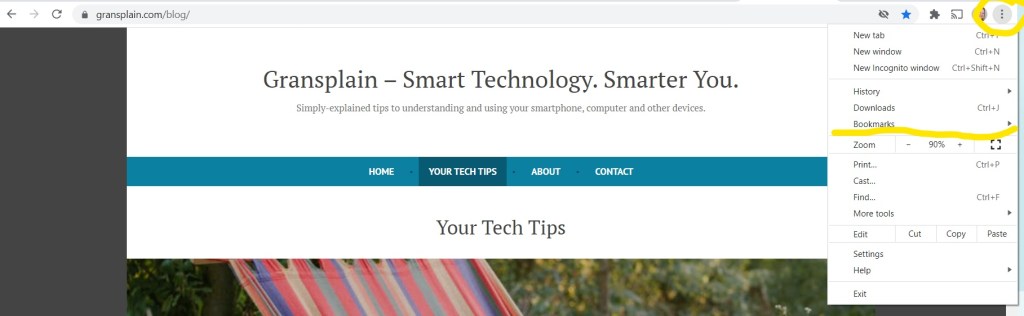
Now click on the vertical three dots on the Chrome bar (see blue arrow in upper right corner on the image below). This will reveal a drop-down menu.
3. Find “Zoom” on the drop-down menu. (See blue arrow on image below).
4. The default should be 100%. Tap the “+” to increase the font size to the desired amount. Here are what 100% (default) and 150% look like for the view of the inbox:
To close the drop-down menu, just tap some white space not on the drop-down menu.
And when you open an individual email, here is what the difference looks like with the default 100% and 150%:
5. If at any time you want to reset the font size, simply go back into the vertical three dots menu, scroll down to “Zoom” and choose the percentage desired.
Steps to change your default text size directly in Gmail (without changing Chrome)
On your computer, open Gmail.
In the top right, click Settings. (See Settings “wheel” circled below.)
Choose the box at the very top of the drop down called “See all settings”.
Scroll down to the ‘Default text style’ section.
Change the font size to your desired option. There are only 4 options here.
Don’t forget….at the very bottom of the page, click “Save changes”.
Changing email font size using Outlook
Outlook is Microsoft’s version of email, and if this is the program you use, follow these steps to change the font size:
To change the zoom level for a single message
Use the slider at the bottom right of the Reading pane (see blue arrow on image below) to adjust your zoom level. As you adjust, the text size in the Reading Pane will increase or decrease. You can actually increase this enormously (handy if you misplace your reading glasses…)
Here is what the same email looks like at 150%:
To change the zoom level on all received messages
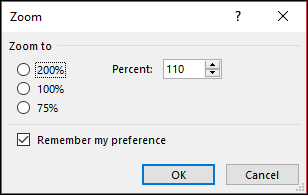
You can now change the zoom level on all received messages. Click the percentage to the right of the Zoom slider to open the Zoom window.
Select one of the default options or enter a specific percentage number.
To apply this zoom level to all messages, check the Remember my preference check box and then click OK.
We hope you enjoy reading through your emails now that you’ve got them at the right size for you. If you know anyone who could also benefit from this tip, why not share the post with them? You can easily do so by copying the address bar at the top of the page and pasting it into an email or text to your friend or family member.
This is the question you may ask yourself when you hear or read about a new technology or online shortcut. How much effort will it take for me to learn and how much benefit will I gain once I do?
Our brains automatically start weighing up the pro’s and con’s of learning a “new way”. And certainly you wouldn’t want to waste all your time trying to learn every new trick, tip and shortcut. Many may not be relevant to your lifestyle, after all. But how many timesavers or chances to avoid hassle are you ignoring simply because you let the thought of investing a couple minutes trying something out get in your way?
Yes, there’s a chance you’ll end up discouraged and frustrated. But there’s a better chance you’ll have learned something valuable. Plus stretching our brains to learn something new is great for our brains, building new connections! That’s why learning a new language builds connections but speaking one we already know (even if a second or third language) does not. So you’ll stand to benefit whether you end up using the new skill or not.
Would you find it valuable to never again have to wait outside for a bus for 10, 15 or even 30 minutes? You could learn how to look up “live” (actual) bus times online and time your leaving just right.
Would you like to enjoy your favorite music station anywhere your laptop or phone goes? You can learn to find your stations on the Internet and enjoy from anywhere you have connection.
What if you could automatically enlarge the font size in the emails you receive? Would this be worth 5 minutes of your time to learn?
Technology can enhance your productivity and enjoyment of life. You just need to invest a bit of patience and time to pick up the tricks that matter to you. Let us know in the comments if there’s something in particular you’d like to learn!
What do we mean by bookmarks that are used on the Internet? Just like when you might want to quickly find your place in a book or among printed documents and you use a bookmark or sticky tab, adding online bookmarks can help you quickly re-find important content. That’s right, you will no longer need to type in the website address and drill down to a specific page on the site each time you want to check a frequently-visited page.
As Chrome is by far the most used web browser in the world (vs Internet Explorer, Firefox, etc), in this post we will take you through how to bookmark pages using Chrome. Bookmarking while using Apple (iPad/iPhone) or Android phones use a similar process and if you let us know you would find it useful, we can detail those in a future post.
To the right of the address bar, click the little star.Choose “Add bookmark”. A bookmark will be automatically created.
Now a pop-up box will appear where you can customize the bookmark if you wish.
Customizing a bookmark
As you can see in the image above, Chrome sets a default name as the webpage address. If you want to simplify to something more memorable you can easily do so by highlighting the name (it may already be highlighted as in the image above) and simply typing in what you’d like to name it.
For example, if you’ve found a good online article about the best pizza in your town, and you’d like to easily re-find it, you may want to re-name the page from “Time Out – Cheesiest Pizzas Revealed” to “Best Pizza”. It will be a whole lot easier to find once you have a longer collection of bookmarked pages if you can see the word “Pizza” right off the bat.
You will also be prompted to choose a Folder in which to save the bookmark. You can keep things simple and use the default “Bookmarks bar”. If instead you envision creating a number of bookmarks and enjoy keeping things neatly filed, then you might want to create folders and file accordingly. For example the pizza article could be filed under a folder you call “Food & Drink”, where you can later add articles on a new coffee shop, etc.
Finding a previously created bookmark
On your computer, open Chrome.
At the top right, click More (the three dots), then in drop-down menu, choose Bookmarks. (see image below)
Choosing Bookmarks will open a new list of all the bookmarks you’ve created so far. Find and click the bookmark you want.
Deleting a Bookmark
Important: Once you’ve deleted a bookmark, you can’t get it back. You would have to create it from scratch. (Not the end of the world, but a bit more hassle than taking a moment to make sure you are deleting the bookmark you’d intended.) However, sometimes you only need a bookmark for a specific use, and once that’s finished, you may want to clear it off your computer just as you’d want to take off sticky tabs from printed material once their purpose had been served.
On your computer, open Chrome.
At the top right, click the More icon (the 3 vertical dots) , then “Bookmarks”, then “Bookmark manager”.
To the right of a bookmark you want to delete, click the down arrow and then choose “Delete”.
Now you know the basics for creating, customizing, finding and deleting bookmarks using your computer. Let us know in the comments if you’d like a future posts on how to do the same using an iPhone, iPad or Android phone. You can also hit the “Like” button below to let us know you have found this helpful and we create similar articles in future.
If you’d like to automatically receive our new tech tip each week directly into your inbox, please subscribe by inputting your email address in the box below. We promise never to share your details with anyone without your express permission.
When you need to know what time a text was sent (either by you or someone else), sometimes the time is shown automatically and sometimes it’s not. There’s a ridiculously simple way to see exactly when an individual text was sent.
In the below image, we can see that the conversation was started at 19:53 on that particular day. However it would be wrong to assume the entire string was written at 19:53. In this case, since the sender first says “now” then updates to say “15 minutes” and then “3 minutes”, it could be confusing to know at which time they could be expected.
By simply swiping left and holding momentarily, the exact time of each message will be revealed to the right of the message bubble (see below).
We now see that although the conversation string was begun at 19:53, it was actually at 20:30 when the sender indicated they would be 3 minutes more. If the recipient wasn’t watching their phone and only viewed the messages all at once without swiping to see the time of the subsequent messages, they might have been concerned why the sender hadn’t shown up at 19:56 (instead of 37 minutes later).
Go ahead and try this now on any of your historical texts. Whether received or sent, you’ll be able to see the exact time of the message. How clever are you!
If you are not yet subscribed to Gransplain and would like our new content to drop automatically into your inbox, please subscribe below for free. We promise never to misuse nor share your data.
And please give us a “thumbs up” to make our content more discoverable to others who might benefit.
Or go ahead and share directly with your friend group using the below.
Here’s a trick I won’t say you can’t live without, but it’s so easy and fun, you’ll wonder why you didn’t know about it sooner.
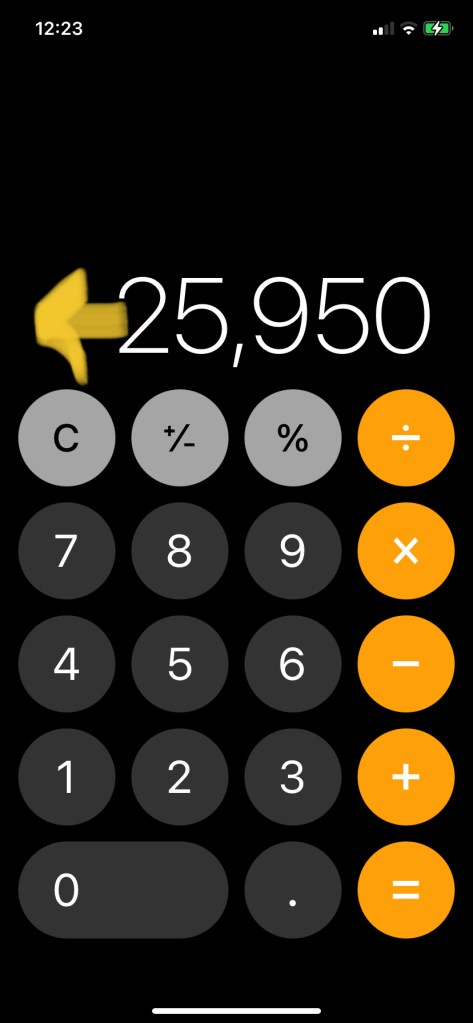
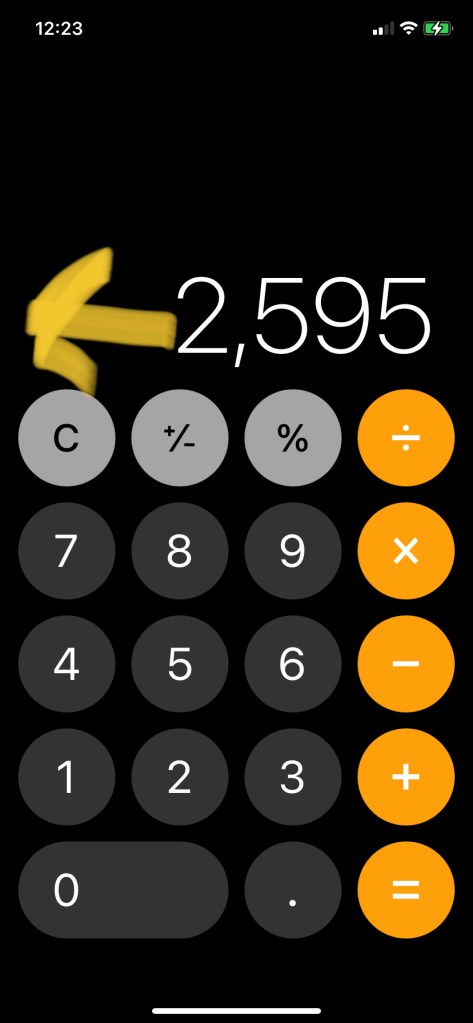
Did you know you can erase a typo on the smartphone’s calculator simply by swiping left?
Say your sausage finger typed in the wrong digit… Instead of locating the “C” button with your eye and then tapping it, simply swipe left over the running total, and the last digit will be erased.
If you’re like me, you’ll find it addictive and be tempted to swipe repeatedly. Go ahead, no one’s looking.
Spread this tip, look smart and help your friends and family by sharing this post via your favorite social media platform.
Whether you’re looking for user instructions or to be entertained, the right video is often the best answer to what you’re searching for. However it’s easy to get lost in the endless library of videos available on the Internet when you realize that YouTube alone adds 720,000 hours of video on average every single day!
How to go about finding the right video for your purposes?
You can start with a general search (ie on Google or another search engine). The advantage of this method is it will include videos that may be housed somewhere other than YouTube. Be aware however that YouTube has been purchased by Google, so they are likely to prioritize in the search results options that drive you to YouTube above equal or better options elsewhere. But I find that the convenience of using Google outweighs the small probability I’m not seeing something that might be marginally better. If after a general search, you don’t see what you want, you can always then go onto another video site (eg Vimeo.com) to search there directly.
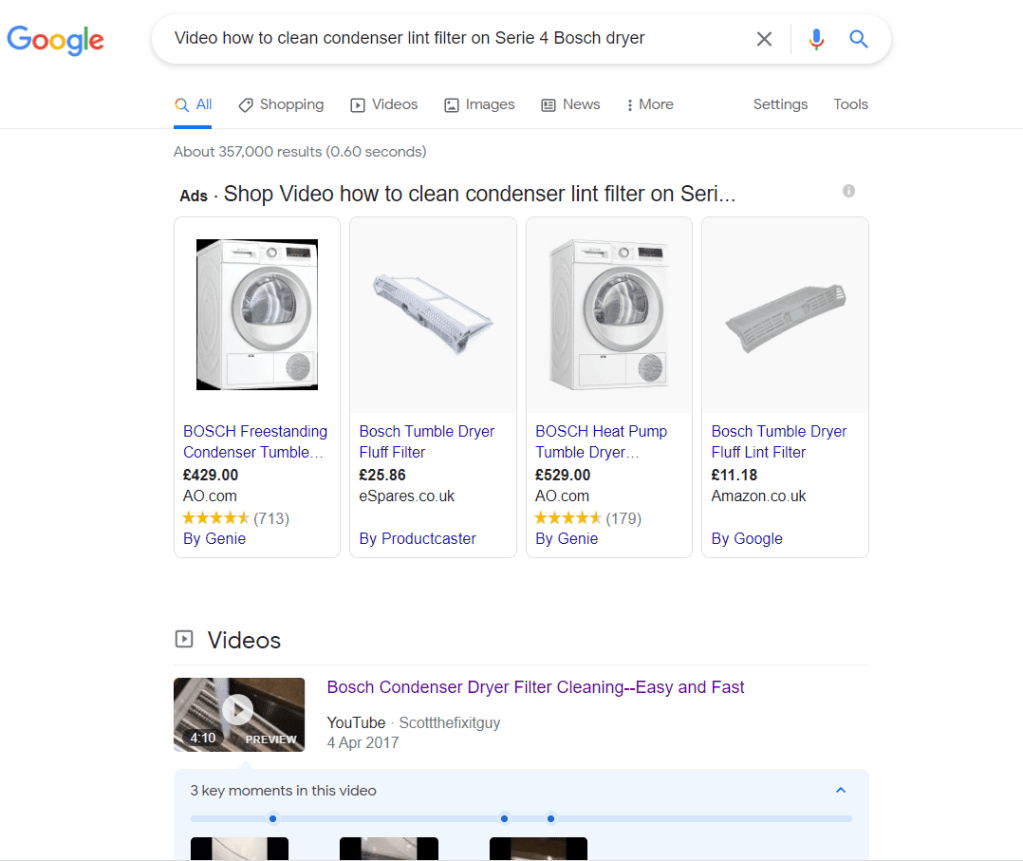
In launching a search from Google, if you only want to see results in video form and not written instructions, then you can add the word “video” to your search query. Let’s say you just got a new clothes dryer and want to know how to access and clean the condenser lint filter without having to wade through the booklet of instructions which, by the way, are in 4 different languages.
We type in “Video how to clean the condenser lint filter on a Bosch Serie 4 dryer”. Here you will want to be as specific as possible with the model as you don’t want to waste time viewing instructions that don’t pertain to your dryer. You may find that at the top of the page of search results you find “Google Shop” options (in the hopes you are actually planning to buy a Bosch dryer not already having bought one and will bring them a generous commission). Simply skip past the paid results, and you’ll find the videos just below (see image below).
Playing and adjusting your video
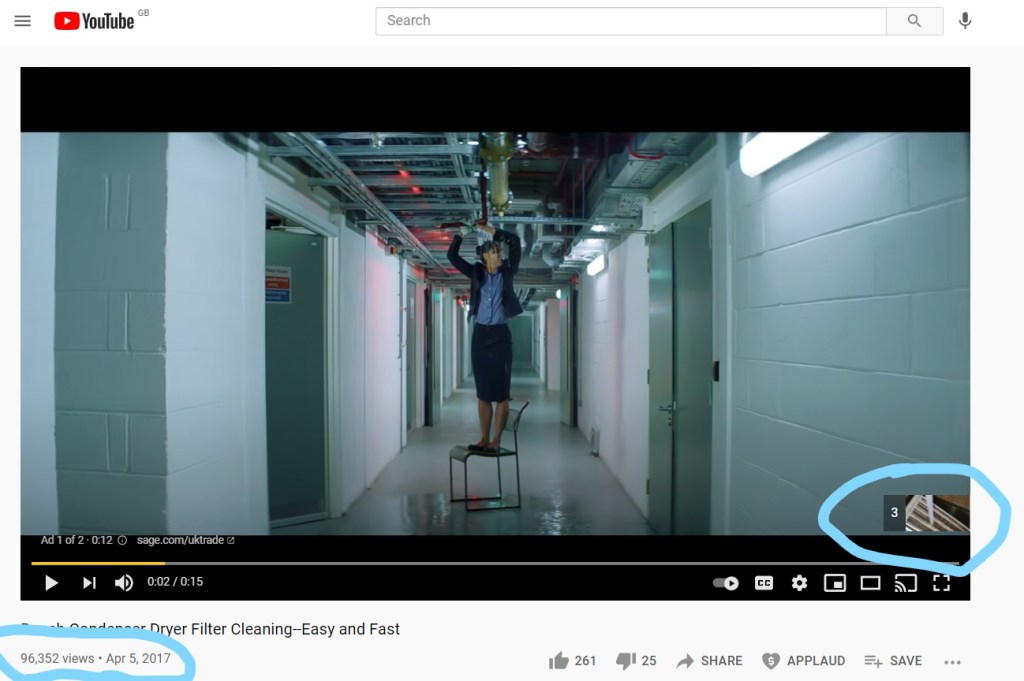
When you select the video, normally an ad will start playing. (This is how YouTube makes its money.) If you look on the lower right hand corner of the video screen, it will tell you in how many more seconds you can skip the ads. (See below right, circled.) Press “Skip” once the counter gets to zero, otherwise additional ads may continue to be fed to you. Don’t get impatient as you usually only are made to watch 4-10 seconds of one ad before you can skip directly to your content. In the scheme of things, this isn’t a bad trade-off. (Sometimes there will be further ads within the video itself but normally only for longer content and not short tutorials like we’re accessing here.)
You can also see when the video was uploaded (see below left, circled). You may need a recent video if you are looking for a tutorial for something that has recently changed. In this case, the video from 2017 is still valid as instructions for changing the lint cartridge on my new dryer.
Once your desired video has started, you can easily access the stop/play (arrow circled, below left) and volume controls just under the video screen. You can also rewind or fast forward by sliding the progress bar left or right (see blue arrow, below left). You may be limited to fast forward only to the point that the video has already loaded (it will continue to load, so you can just wait for it to finish.) If you hover the mouse over the volume icon, a slider will appear and you can adjust the volume accordingly. The numbers to the right of the volume icon indicate how long the total running time is and at which minute and second you are in the process. This is handy if you want to remember for yourself or share with someone else something that takes place at a particular place in the video. They can simply slide to the appropriate time to view only the specific part.
You can also adjust the image to play at full screen (see yellow arrow below, right). Simply press same icon again if you want to leave “full screen” mode. There are other options to “cast” the video to your television, play in theatre mode, add closed caption (cc) and adjust other settings. Go ahead and have a play with these buttons.
Looking for Free Video Entertainment
If you are looking to be entertained and don’t have a particular video in mind, you may want to go to the homepage of Youtube.com and select “Explore” (see yellow underline on image below, left)
Here you can narrow down and browse by categories (to the right of the underlined menu bar) for example: Movies & Shows, Music, Learning, Sports. Simply tick on one of these and you’ll be invited to further narrow down your search, for example music by genre or new releases. Films and shows are normally to rent or buy, whilst music and other media often offers free content.
You can also use the Search bar (above the media choices) to type in the name of an actor, music artist, director, film or subject matter and go from there.
Just be mindful watching videos on a streaming service like YouTube can be addictive! You will find the service will often automatically load another similar video after the one you selected has finished. In future posts we will cover how you can shunt that auto-feed option and regain control of your time. For now, happy viewing!
If you are not yet subscribed to Gransplain and would like our new content to drop automatically into your inbox, please subscribe below for free. We promise never to misuse nor share your data.
And please give us a “thumbs up” to make our content more discoverable to others who might benefit.
Or go ahead and share directly with your friend group using the below.
“Technology is a useful servant but a dangerous master.”
Christian Lous Lange
Those words were made famous by the Nobel Peace Prize winning Norwegian Historian….nearly a hundred years ago. They are perhaps more true today than in his time.
Do you sometimes feel that technology has been introduced to exclude you, trip you up or even enslave you? How can you ensure it remains of service to you rather than a source of stress?
It’s all down to attitude. Believing you can master new skills, including using new technology. Because you can.
If you’re reading this, you’ve already agreed with the descriptor “Smart You”, and you should.
Think of all the skills you’ve already acquired… reading, writing, driving, parenting? How many of those skills did you pick up on the first attempt? Not many, I’m guessing.
Learning technology is similar to acquiring any other skill. It takes some practice and most of all, a good dose of patience. So expect some moments of frustration or confusion as you figure things out. And accept help.
Do you think most others figured out on their own how to work their smartphone? Think again. They asked friends and colleagues how they had managed to add text to a photo before sharing, insert original emojis, edit a video. You may have noticed your laptop or smartphone didn’t come with any instruction booklet on how to actually use them. The other people didn’t receive one either. But they may have consulted one or more of the millions of tutorials found online. The Internet has a wealth of free instructional videos to help you with just about anything you can imagine, including how to use your smart tech. Stay tuned for the upcoming post on how to find videos on YouTube.
Plus you’ve now got Gransplain to help you acquire skills one by one.
Accept that the road may not be perfectly smooth, but be confident that mastery lies at the other end.
Thanks for sharing the journey with us. If you know anyone else who may want to join us on the road to mastery, please share Gransplain with them. You can do so either by tapping the social media network logo of your choice below or by uploading this post and sending as a link however you prefer. To access the upload, if you’re on a smartphone, swipe up from the middle of the screen and the upload button should appear at the bottom of the screen. Tap it and you’ll be prompted by which medium you’d like to send (email, text, Whatsapp, etc). Select your recipient(s), add a quick message (why you’re sending this) and hit send.
If you’re on a computer, go to the address bar at the top of the page. Put your cursor anywhere on the text (address) and right click with mouse or trackpad. A drop down menu will appear. Choose “copy”, then go to your email or messaging platform, choose recipient(s), add a subject and message. Then go to the message body and right click again, this time choosing “paste” from the dropdown menu. In another post, you’ll learn how to embed a link into an email, so stay tuned!
Now feel great that you’ve done your good deed for the day.
It couldn’t be easier to take a screenshot on your iPhone. It’s so handy to record information to use later that you may find it’s something you do as a matter of course several times a day. I know I find it easier than remembering details, memorizing mapped journeys or data sources that I regularly take and save screenshots.
Taking a screengrab can also give you peace of mind as a back-up if you think you might later be without strong internet connection. Have you ever been caught out part way through a journey and wanting to see next steps only to find that there’s no data connection? I avoid the stress by taking screenshots of key points in my journey. If I lose internet connection, I simply refer back to my photos and carry on.
This also avoids the need to waste paper and ink by needlessly printing out directions. Ditto with e-tickets and QR codes. It’s so simple to grab a screenshot and present this quickly and easily to the gatekeeper rather than being that person who holds up the line by fumbling about trying to find and access the e-ticket attached to an email.
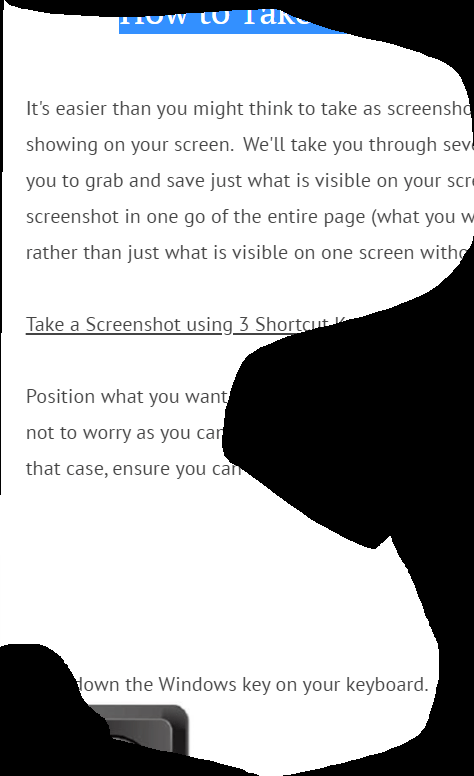
How to Take a Screenshot
Simply go to the page and position it as you’d like to capture it. Then simultaneously squeeze the “volume up” button at the same time as the on/off button. The “volume up” button is found at the left side of your handset (not screen). There are two buttons on the left side, and volume up is, well, the upper one. The on/off button is on the right side of the handset (not the screen). If you are not careful and press only the on/off or the on/off with the lower button (hey, I do this all the time because I’m not looking), you will instead lock the phone. You can unlock it by pressing just the on/off button on the right and swiping to unlock.
Once you have successfully taken the screen shot, you will see it shrink down to a small rectangle and momentarily “land” in the lower left hand of your screen. If you’re quick you can tap it to bring up the options to edit or save it. If you’re not quick enough, it will “disappear” from your screen, but don’t worry, it has simply been stored to your photos and will be at the top of “Recents”.
How to Edit your Screenshot
Either tap on the screenshot before it disappears from your screen or go into home screen to select your photos. The icon looks like this:
Find your photo at the top. If you’re shown files, choose “Recents” and find it at the top. Select, and choose the Edit button (found on top right, as shown below):
If you’d like to mark it up (for example circling the destination), choose Edit, then select the three dots in a circle at the top right (circled, see below left). Then tap on “Markup” (below middle), then choose your desired pen thickness and color. (below left). You can get rid of any errors with the pink-topped “eraser pen” in the middle (image below left). When you’re happy, click “Done” (top left corner).
How to Upload your Screenshot
Once you’re happy with your screenshot you can upload it to an email, message or elsewhere. Choose the upload icon (see image below), then follow the prompts for where you’d like to use it. Note there may be more options under “Other” at the far left if you swipe along the options.
You can make an image easier to find by adding it to “Favorites” by tapping the heart symbol, as shown below. The heart shape will fill in. If you no longer want it as a Favorite, simply tap the heart icon again and it will return to outline shape only.
Alternatively, you can get rid of the image whilst it’s on your screen by tapping the rubbish bin (below left, circled in image below):
That’s it, now you are a master at taking, editing and saving screenshots on your smartphone.
Be sure to subscribe to automatically receive tips on using your iPhone and other smart technology. In a future article we will show you how to manage your Pictures. Simply write in your email address in the box below and hit “Subscribe”. We promise never to share your details with anyone without your permission.
And if you learned something new, please give us a “Like” so that others may find us.
It’s easier than you might think to take as screenshot or “screen grab” to save a record of whatever is showing on your screen. We’ll take you through several ways you can do so. Two methods will allow you to grab and save just what is visible on your screen, and we’ll also go over ways to take a screenshot in one go of the entire page (what you would see if you scrolled from top to bottom, rather than just what is visible on one screen without scrolling).
Take a Screenshot using 3 Shortcut Keys
The advantage of this method (vs using the Print Screen button) is that you won’t have to crop the shot after taking it. Instead you will choose only what you want to capture right from the start. Here’s how…Position what you want to record so you can see it from start to finish. If it doesn’t fit in one page, not to worry as you can either take multiple screenshots or use a tool suggested later in this post. In that case, ensure you can see the top/start of what you want to capture.
Hold down the Windows key on your keyboard. It looks like one of these: or
Whilst holding it down, also hold down the Shift key and press the “S” key. This is easy as they are all found in the lower left section of your keyboard. Release all keys. Your screen should go grey and you will see at the top of your screen a row of icons, as per below:
You will almost always want to take a rectangular screen grab or “snip”, so choose the first icon on the left. Now, with your mouse or tracker, position the cursor (which is in the shape of a “t” ) in the upper corner of the area you want to record. Now hold down the left click of the mouse as you move down and across the page until you have highlighted everything you want to record. Then release the left click. (This is the same movement you would make if you were highlighting text in a document.) If you make a mistake and release the left click too soon, you will need to start over with the three shortcut keys (Windows, Shift, “S”). Don’t worry, I often take 2 or more attempts until I get exactly right what I want to save. Remember, if you want to record more than can be seen on one screen of your computer, you will need to take multiple screenshots or better yet, use a different program to record it all at once (see below section).
Using your Screenshot
If you want to paste this somewhere (an email, a Word doc), you can go immediately to the place you want to paste it and do so as you would normally. For example you can right click and select “Paste” or use the shortcut keys Control + “V”.
Your screenshots may or may not already have been set up to automatically be saved in a file called “Screenshots”. You can check this a bit later. For now presuming you have Windows 10, you can find your latest several screenshots on your Clipboard. To access your Clipboard, use the shortcut keys (WIndows) + “V”. Select the screengrab and Save to whichever folder you’d like (or paste it to a document).
Other Shaped Screenshots
If for some reason you do not want a rectangular-shaped screen grab, then you can use the second icon from the left (see above) to “draw” your own outline. Below is an example of a freeform shaped screen shot of this page:
Where’s My Screenshot?
Wouldn’t it be nice if the screenshots automatically saved in a folder called, say, “Screenshots”? Well depending on the default on your computer, they may already be doing so.
If you’ve taken screenshots in the above “3 Shortcut Keys” method (ie Windows/Shift/S) then:
1. Open your File Explorer (the file folder icon).
2. Once you’ve opened the Explorer, click on “This PC” in the left sidebar, and then “Pictures.”
3. In “Pictures,” locate the folder called “Screenshots.” Open it, and any and all screenshots taken should be there.
However if there isn’t a folder called Screenshots, you can set one up. Do so by hitting just the “Print Screen” button on your keyboard (aka “PrtScn” usually upper row on right). You will be prompted to save onto your OneDrive file. Follow the prompts, and you will then be able to find the folder as per the 3 steps above. Note only the screenshot you just took will be in the folder. If there was not previously a folder set up, any screen grabs you took before that will only have gone onto your Clipboard and then have disappeared as you filled the clipboard with new screenshots.
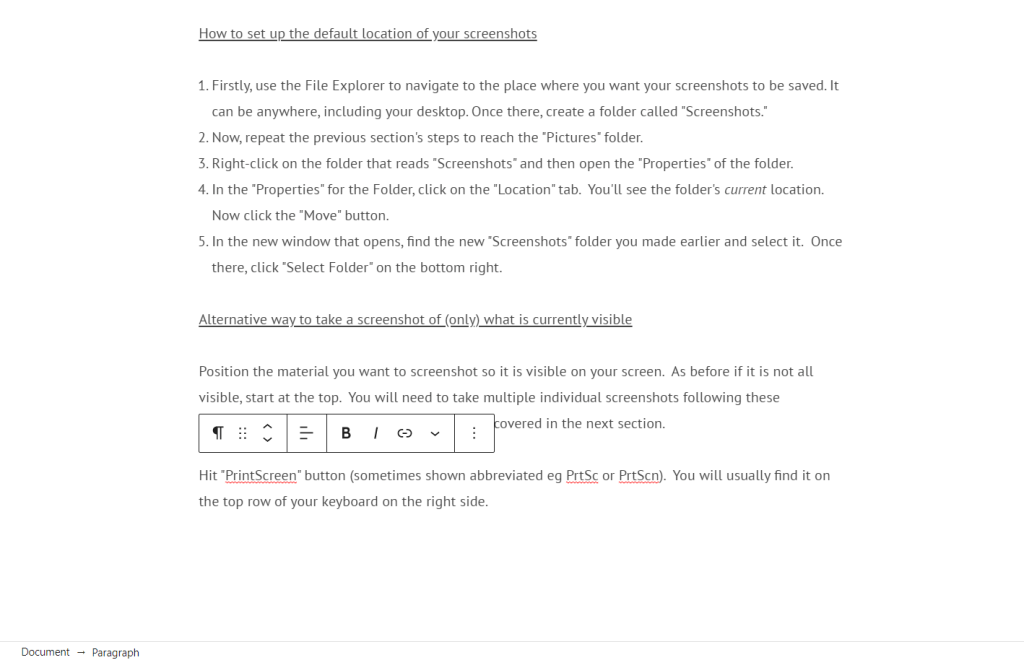
How to set up the default location of your screenshots
Firstly, use the File Explorer to navigate to the place where you want your screenshots to be saved. It can be anywhere, including your desktop. Once there, create a folder called “Screenshots.”
Now, repeat the previous section’s steps to reach the “Pictures” folder.
Right-click on the folder that reads “Screenshots” and then open the “Properties” of the folder.
In the “Properties” for the Folder, click on the “Location” tab. You’ll see the folder’s current location. Now click the “Move” button.
In the new window that opens, find the new “Screenshots” folder you made earlier and select it. Once there, click “Select Folder” on the bottom right.
Alternative way to take a screenshot of (only) what is currently visible by using PrintScreen button
Position the material you want to screenshot so it is visible on your screen. As before if it is not all visible, start at the top. You will need to take multiple individual screenshots following these directions or you can use the full page method covered in the next section.
Hit “PrintScreen” button (sometimes shown abbreviated eg PrtSc or PrtScn). You will usually find it on the top row of your keyboard on the right side.
Unlike using the snip method above, this will simply take a snapshot of everything currently visible on your screen. So all the open tabs, any sidebar information, ads, etc. See an example of what I received when I took a screenshot of this page using PrintScreen:
If you prefer, you can crop the screenshot before pasting or sending it so that you show only what you want to show. Whichever program you’re using, go to “Edit” then look for “Crop”, which may be shown as an icon similar to these:
Here is the above once I cropped out the top and sidebars, which weren’t needed:
What to do if I want a screenshot of the entire page, vs. just what I can see at the moment?
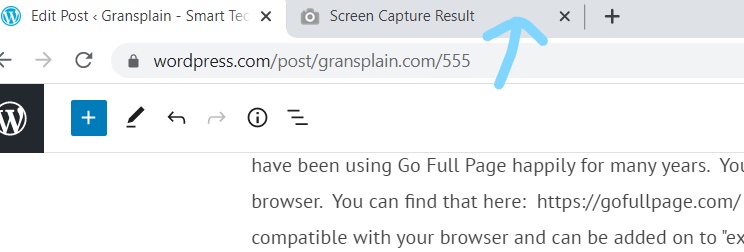
There are free tools you can use that will take a single screenshot of the entire page you are on. I have been using Go Full Page happily for many years. You add it as an extension on your Chrome browser. You can find that here: https://gofullpage.com/ Extensions are simply tools that are compatible with your browser and can be added on to “extend” its capabilities. Always check that an extension is safe and highly rated before adding it. If you change your mind, you can always delete any extension later.
Where’s my extenstion?
Once you’ve installed this (or any Chrome extension), look for this icon to the right of your address bar (the bar where you type in the web address where you want to go). It looks like a puzzle piece:
Tap on the icon, and a menu will drop down showing all the extensions you have installed. Choose the GoFullPage one. (If you are prompted, choose “Allow”. ) If no prompts are shown, in tapping the GoFullPage, a screenshot of the entire page will take place automatically. You’ll see a small box briefly appear on the upper right of your screen showing a partial circle and the words “screen capture in progress”.
The resulting screen capture will appear as a new tab (see below):
Open that tab, and you will find the actions you can take on the top bar:
If you’re looking to attach or embed it in an email, then download first, save as file name of your choosing then attach or embed in your email from your saved files. You can download as a pdf or use the download icon to the right of the pdf download icon in order to save as a different type of file. Most email and other programs should accept a pdf without hassle, so it’s the easy choice.
That’s it, you now know various ways you can take a screenshot and how to use it. It’s especially handy if you are asking for someone’s help in guiding you through a process online. You simply take a screen grab showing where you got stuck and send it to them.
How to get more helpful tips on Screenshots and other tricks
If you subscribe to our blog, you’ll automatically get access to our next post “How to Take a Screenshot on your iPhone” as well as all our free future tutorials. Simply subscribe by inputting your email address and hitting “Subscribe” below. We will use your details only to send you updates and promise not to share them with others.
This was a long one. Let us know if you liked this post by giving us a “Thumbs up”.
Why should you care about your phone’s battery? Well mostly you don’t have to care. It’s only once you find you’re having to recharge it too often that you may be interested in prolonging its charge and its life. Phone batteries have improved considerably from the early days of smartphones, but one thing that hasn’t changed is that they are expensive to replace. Many if not most people choose to buy a new phone rather than just replacing the battery due to their expense, both as a total outlay and as a percentage of the cost of a new phone. So better to be aware of how you are using your battery and how you can conserve it.
Checking current battery health
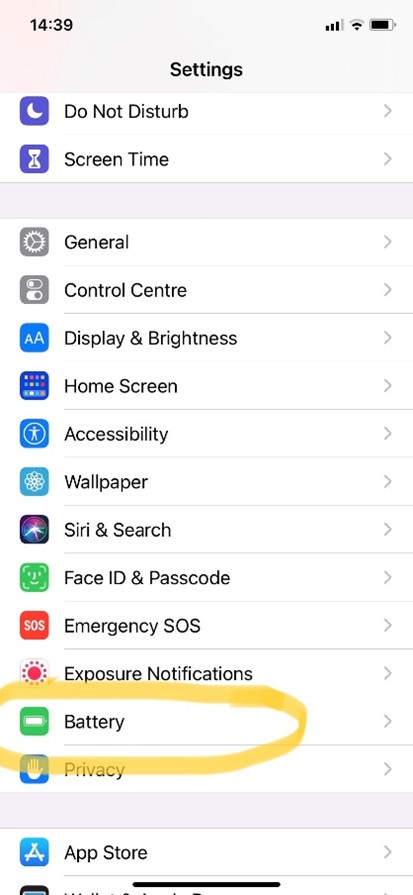
Battery health refers to the overall viability of the battery rather than its current charge percentage. Smartphone batteries start out able to charge to their full capacity, but over time this maximum capacity erodes to a percentage of its original. That is a major reason why older batteries seem to not hold their charge as well. What’s your current maximum charge capacity? You can easily check in a few taps on your iPhone. Go to Settings
Scroll down to Battery, and select it. (first image below)
Scroll down to Battery Health and select. (2nd image below)
In the example below (2nd image) you can see that my battery’s maximum capacity is at 99%. This is pretty good; my phone and battery are about 9 months old at the time of this writing. Current prevailing wisdom says you should look to replace your battery (or get a new phone if you prefer) once your maximum capacity gets as low as 80%.
If you aren’t ready to replace your battery but want to get more from every charge, there are a number of things you can do. The first step is knowing which features or programs are using up your battery.
What’s using up your smartphone battery?
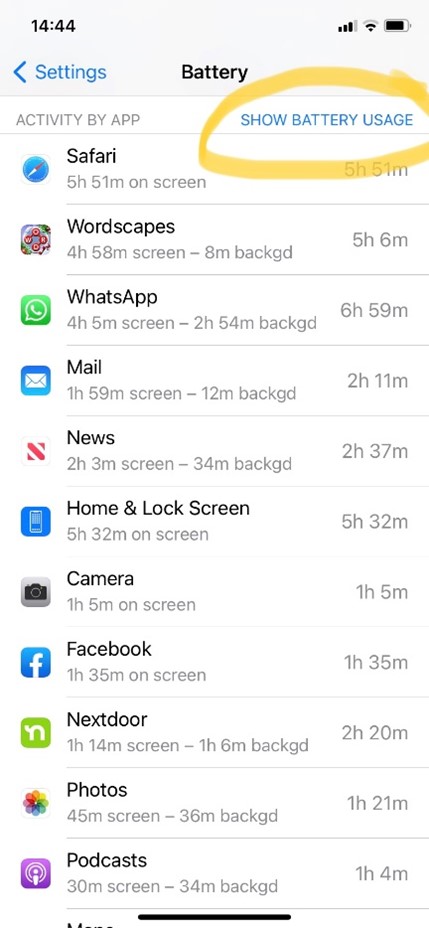
In Battery Health, choose “Last 10 Days” tab on right (see pic below, right). Alternatively, you can keep it on the default tab of “Last 24 hours”, but you will get a more holistic view of your habits if you view them across more time, hence choosing “Last 10 Days”. As you can see from the green and blue bars below, battery usage can vary greatly across each day, depending if your habits vary.
You will see a list of programs and apps in descending order of their use of your battery. Scroll down further to see the list that will show you down to small figures. (See below, left). In this case my search browser (Safari) was responsible for 18% of my battery usage in the last week and a half.
If you’re feeling brave and prefer to see how many hours you’ve wasted, er spent, on various activities, you can tap “Show Activity”. (See image below). Tapping again (this time it says “Show Battery Usage”, see below right) will bring you back to reading percentages rather than hours & minutes.
Improving your iPhone battery usage
If anything looks excessive, you can take steps to rectify it either by reducing your time on that program (for example gaming…) or by ensuring the battery isn’t wasted when you’re not actually using the app or program. For example, if you see “Maps” is taking up more battery than you would expect, it may be that you have forgotten to close the app when not in use. Be sure to do so to avoid the program continually trying to read where you are. Likewise if you think your Search browser (eg Safari, Explorer, Edge, etc) is over-represented, it may be that you are not closing out of search tabs when you’re done with them. It’s easy to do if you are in the habit of swiping up when you’re done with a results page. When recently helping a friend determine her smartphone battery usage, we found that her browser was taking over 80% of her battery charge. When we opened the browser we found she had over 70 tabs open! You can find easy instructions how to manage your search tabs under this subject topic.
If something innocuous like your Home Screen is taking up a lot of power, it may be that your screen brightness is set very high, the time before your screen locks is long, or both. You can read how to manage these in our posts on these subjects.
Never miss another Gransplain tip when you subscribe for free. You’ll automatically receive our tips each week, and we promise to keep your email just between us.

 on the Chrome bar (see blue arrow in upper right corner on the image below). This will reveal a drop-down menu.


 below.


 or
or