Featured

How to Check and Improve your iPhone Battery Health

Why should you care about your phone’s battery?  Well mostly you don’t have to care.  It’s only once you find you’re having to recharge it too often that you may be interested in prolonging its charge and its life.  Phone batteries have improved considerably from the early days of smartphones, but one thing that hasn’t changed is that they are expensive to replace.  Many if not most people choose to buy a new phone rather than just replacing the battery due to their expense, both as a total outlay and as a percentage of the cost of a new phone.  So better to be aware of how you are using your battery and how you can conserve it.

Checking current battery health

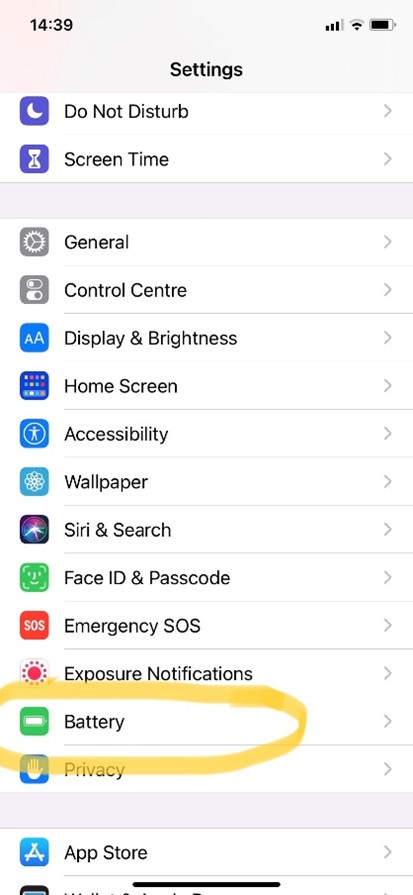
Battery health refers to the overall viability of the battery rather than its current charge percentage.  Smartphone batteries start out able to charge to their full capacity, but over time this maximum capacity erodes to a percentage of its original.  That is a major reason why older batteries seem to not hold their charge as well.  What’s your current maximum charge capacity?  You can easily check in a few taps on your iPhone.  Go to Settings   

Scroll down to Battery, and select it. (first image below)

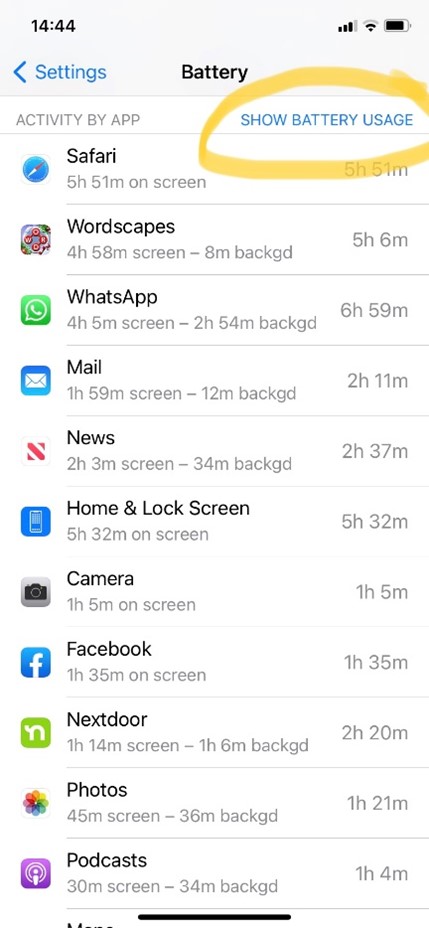
Scroll down to Battery Health and select. (2nd image below)

In the example below (2nd image) you can see that my battery’s maximum capacity is at 99%.  This is pretty good; my phone and battery are about 9 months old at the time of this writing.  Current prevailing wisdom says you should look to replace your battery (or get a new phone if you prefer) once your maximum capacity gets as low as 80%. 

If you aren’t ready to replace your battery but want to get more from every charge, there are a number of things you can do.  The first step is knowing which features or programs are using up your battery.

What’s using up your smartphone battery?

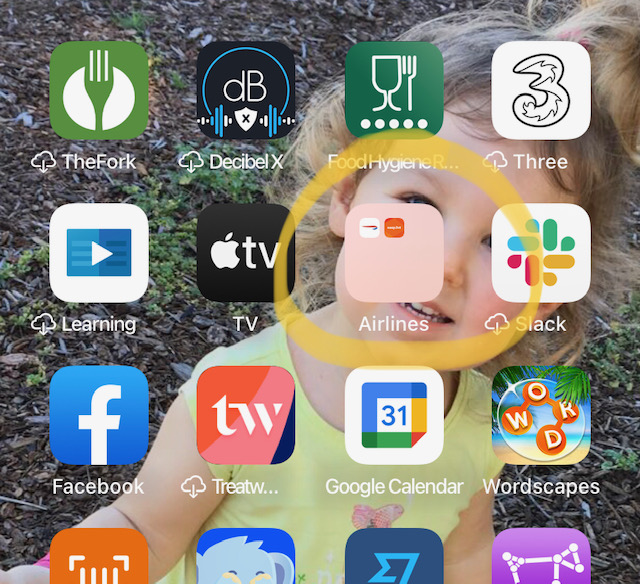
In Battery Health, choose “Last 10 Days” tab on right (see pic below, right).  Alternatively, you can keep it on the default tab of “Last 24 hours”, but you will get a more holistic view of your habits if you view them across more time, hence choosing “Last 10 Days”.   As you can see from the green and blue bars below, battery usage can vary greatly across each day, depending if your habits vary.

You will see a list of programs and apps in descending order of their use of your battery.  Scroll down further to see the list that will show you down to small figures.  (See below, left).  In this case my search browser (Safari) was responsible for 18% of my battery usage in the last week and a half.

If you’re feeling brave and prefer to see how many hours you’ve wasted, er spent, on various activities, you can tap “Show Activity”. (See image below).  Tapping again (this time it says “Show Battery Usage”, see below right) will bring you back to reading percentages rather than hours & minutes.

Improving your iPhone battery usage

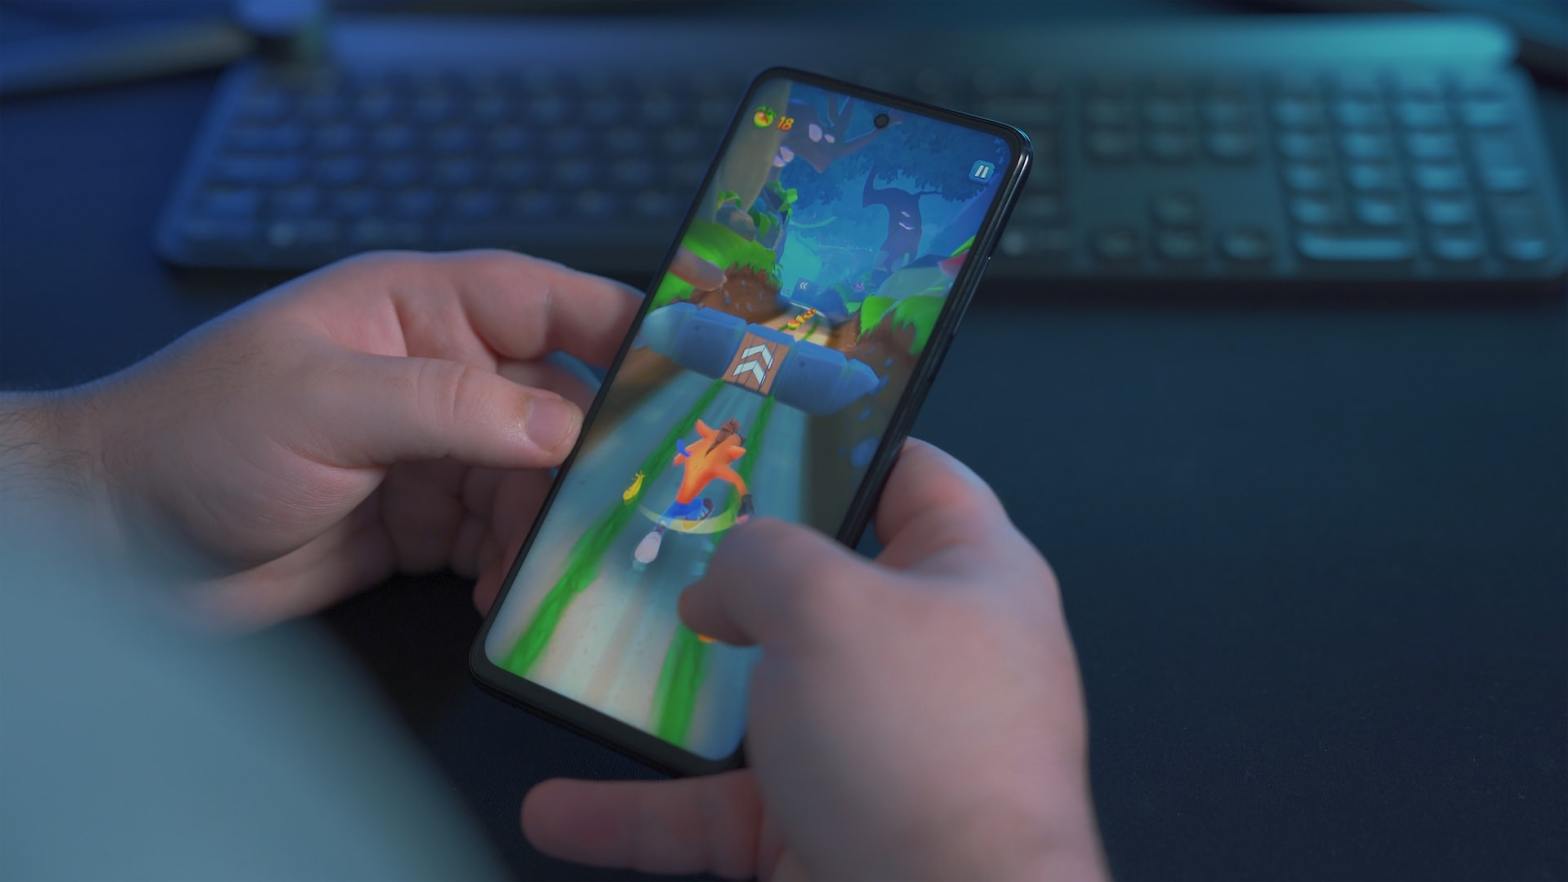
If anything looks excessive, you can take steps to rectify it either by reducing your time on that program (for example gaming…) or by ensuring the battery isn’t wasted when you’re not actually using the app or program.  For example, if you see “Maps” is taking up more battery than you would expect, it may be that you have forgotten to close the app when not in use.  Be sure to do so to avoid the program continually trying to read where you are.  Likewise if you think your Search browser (eg Safari, Explorer, Edge, etc) is over-represented, it may be that you are not closing out of search tabs when you’re done with them.  It’s easy to do if you are in the habit of swiping up when you’re done with a results page.   When recently helping a friend determine her smartphone battery usage, we found that her browser was taking over 80% of her battery charge.  When we opened the browser we found she had over 70 tabs open!   You can find easy instructions how to manage your search tabs under this subject topic.

If something innocuous like your Home Screen is taking up a lot of power, it may be that your screen brightness is set very high, the time before your screen locks is long, or both.  You can read how to manage these in our posts on these subjects.

Never miss another Gransplain tip when you subscribe for free. You’ll automatically receive our tips each week, and we promise to keep your email just between us.

Featured

Easy Shortcut to correct text typos on iPhone or iPad

You’re about to hit “Send” on your text when you notice one or more typos.  Perhaps it’s auto-correct wreaking havoc again or simply a matter of a clumsy thumb.  Either way you realize you’ll cause more confusion than clarity if you send it as is.

Do you ever struggle getting the cursor to the right spot so that you can erase and re-type the incorrect word?  Sometimes you just need to change one letter, for example making a capital into a lower case….like when my autocorrect keeps changing “May I be frank?” into “May I be Frank?”.  Er, no, I’m not changing name nor gender just now, thank you.

Or annoyingly the cursor seems to be on the offending word, but when you release your thumb, suddenly the cursor is really on the line below.  So you have to start over….

This super quick tip will make it easy for you to clean up your typos before sending a text (or email) on your phone and also allow a more fluid conversation via text as you won’t have long pauses between when you receive a message and are able to reply without typos.

Whilst on your un-sent message, hold down the space bar on your keypad see first diagram below.

When you hold down (not tap) the space bar, the keypad will turn grey (see screenshot below). This is to signal it has become a trackpad!

Using your finger to slide around the trackpad (internal mouse), you’ll easily be able to position the cursor correctly within the text box above.  You may prefer to position the cursor at the end of the mis-spelt word and erase and re-type from there.  Once you release your tracking finger, the trackpad will automatically revert to a keyboard.

Alternatively, you can land the cursor within the mis-spelt word and predictive text feature will propose replacements.  If you find what you’re looking for, as we did in our example, (see diagram below) simply choose it by tapping on it.

With this shortcut feature, you’ll find texting just got quicker and easier.    And bonus, this tip also works when typing an email using your smartphone’s keyboard/keypad!

Never miss another Gransplain tip when you subscribe for free. You’ll automatically receive our tips each week, and we promise to keep your email just between us.

When’s My Bus Coming?

If you take public transportation, this is a question you’ll ask yourself often. Especially if you’re at a certain distance from your destination (or transfer) where you could choose to walk. Maybe it’s raining or you’re running late, but to make the right call, you’ll need to know approximately how long you’d be waiting for that next bus. By using a Bus app, you don’t have to wonder.

This is also helpful when there are a choice of busses running along similar routes, some local” making lots of stops and another “express”, making fewer stops but with less frequency.

Using Bus Times App

Here we’ll give a quick tour of the functionality of our London bus app. Features in the app for your local area may vary but the principles will likely be similar, so it’s worth a quick eyeball.

Open the app on your smartphone (after all, this app is most helpful when you’re on the go and need live information enroute). You’ll see a screen similar to the below. Until you’ve been using the app awhile, choose bus stops nearest you. (The other are for frequent or recent choices, which won’t apply on your first use.) See yellow circled area.

In the case of London, the single letters (eg G or B) refer to the bus stop. The sign at the physical bus stop will match that letter. Note there is a different letter for the same bus route in the opposite direction as those buses will stop on the other side of the road. The numbers or combination of a letter and numbers on the app refers to the number of the buses that serve that stop and should be the same in either direction.

Now select the bus number or route you desire. (See below, circled.) It will say a key destination it’s travelling toward, so make sure you tick the one traveling in your desired direction. In large font it will say how many minutes until the next bus arrives. In small font below it will say the next 2 times after that (in case you’re not close enough to reach the stop in time for the first). In the case below, the next bus is in 2 minutes, the 2nd bus in 14 minutes and the third one will arrive 20 minutes from now.

Accessing Details of the Route

If you tap on your bus route, it will open a screen that shows you the route of the bus, starting from one or two stops before yours and showing a screens’ worth of stops that follow. So in the case below, our nearest stop is St Peters Church, to which it’s expected in 2 minutes. You can see that it is “due” already at both of the stops ahead of ours. So in fact, it might be a minute or so late, depending on how far those stops are and traffic. It’s helpful to know in case you’re undecided if it’s worth hustling to get to your stop in 2 minutes. In this case, I’d bet you’d still be fine getting there in 3 minutes. In addition, this feature tells you in how many minutes from now you can expect the bus to arrive at each of the stops beyond yours. In the example below, if we catch this next bus in 2 minutes, it will be expected to arrive at Duke Road in 12 minutes. This is handy if you are trying to coordinate with a friend, either at your point of arrival or part way along your route.

How to Use the Journey Planner

The bus times app also serves as a journey planner if you want to know your options how to get from point A to point B. It covers bus journeys as well as travel by tube, in the case of London. It will also tell you the total fare at the time of your search. You will find the Journey Planner function in the bottom menu (circled in yellow below). If your journey begins from where you are currently, your smartphone will automatically take that into account. So simply choose a destination by ticking the “End Location” field shown below with a yellow arrow and start typing. Press enter and the search will bring up matches which you can then confirm.

If you’ll be travelling from a different location (for example you’re trying to see how you’ll get from a restaurant you’ll be dining at later to a club), tap on the “Your Location” and start filling that in with your start point.

Options will then come on screen with your travel options by route, time and cost. The number below and to the right of each walking figure indicates the average walk time at that leg of the journey. So in the first option below, there will be a 3-min walk to the bus stop then a 14 minute walk after the second train leg in order to arrive at the destination. If you tap the little ‘i‘ next to the cost of the journey, it will bring up details as to any cost fluctuations by time of day.

What Else?

By tapping “More” (see below, circled in yellow), you’ve got loads of special features at your fingertips including setting updates, checking for road or bus route disruptions, etc.

Now there’s no excuse for being at the mercy of a bus that never arrives. You can grab back more control by knowing how long it should actually take and alternative options if the wait times for your original plan doesn’t suit.

Let us know what you thought of this post by voting below. And if you’re not already subscribed, you’re missing out. Simply fill in your email and hit “Subscribe” to receive a free weekly email.

Games People Play

Do you like doing puzzles and playing games on your mobile and are looking to add to your collection? Or perhaps you have been enjoying the 3-dimensional kind (puzzle books or newspaper sections, board games) and would like to get started with playing on your mobile? Either way you’re probably not looking for the ones that always seem to make the top 10 list with words like ‘vampires’, ‘immortal’ or ‘gunfire’ in the title. Fear not, there are loads of games available you might actually enjoy. And many have a free version!

Where to Find Games for your Smartphone

You can look for games and puzzle apps in Google Play, or if you have an iPhone, in the App Store.

If you know the name of the game or puzzle you’re after, simply open the search icon (look for the magnifying glass, see circled in yellow below) and type the name in the search bar at the top of the screen (yellow arrow below). Scroll through the search results and be aware that sponsored apps (those who pay Google or Apple a fee) will likely appear at the top of your search results even if unrelated to what you’ve typed.

If the app has a cost to enroll, it will say on the button (see yellow circle below). Otherwise it will say “Get” (see arrow below).

Any Good Game or Puzzle Recommendations?

Still think playing games on your smartphone is for kids? According to Statista, over 50% of people aged 65+ now play games on mobile. The key if finding the right game for you. If you are looking for something that will not cause stress, here are a few of the more relaxing games:

  • Card Shark Solitaire and other card games
  • Bubble Shooter
  • Angry Birds
  • Jigsaw Puzzle
  • Candy Crush (personally I find this one too saccharine, but it is very popular)
  • Tetris (a favorite of my father)
  • Slice It
  • Ludo King
  • Dots (Android)

Why not have a play with one or two of these and see how you get on?

Happy 2nd Birthday, Gransplain

To celebrate completing two years of publishing this blog, today we are taking a look back at the most popular post for each of the 2 past years.

In the past 12 months, the most read and liked post has been “Winning at Happy & Well”, which reveals the findings of a Harvard Medical School study that tracked its subjects for 6 decades. To summarize, the longtime study director, Harvard psychiatry professor George Vaillant, put it this way “There are two pillars of happiness….One is love. The other is finding a way of coping with life that does not push love away.” Moreover, “The people who were the most satisfied in their relationships at age fifty were the healthiest at age eighty.” If you’d like to (re-)read the article, you’ll find it here.

In our first year, there was a tie for most popular post… Readers found it helpful to get advice how to attach a photo from their smartphone into an email. We covered how to do so starting from the photo as well as starting from the draft email. You can find the instructions for both methods here.

Equally popular was an article covering how to get more from the life of your smartphone battery. It tells how to diagnose what programs are taking up your juice and tips how to get more out of every charge. You can access those step-by-step instructions here. See how we did that? We got 3 retrospective posts in for our 2nd birthday. Now pass around the chocolate cake, please….

In the next several posts, we’ll be talking about getting the most out of navigation apps to cut down on the friction or hassle of getting from here to there. Be sure not to miss out by subscribing below for free.

Block Ads for Free on Your Browser

You may be thinking that annoying ads are simply the cost you pay for the convenience of using the Internet. Well, they don’t have to be. There are ways to block ads and other content by adding a tool to your browser. Today we’re going to cover one that is highly recommended by expert sites and is free to use.

Why Block Content?

Not only can you get rid of annoying ads, content blockers can also neutralize invasion of your privacy. Ad blockers don’t just remove the excessive bloat from websites, like auto-playing video and snazzy ads, which make your computer’s fan work on overtime. Ad blockers are also good for privacy, because they prevent the tracking code within ads from loading.

In turn, blocking unwanted content is a potentially effective technology for energy conservation. Loading up unwanted content is estimated at costing us $1.8B in wasted energy.

How to Block Ads and Other Unwanted Content

The uBlock Origin is a free and open-source, cross-platform browser extension for content filtering—primarily aimed at neutralizing privacy invasion in an efficient, user-friendly method.

uBlock Origin’s extension is available for most widely-used browsers, including: Chrome, Chromium, MS Edge, Opera, Firefox and all Safari releases prior to 13.

For those interested in the details, uBlock Origin integrates with your web browser and uses a set of filters to block specific content. These filters examine the elements of websites, according to their addresses (URLs), and tell the browser to not load the ones that match their filters. Setting these up manually would be complex for most users, so ad blockers include tens of thousands of such rules and maintain them up-to-date as new ad techniques appear.

For the rest of us, what you need to know is that installing uBlock Origin couldn’t be easier and the Chrome version alone has more than 10 million users. Simply go to their site and choose your browser. As Chrome is used by the majority of web users, at least in the US and UK, they’ve included a button at the top of the page. If you’re using a different browser, head to the bottom of the page to find yours. When prompted, tap “Add to…(eg Chrome)”. See below.

What’s the Cost…Really?

uBlock Origin specifically refuses donations, and instead advises all of its clients, users and supporters who would like to donate do so to block list maintainers. (Blocklist maintainers utilize email spam traps and user feedback to identify IP addresses, domain names, and email addresses that are sending unsolicited messages and spam emails. These are the “good guys” that help keep the Internet safe.)

How to Uninstall a Browser Extension

If you decide you no longer want to use this (or any other extension you’ve installed on your browser), simply tap the browser extension icon to the right of your web address bar (see below, circle top right). This will bring a drop-down menu of all your extensions. Select the one you want to uninstall (eg uBlock Origin), tap the ellipsis (3-vertical dots) menu (see yellow arrow below). Then select “Remove from Chrome” (underscored in yellow below).

And now happy browsing! If you don’t want to miss out on future posts, subscribe below. Also completely free, because we like to make sure technology is for everyone.

Making it to 100

This is our 100th post, so it made sense to look at how technology can help guide you to achieving 100 (years). Before we do so, a big “thank you” to you for your readership, whether this is the first or 100th post you’ve read.

Technology and Healthspan

Technological advances in recent years have proven amazing in helping us audit and track key factors that promote a longer healthspan. There are multiple wearable monitors that act as a dashboard for your body.

Since I’ve got no background in medical science, I turn to experts who are validated by academia and dedicated to this area of research. Today I want to recommend the podcast Lifespan with Dr. David Sinclair, a lecturer and researcher at Harvard Medical School.

Dr. Sinclair has published a short podcast series, which is available at no cost. You can find it on a number of listening platforms. Here is a link to his 8th and final episode of the first series called “Biotracking, Age Reversal & Other Health Technologies”, where he and a professor of journalism discuss wearable sensors and biological age measurements.

Other episodes cover the science behind why we age (ep 1), what and when to eat for longevity (Ep 2), the science of keeping the brain healthy (7th) as well as other relevant topics for low or no-cost ways to improve your chances of living healthy for longer. While there are unfortunately no guarantees for making it to a healthy 100, why not make yourself familiar with the recent advances that science has shown can help us toward that goal?

Don’t miss out on future posts; subscribe today!

Keep Track of Your Medications on iPhone

If you have found that the number of medications you need to take has surpassed your ability to keep track from sheer memory, it might be time for a better way. My Dad used to have a growing list of medicines and dosages on a typed list he printed out and kept in his wallet, however every time there was a change, he had to either correct and re-print or scribble over the copy already on hand. New technology offers a better way.

How to Add a Medication to your iPhone

Adding manually Below we’ll cover instructions for adding via your iPhone’s camera, which applies only if you are in the U.S. and use an iPhone XR or later. Otherwise, follow the simple guidance here:

  1. On your iPhone, open the Health app.
  2. Tap Browse, then tap Medications.
  3. Tap Add Medication.
  4. Enter the name of the medication in the Search field.
    • If you’re in the United States, and the medication is listed, tap the medication.
    • If you’re outside the United States, or the medicine is not listed, tap Add, then tap Next.
  5. Choose the Medication Type. If the medication is unlisted, enter the Strength of the medication or select No Strength Information.
  6. Tap Next.
  7. Tap Frequency to select an interval, then tap Done.
  8. Tap Add a time to further specify when you take the medication, then tap Next.
  9. Choose the shape of your medication and tap Next, or you can tap Skip. You may need to approximate if you can’t find the exact shape. For example, there seemed to be no option of a round ball-shaped pill.
  10. Select the colour of the Medication (again, you may need to approximate) and Background to customise it.
  11. Review your Medication details and enter any Optional Details, then tap Next.
  12. Select any life factors that may pose an interaction risk with your medication, then tap Done.*

After adding your medications, if you’d like to create a copy to save or share, you can scroll to the More section of the Medications screen and tap Export PDF.

Adding a Medication via your iPhone’s Camera

This feature is available in the United States only and when using an iPhone model XR or later.

You can add a medication quickly by directing the camera on your iPhone XR or later at the medication label. If your medication isn’t listed in the database you can still add a medication by typing in the name.

  1. On your iPhone XR or later, open the Health app.
  2. Tap Browse, then tap Medications.
  3. Tap Add Medication.
  4. Tap the camera icon, then tap Get Started. If prompted, allow the Health app to access your camera.
  5. Position the medication label in the frame.
  6. Tap Next.
  7. Tap Frequency to select an interval, then tap Done.
  8. Tap Add a time to further specify when you take the medication, then tap Next.
  9. Choose the shape of your medication and tap Next, or you can tap Skip.
  10. Select the colour of the Medication and Background if you wish to customise it.
  11. Review your Medication details and enter any Optional Details, then tap Next.

How to Remove or Archive a Medication on iPhone

Delete a medication

To remove all information and history of the medication, choose Delete Medication.

  1. On your iPhone, open the Health app.
  2. Tap Browse, then tap Medications.
  3. Scroll to Your Medications, then tap the medication you want to delete.
  4. Scroll to Options, then tap Delete Medication.
  5. Tap Delete Medication.

Archive a medication

To keep the medication details and log history for your records, choose the Archive feature.

  1. Again, start by opening the Health app.
  2. Tap Browse, then tap Medications.
  3. Scroll to Your Medications.
  4. Swipe left on a medication, then tap Archive.

The medication will appear in your Archived Medications list. 

How to Organize Apps in Folders on iPhone

If you’ve only got a handful of apps and one or two Home Screen pages on your iPhone, you can easily remember where to find the app you’re looking for. However, once you’ve got 3, 4, 5 or more Home Screen pages filled with apps, it can make accessing them easier by using folders. It’s no harder than setting up a paper filing system and much easier to update!

What is an App Folder on iPhone?

Similar to a paper file folder, an app folder holds separate sources of information (usually with a similar theme) in one place for convenience. Using folders makes accessing apps quicker than scrolling through multiple home screen pages. For instance, you can group all your airline apps in one Travel folder. As you’ll see below, you can easily swap apps in and out of folders, make new folders and sunset others.

How to Create and Delete Folders on Your iPhone Home Screen

  1. Touch and hold the Home Screen background until the apps begin to jiggle and a minus sign appears at the top left of each. Take care at this point to avoid stray taps, which could delete an app. (Yes, I’ve done so.)
  2. To create a folder, drag an app onto another app. If you’re unsure how to move an app, see last week’s post. Imagine having all your streaming entertainment apps in one folder, making it easier to browse what to watch without having to hunt for each of the apps.
  3. Drag other apps into the folder if desired. (You can even have multiple pages of apps in the folder.)
  4. To rename the folder, touch and hold it, tap Rename or simply erase the word “Folder” and write your chosen folder name. If the apps begin to jiggle, tap the Home Screen background and try again.
  5. When you’re finished, tap Done, then tap the Home Screen background twice. See yellow circled “Airline” folder in image below.
  6. To delete a folder, tap the folder to open it. Then drag each of the apps out of it. The folder will then be deleted automatically.

How to Remove an App from its Folder

  1. Go to the Home Screen page with the folder that contains the app, then tap the folder to open it.
  2. Touch and hold the app until the apps begin to jiggle and a minus sign appears in the top left.
  3. Drag the app from the folder to the Home Screen. You can drag it to whichever page of the Home Screen that you’d prefer by moving it to the left or right edge. You may need to wait a moment for the next page to appear. Release the icon once you’re happy with its location. Tap the background to stop the apps jiggling.

As it’s so easy to create and un-create folders, you can see if using them works for you. Give it a week to fully get used to any changes before making a final decision.

How to Move Apps on Your iPhone

  1. Touch and hold any app or widget on the Home Screen, then tap Edit Home Screen. You’ll notice that the apps begin to jiggle and a minus sign appears on the top left of each app. Proceed carefully because you can easily delete an app at this point with a couple rogue taps.
  2. Choose where you want the app to go:
    • You can drag an app to another location on the same screen. Simply release it once it’s where you’d like. Now tap (a blank spot) on the screen to stop the apps jiggling.
    • If instead you’d prefer it on another page of your home screen(s), drag the app or widget to the right or left edge of the screen. You might need to wait a second for the new page to appear. You can do this as many times as needed to get to the desired page before releasing the app icon. Again tap a blank area of the screen in order to stop the jiggling.
    • Hint: The dots above the Dock show how many pages you have and which one you’re viewing. See yellow circle in screenshot below.
  3. When you’re finished, press the Home button if your model iPhone has one, or if not, tap Done.

How to Reset All Apps to Their Original Position

  1. Go to Settings  > General > Transfer or Reset iPhone.
  2. Tap Reset >Reset Home Screen Layout > Reset Home Screen. Note: any folders you’ve created will be removed, and apps you’ve downloaded will then be arranged alphabetically after all apps that came included as standard with your iPhone.

Next week we’ll look at how to arrange and re-arrange apps into folders, themed to your choosing. If you’d like to receive this automatically into your inbox, simply type in your email address below and hit Subscribe.

Productivity Tips for Tabs in Chrome Browser

Some tabs are more useful than others. You can choose to “pin” an important tab in place so that it doesn’t move around with the addition of new tabs. It’s super easy to do so.

What is a Pinned Tab?

Pinning a tab on your Chrome browser is similar to doing so with a printed page on a corkboard. Pinned tabs move in front of other open tabs and stay there, making it easy to get to your most used tabs quickly.

How to Pin , Unpin or Move a Pinned Tab in Chrome

  1. Make sure you are using Chrome browser. Right-click on your desired tab then click Pin.
  2. To unpin a tab, right-click the tab and click Unpin.
  3. To move a pinned tab to a different window, again right-click on the tab and click Move tab to another window.
  4. To move it back to your original window, right-click and hover on Move tab to another window. You should get the option to choose either yet another window or the original window (see arrow below, which shows description of my original window).

It’s as easy as that. The most alert among you may have noticed there are a few other options for shortcuts found when right-clicking on a tab. For instance, you can insert a tab to the right of the one you right-click on rather than opening a new tab on the far right, which is the default. Have a play with the options you might find save you time.

If you’re not already a subscribed, you’re missing out. You can have tips land automatically each week into your inbox simply by adding your email below and hitting “Subscribe”. There’s no cost, and we never share your details.

Citymapper – Comprehensive Navigation in Major Cities

Citymapper is a public transit app and mapping service which displays transport options, usually with live timing, between any two locations in a covered metro area. It integrates data for all urban modes of transport, including walking, cycling, ridesharing and driving, in addition to public transport.

Why use Citymapper?

Citymapper is free for both Android and iOs. Unlike Google and Apple Maps, which focus mainly on driving and walking trips, Citymapper encompasses everything. Citymapper has features that track trains, ferries, trams, and almost all kinds of public transportation listed in your city.

Coverage

Originally launched for London by an ex-Google employee, at the time of this writing Citymapper now covers 71 cities across UK & Europe, 27 in US & Canada, 2 in Latam and 7 in Asia-Pacific. You can check their up-to-date list of cities as well as vote for which you’d like to see covered here.

5 Reasons You’ll Love Citymapper

There’s nothing not to love about this app. We’ve already mentioned it’s free, but this is one app I’d happily pay a subscription to keep.

  1. It shows you a summary of all your options without making you tick into each one to check travel time and cost (or calories burned, in the case of walking/cycling). Note, in the case of rideshare, the cost is shown as “X amount+”, but I’ve found it to be accurate, certainly in terms of which companies are offering the better rates at the moment.
  2. It’s updated. So if your subway line is experiencing delays, that information will be included. If it’s not working at all, the option won’t be shown.
  3. When taking the tube in London requiring a transfer, it even shows you when you’re better off at the front, middle or back of the train, depending on the transfer point or exit. This saves time and snaking through a crowded platform.
  4. In one place you can see the relative costs of different public transport and rideshare providers for your desired trip.
  5. You can search for a given departure or arrival time on a given day. This is helpful ahead of deciding where to meet up with friends, whether to apply to a job across town, etc. Word to the wise: you’ll want to check again before travel closer to the time/day as things obviously can change.

How to Use Citymapper

Download the app from the App Store or Google Play. Open it and you’ll see a screen like the below (London version shown). Tap “Get Me Somewhere”. This will bring up the keyboard option (as well as recent searches once you’ve used it).

Start typing, and it will bring up likely matches you can then select once it shows the choice you’re looking for. You can input street addresses or places of interest (eg rail stations, restaurant names). If you simply put in a street without a numbered address, it will guide you to the middle of the street. In London, it also works with postcodes as these are specific to a small area (generally one city block of one road).

Once your desired destination comes up, scroll down to see all the options of how to get there.

If you want to know how to get from B to C (ie not from where you are now but where you’ll be at another time), simply tap the top text box that reads as default (Current Location), and this will bring up the keyboard where you can start typing your desired starting point.

Add your home address to save steps whenever you want to get home from wherever you are in your given city. Instead of “Get Me Somewhere”, you simply tap “Get Me Home”, and the app brings up all your options. Much appreciated when you’re tired and just want to be home sweet home without a lot of faff.

Top Tip

From experience, I know to look up my intended trip ahead of time and take screenshots of each leg of the journey. Why? Because phone coverage can be spotty especially using underground options, although poor connections can happen anywhere.

This way you’ll have a back-up if you’ve forgotten where you need to change or exit, for example. It also means you won’t need to stand near a busy entrance/exit waiting to get signal as you can simply tap the screenshot in your photos to see if you’re meant to turn left or right outside the station or alighting the bus. Just remember to delete these pics once done so you don’t clog up your memory.

After using Citymapper a few times, you’ll probably wonder how you’d gotten along without it for so long. And when you visit another of the cities covered, it is so much easier than trying to read a map or come to terms with an additional app.

If you’ve found this post useful and you’re not already subscribed, why not sign up today. It’s free, and we won’t share your details.

Let us know below if you’ve enjoyed this post (or not so much)…