
There may be times when something important is being said to you, and you know you cannot take notes fast enough to capture the important points. A medical appointment is a good example. Using the voice recordings app that comes pre-loaded on your iPhone, you can easily capture the conversation without sacrificing active listening. This will also allow you to share the recording in a message or email.
A family member was recently hospitalized with up to 6 different specialist doctors assessing him per day. Each visit was just a few minutes and full of technical terms and numeric values like white blood cells and hemoglobin, heart rhythm, blood pressure, etc. not to mention lots of complicated drug names. It would have been impossible to capture and share with other interested parties (including the assigned nurse who was often tending other patients) without the ability to record the conversation and indicated actions and share immediately with other decision makers.
Even with a planned medical visit, it can make the process much less stressful if you know you can re-listen to the assessment later on so you can fully focus on answering and asking relevant questions instead of trying to capture notes. Let’s take a look at the easy steps to record, save and share a voice memo.
How to Make Voice Recordings on your iPhone
Before starting, it’s always advisable to ask permission from the person you will be recording. If you tell them why and how you will be using it, you’re more likely to get their agreement. Of course, there may be rare occasions where it’s not possible or appropriate to ask permission (you’re part of a large audience or someone is being verbally abusive), but with practice it’s really easy to record unobtrusively even.
Look for the Voice Memos icon as shown below, left as well as circled on the home screen, right.

Tap once to open, and you should see a screen with the names of any recordings you’ve already made as well as the red record button at the bottom. See it circled below. Tap this button once to start recording, and you’ll see the audio bars move. Tap the same button again to pause. You’ll then be given the chance to either tap it a third time to resume recording or tap “Done” to save the recording as is.

Once you’ve finished recording, the app will take you back to the list of your prior recordings with the one you just made at the top. It is now saved in your voice memo files, and the default name will be “New Recording 1” (or whichever number of recording you’re on). To customize the file name, simply tap on the title and the keyboard will appear at the bottom of the screen, see below left. Once you’re finished typing in your choice of title, simply hit the “return” button on the keyboard and the new title will replace the default. See below right.

Listening to Your Recordings
Highlight the recording you would like to review. The latest one should be at the top. This is very intuitive in that the play button is the standard triangle. You can also rewind or fast forward 15 seconds at a time by using the appropriate circles with arrows indicating the direction. These can be tapped multiple times at once to skip 30, 45, 60 seconds at a time or more. You can also send the recording to trash if you don’t need it.
How to Share Voice Recordings
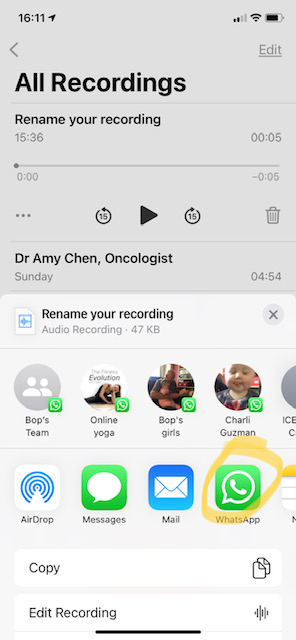
To share your voice recordings, go to the desired file and tap the ellipsis (three dots) on the left under the file name. See below, left. This will bring up several options including sharing the file. It’s here that you can also edit it, for example, cutting out any irrelevant parts before sharing. We can cover that in another post, and for now we’ll skip right to the part where you can share this recording with others. Choose the share icon. (See below, right).


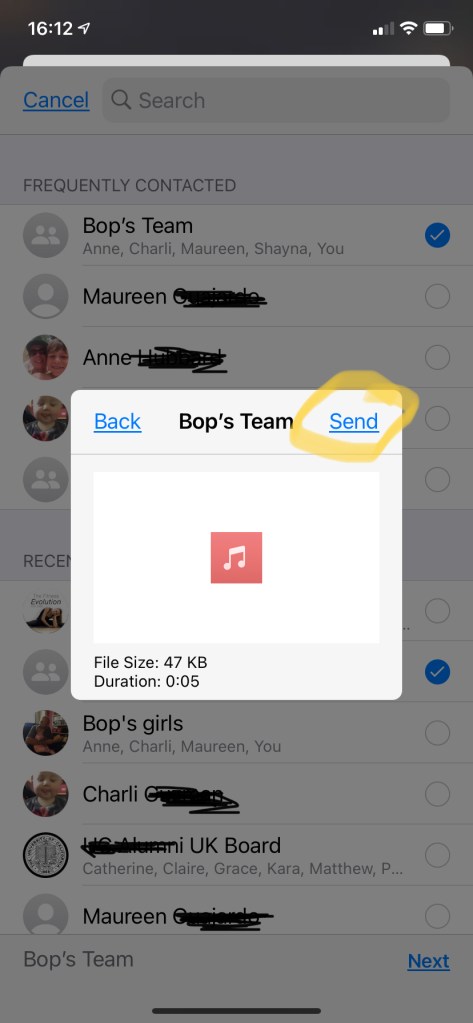
This will bring up the usual options where you can share the file. Remember that an advantage of sharing via WhatsApp is that all messages are encrypted, and you may appreciate the added security if you are sharing private medical information. WhatsApp will also be free. As mentioned in a previous post, sending files via text may or may not be free, depending on your service provider and package. We’ll use WhatsApp in this demonstration. You’ll see it appear in the options (below, left). Once you select it, find your recipient in the list. Once you tap them, the circle next to their name (or chat group name) will turn blue. The voice memo file will appear; look for the Send command in the top right (see below, right).
The file will have sent. You can open your WhatsApp program to verify. Unfortunately, the filename won’t appear, so you may want to add some context by including a note in the chat. Of course, you can do this before sending the voice memo if you wish.
Now that you know recording and sharing voice memos is super easy, you may want to use this for all sorts of situations like sending someone a recorded birthday message (with or without a song!). If you found this helpful, be sure to share with friends or family, and give us a “thumbs up” below.
So as not to miss a future post, be sure to subscribe for free below. We promise to keep your information just between us.

One thought on “Record and Share Voice Memos”