
Whether you’re looking to attach a photo to a text message or use another messaging app like Whatsapp or Facebook Messenger, adding a picture is easy. Here we’ll review the simple steps as well as help with troubleshooting just in case.
Adding a Photo to a Text Message
The first thing to do is decide if using text to send photos is the best option for you. Most, if not all, mobile phone service providers charge handsomely when you attach media, including photos. Depending on your phone’s operating system and the person(s)’ you’re messaging, your supplier may automatically convert text messages into MMS (multi-media messaging service), along with a hefty charge. As service charges vary, you’ll need to check with your supplier about any charges that apply to your plan.
Let’s look at situations when you are apt to get your text converted to a MMS, along with an extra charge:
- You are not using iMessage and
- your text includes a photograph, emoticon, GIF, video or sound clip.
- your text is long, generally more than 160 characters. (Now you know why young people generally send lots of short texts about one subject rather than one long text.)
- You use iPhone Messages but send a text to a non-iPhone user.
- You send a text to an email address.
If you’re using an iPhone, you can first check if your recipient is as well, in which case when you send them a text, even one with a photo, it will use the default iMessage, which is a free iPhone-to-iPhone user service. How do you know?
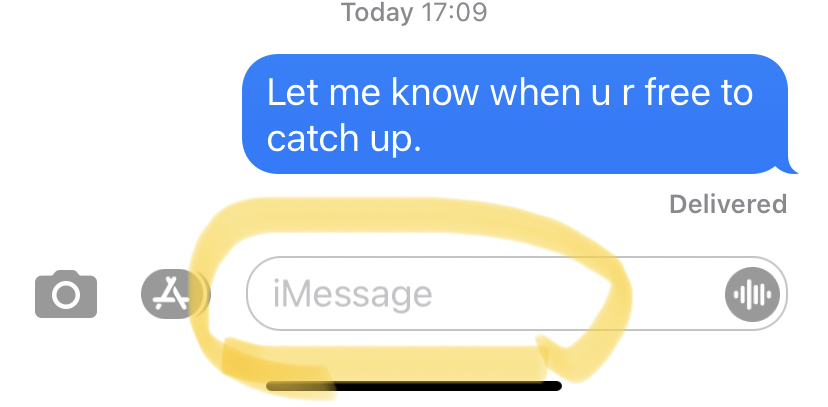
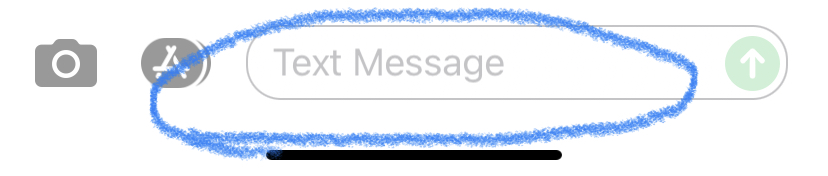
Tap on your text app ![]() to open. Find your intended recipient and open the conversation string with them. Check at the bottom whether the blank message says “iMessage” (see below, left) in which case you will be using the free service. Or alternatively “Text Message” (see below, right), which would probably engender an extra charge added to your bill. Don’t worry, in the next section, we review how to use a free messaging service instead. If you do not have an existing chat history with your intended recipient, then you’ll need to either check with them if they are using an iPhone or you can use a different messaging service (eg Whatsapp, Messenger).
to open. Find your intended recipient and open the conversation string with them. Check at the bottom whether the blank message says “iMessage” (see below, left) in which case you will be using the free service. Or alternatively “Text Message” (see below, right), which would probably engender an extra charge added to your bill. Don’t worry, in the next section, we review how to use a free messaging service instead. If you do not have an existing chat history with your intended recipient, then you’ll need to either check with them if they are using an iPhone or you can use a different messaging service (eg Whatsapp, Messenger).
Starting in the text conversation string
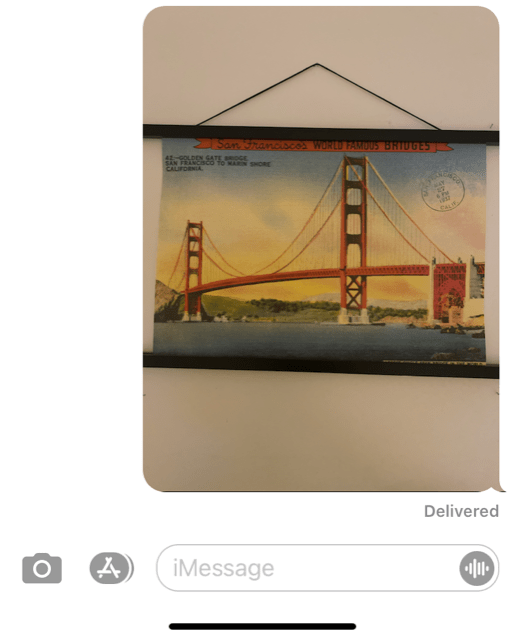
Once you’re fine to go ahead, you can opt to start in the chat string with the recipient by tapping the camera icon (see to the far left of the yellow circle above). This will open your camera in preparation to take a new photo. If this is what you want to do, go ahead and take the desired photo. You’ll have the option to edit that if you wish. Once you’re happy with it, tap the “up arrow” in the blue circle, see below circled. This will load the photo and send the text automatically. See below right.
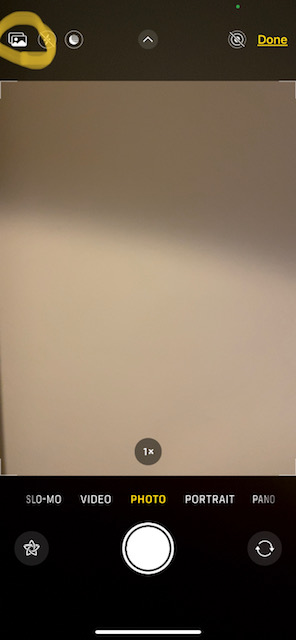
If you’re looking instead to attach an existing photo you have in your gallery (ie taken previously, downloaded or received from someone else), then after hitting the camera icon as above, instead of hitting the shutter, look for the photo gallery icon in the upper left corner of the screen. See below, left, circled in yellow. This will open your collection of saved images, and you can select the one or multiple ones you want to attach by tapping them. (If you don’t see the ones you want, swipe left until it appears. A blue tick box will appear in the lower right corner of the image(s) selected (see below, right).
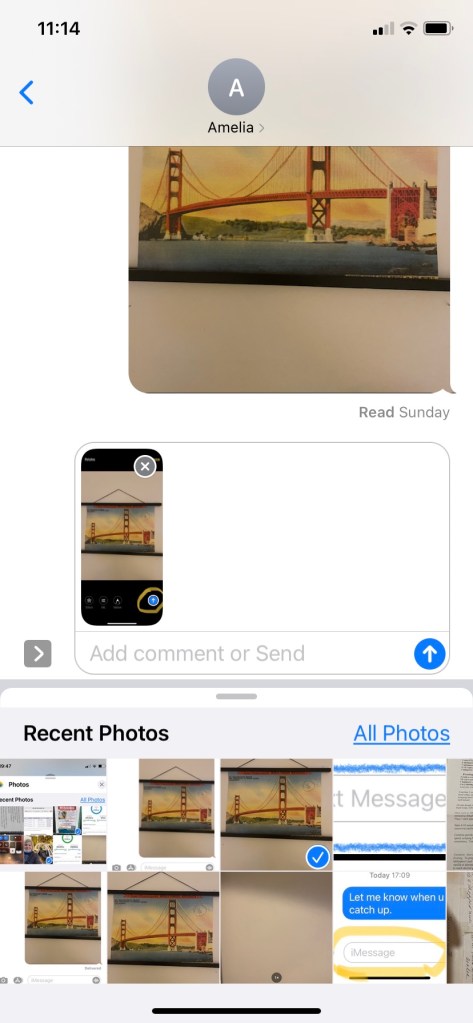
Then simply close photos by tapping the “X” in the upper right corner. This will bring you back to your text message, where you will be prompted to add a comment (optional) or simply tap the “up arrow” to send. If you’ve attached the wrong photo, simply tap the small “x” in the upper right corner of that image to un-include it before sending.

Starting in your Pictures
It’s often easier to start the process of sending photos by starting in the photo gallery ![]() or immediately after taking a picture. Why? Because they’re larger so it’s easier to identify which ones you want to share. This is super easy and starts off the same way as attaching pictures to an email, which we covered in an earlier post. If you’ve just taken the picture, tap the small image that is still sitting in the lower left corner of your screen. If it is no longer there, you can find it (and any others) in your photo gallery. Once you’ve selected the first shot you’d like to share, tap it and then tap the upload icon
or immediately after taking a picture. Why? Because they’re larger so it’s easier to identify which ones you want to share. This is super easy and starts off the same way as attaching pictures to an email, which we covered in an earlier post. If you’ve just taken the picture, tap the small image that is still sitting in the lower left corner of your screen. If it is no longer there, you can find it (and any others) in your photo gallery. Once you’ve selected the first shot you’d like to share, tap it and then tap the upload icon  in the lower left corner. If you want to select multiple images to send in one go, you must still start by tapping the upload icon, and only then will you be given the chance to add other pictures. Tap any others you wish (scroll or gently swipe to the side to see more images), and you should see a blue tick box in the lower right corner of the ones you’ve selected. If you’ve made a mistake, simply tick that one again to de-select it. Once you’ve got all those you wish to share then you will select the mode in which you wish to send them. Your choices are found below the gallery. See an example below.
Directly below your gallery, you may be shown your recently or frequently used connections (circled in blue below). If you’re sending to one of those options, this will be quicker to tap it. Otherwise first choose the mode or platform you want to use (circled in yellow, scroll to the right if it’s not displayed) to open up the chosen app, then choose your recipient from within that app. If you don’t find your recipient, you will first have to go back to add them to your contacts within that app before returning and re-selecting pictures to send.

Once you’ve chosen your preferred communications app, eg Whatsapp, you’ll be shown a list of your contacts (individuals and groups), with the most frequently used ones at the top. You can scroll down to find your desired recipient(s) or alternatively start typing their name in the search box at the very top. Tap your choice, and you will see your picture along with an optional message box where you can add a message (as below):
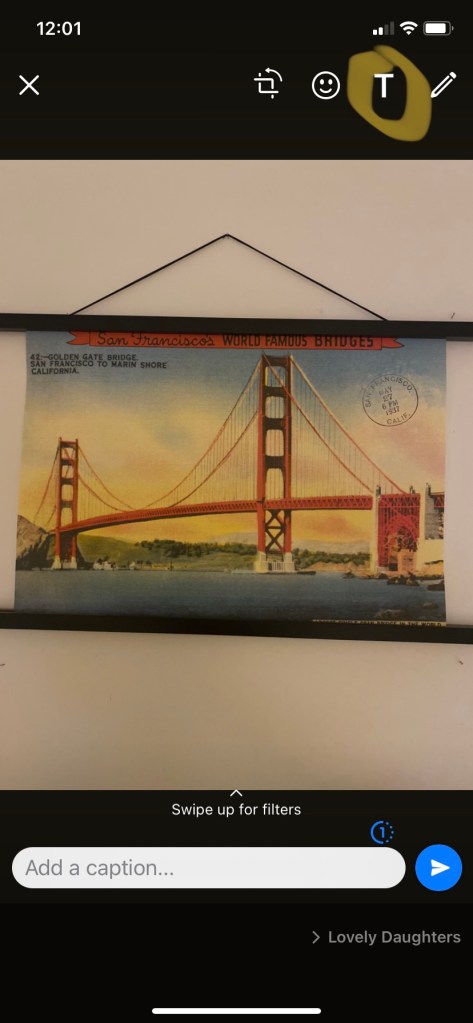
If you prefer to customize your picture, you can add typed or hand-written text as well as emojis. See “T” for typed text, circled above in yellow. This will bring up a cursor onto the middle of your image as well as a color scale. Choose your color and start typing (see below left). Don’t worry, you’ll have the opportunity to move the message off the middle of the image after you’ve finished typing it! To do so, select and drag it elsewhere on the image. Add any emoji if desired and then you can move it after it pops onto your image again by dragging. You can also rotate your image by selecting the icon to the left of the emoji icon. You can undo any mistake by tapping the “back arrow” as many times as necessary. See finished message below right.


Starting in your messaging app
Sometimes you may be in the middle of a conversation via your messaging app, and you want to include an image. Simply choose the camera icon to the side of the blank chat box. This will bring up your camera (and a few of the very recent pics). As before, if instead you want to attach an existing photo, tap the gallery icon in the lower left corner ![]() (appearance may vary depending on the app, but you get the idea) to bring up your picture collection. Proceed as before selecting and uploading.
(appearance may vary depending on the app, but you get the idea) to bring up your picture collection. Proceed as before selecting and uploading.
As with any new skill, the best thing to do is practice to build muscle memory. Why not have a try now? Soon this will be second nature and you won’t have to think at all to access and share your pictures via messaging.
Let us know what you thought about this post with a thumbs up (or down).
If you’d like to automatically receive our new posts each week, simply subscribe for free by entering your email address below and hitting the Subscribe button. We promise to keep your information just between us.

2 thoughts on “Attaching Photos to Messages”