3 Easy Steps to Using FaceTime

What is FaceTime anyway? It’s a communication platform developed and provided by Apple (not Facebook) that allows you to make video or audio-only calls for free. Why is it free? Because it uses high speed data instead of traditional or cellular phone service, there is no cost other than using your allotted data allowance (minutes), which you can also avoid by using available WiFi.

You can use FaceTime to catch up with friends or family with no long-distance phone charges. Sound good? There are the 3 easy steps to get you connected – finding your contact, making the call and ending the call.

Getting Started with FaceTime

You can choose which way to begin your outgoing call or video call…. either by opening up the FaceTime app or opening your Contacts on Phone. We’ll show you both methods, which are equally easy.

Starting with the FaceTime App

Find the FaceTime app on your home screen and tap to open.

If you can’t readily find the app, you can search for it from the home screen by swiping downwards from the middle of the top of your screen. This will bring up the Search bar, and you can type “FaceTime”. If it doesn’t come up, it’s probably no longer installed, and you can go to the App store to search for it and download it (look for the green logo matching the above). There is no cost to download the app.

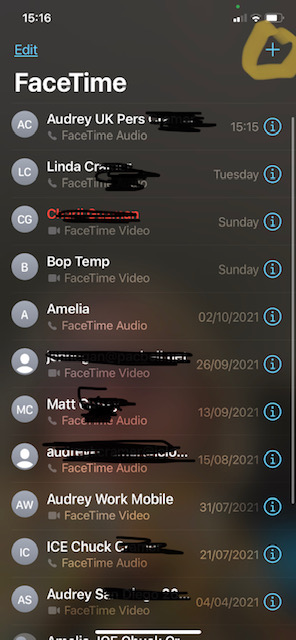
Once you have the app open, if you have made or received FaceTime video or calls before, they will be listed here in order, starting with the most recent at the top. If you wish to call someone with whom you chat frequently, this can sometimes be the fastest way to find them. But do bear in mind that if you simply choose them by tapping their name in the call history list, the call will default to whichever mode you last used with them (ie video or audio only). There’s nothing more awkward than finding you’ve inadvertently placed a video call when expecting audio only when you’re in your pajamas!

If you want to choose which mode to use, it’s safest to choose your contact by either tapping the “i” next to their name if its shown here already, typing their name using the “+” button, or starting the process from your phone contacts.

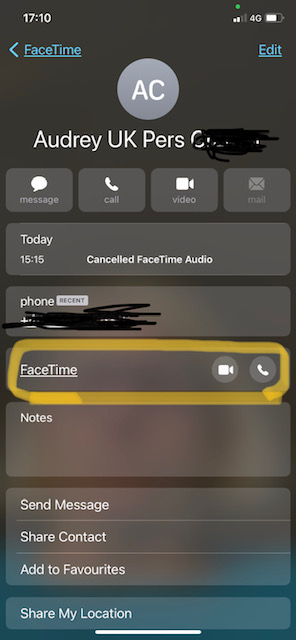
If you see your contact’s name in the list, the simplest way to proceed is to tap the “i” in the circle next to their name. This will bring up the screen shown below. You can find the FaceTime options towards the middle of the screen (circled in yellow, below). Make your choice of video or audio only by tapping the corresponding icon on the right. I always avoid the temptation to tap the icon at the top of the screen as I’ve been caught out in the past with a very expensive long distance phone bill. The charges when not using FaceTime will depend on your contract with your mobile phone provider. Always best to select FaceTime as shown below. Because FaceTime operates across data lines rather than phone lines, you will not be charged other than using part of your data allowance. You can avoid this as well by ensuring your WiFi is on.

If the person you wish to contact can’t (easily) be found in the list of recent contacts in the FaceTime app, simply tap the “+” icon in top right corner (see yellow circle below). This will bring up the search bar, and you can type in the name of the person in your contacts you wish to call. The screen will then come up as in the image above.

Starting from your Phone Contacts

You may alternatively start by opening your phone app and tapping “Contacts” in the footer

When you find your desired contact, the screen will appear like this (similar to above, but in a light background for some reason):

Choose FaceTime (circled in yellow, above) and the mode you prefer (video or audio only).

Making the call with FaceTime

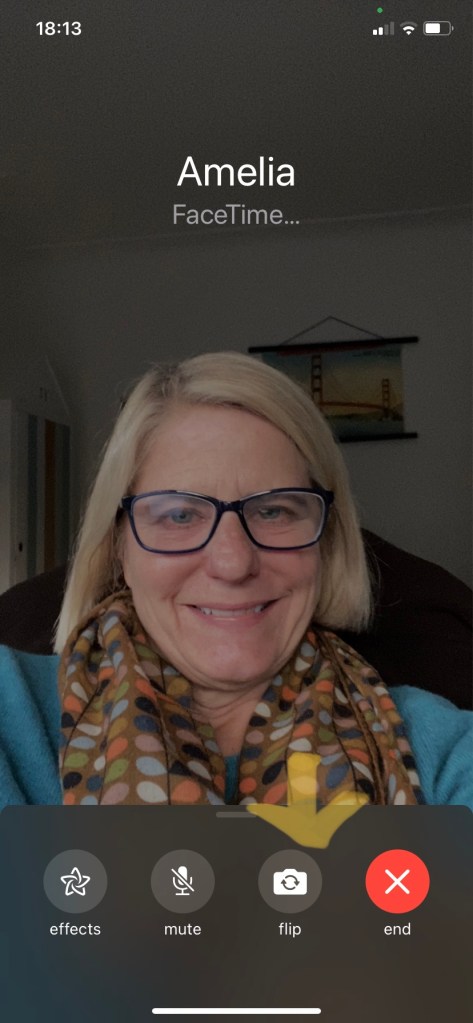
Once you tap FaceTime within contacts or the contact within the FaceTime app, the call will immediately go through. If you have chosen video, you will see yourself on the screen until the other person answers. I tend to use this time as a quick “disaster check” to ensure my hair isn’t messy or lipstick comically applied. Remember your contact will see you framed however you can see yourself framed. It’s most appealing if you ensure your image is centered in the frame and angled straight on. No one likes to talk to the top of your forehead or the bottom of your chin. Ahem, you know who you are…

How to show them something other than you

If at any point you want to show your contact your kitchen refurb or the dog’s latest trick, simply flip the camera. See the yellow arrow below. This will now switch to using the camera at the back of your smartphone ie facing outward. To switch back to your face, tap “Flip” again. If the menu is not showing, simply tap anywhere on your screen and it will appear again as a footer. You do have to be a bit fast to tap your choice from the footer menu as it disappears rather quickly…

Ending the call

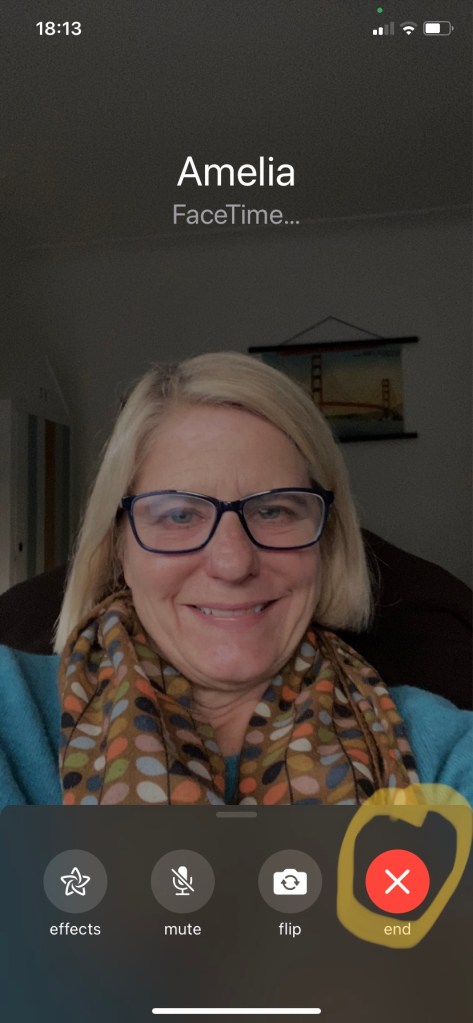
Ending a FaceTime call couldn’t be easier. As with any other audio or video call, simply tap the red button. In this case it has an “X” in it and is marked “end”.

What happens in FaceTime if the person doesn’t answer?

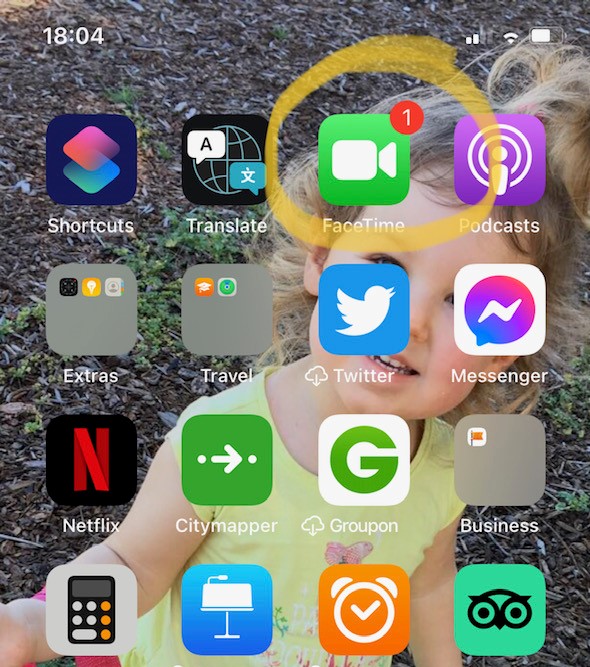
If your contact does not answer within a certain number of rings, the ringing will stop and you will be offered the chance to either try again, leave a message or “Cancel”. If you opt to leave a message, this will appear in their normal Messages and your provider may charge you. If you tap “Cancel” this will bring you back one step ie to your contacts screen. Your friend will be advised automatically that they have missed a FaceTime call from you. This will appear to them on the app on their home screen as a number (see below, circled in yellow), referring to how many calls they’ve missed. Upon opening the app, they will know which caller(s) they’ve missed as the name(s) will appear in red in the call list (and will likely be at the top, unless they’ve been making other FaceTime calls in the meantime).

So wouldn’t you agree that making a FaceTime call couldn’t be easier? Staying in touch with our loved ones has been shown to add to a longer, richer life, so why not try it out now?

Thanks for reading, and please let us know with a “thumbs up” if you learned something in this post.

You’ll never miss another Gransplain tip when you subscribe for free. You’ll automatically receive our tips each week, and we promise to keep your email just between us.

The Basics of Taking Time-Lapse Video on your iPhone

Time-lapse is a popular technique used to make something appear to have taken place much more quickly than it actually did. By shooting a series of photographs in quick succession depicting a scene that normally changes slowly over time and then speeding up the playback, you can make the action appear to occur unnaturally quickly. Think of a flower blooming within seconds vs hours or the night sky shown as a swirling whirl of stars. Perhaps you’ve enjoyed watching speeded-up video instruction for new recipes? These were likely recorded using time-lapse photography. With just a few tips here, you’ll be able to shoot and edit your own time-lapse videos on your iPhone.

How time-lapse works on iPhone

Unlike shooting a time-lapse with a standard camera, shooting with an iPhone is incredibly simple as you can take advantage of the default settings.

The Time-Lapse setting on your smartphone will automatically shoot your subject at 1–2 frames per second, dependent on the total time you shoot for.  And when it’s time to play back the video, it will do so at the speed of 20-40 frames per second, regardless of how long you shot. The longer you record, the fewer frames will be captured from each second of shooting, resulting in a more dramatic final effect.

Getting Started with Time-Lapse Video on your iPhone

Open your camera app.

Scroll through the options above the red shutter button, and tap “Time-Lapse” (shown here circled in blue).

When you’re ready to record, tap the red shutter button.

Tap the shutter button again when you want to stop recording.

Your time-lapse video will be saved to your photo library under both “Recents” and “Time-lapse”.

How to shoot a better-quality time-lapse video

Time-lapse videos work best when you are shooting a slow-moving scene, like the hands of a clock, the sunrise, a crowd gathering or dispersing or your dog enjoying a lazy afternoon in their favorite sunny spot. Regardless of the scene you choose to capture, there are a few tricks to ensuring a great quality finish:

  • Use a tripod. The key to a high finish time-lapse is capturing movement in several frames from the same spot, and the easiest way to do this is with a tripod. In the event you haven’t yet decided to invest in a tripod for your iPhone, you can approximate the benefit by using your creativity to cobble together a substitute. For example, I’ve used a sturdy beach chair stacked with just the right configuration of towels to capture a sunset at the beach. Stacks of books can help out in the kitchen if you’re capturing the making of a recipe, but you’ll need to get the camera angle just right before shooting to show adding of ingredients and mixing.
  • Focus. In order to achieve the same focus and exposure for every frame in your time-lapse, hold your finger down on the screen and “lock” the exposure and focus before shooting. 
  • Check you have sufficient battery.  Shooting any video tends to use quite a bit of battery juice, and shooting a longer recording like a time-lapse will require a lot of available battery. Ensure you have plenty of battery available and preferably a full battery unless you want your video to end with half a sunset.

How to trim a time-lapse video

You can trim your time-lapse video on iPhone using your Photos app in the same way that you would trim any video. When doing so using the Photos app, you can only make the video shorter by trimming the ends. Here are the simple steps how to trim your video:

  1. Open your time-lapse in Photos and tap Edit.
  2. Slide your finger along the timeline at the bottom of the screen until a yellow box appears.
  3. Use your fingertip to slide the arrows on either side of the timeline to trim any bits you don’t want from the beginning or end of your video.
  4. To exit you must tap “Done” and then choose either “Save Video” (replaces what you shot originally) or “Save Video as New Clip” (adds as an additional version).

How to crop and otherwise edit your time-lapse video

You may prefer to focus your video on only a section of the frame you shot, cropping out anything on the edges that might distract from the “main action”.

  1. As before, open your time-lapse video in Photos and tap “Edit”.
  2. Select the crop icon at the bottom of the screen.
  3. A white outline will appear around your time-lapse photo. You can drag the edges of the outline to adjust the orientation and size of your video.
  4. Feel free to experiment with the other Edit features, such as adjusting the contrast, infusing the video with warmth or coolness or indeed converting it to monochrome (black & white). All possible in a few swipes and taps!

Now you’ve covered the basics for taking and editing time-lapse videos, why not have a try yourself? No need to wait for a spectacular sunset, try capturing your pet as we’ve done here or another moving creature (perhaps a spouse or child in your family)?

Let us know what you thought about this post.

Be sure not to miss all our tips to get more out of the technology you already own. Simply input your email below and press “Subscribe”. We promise not to share your details, and you can unsubscribe at any time.

The Basics for Taking Slo-Mo Videos

Using the slow motion feature on your iPhone can result in really interesting, quirky or even hilarious videos and single frame photos. Who doesn’t enjoy watching a dog catch a frisbee then do an unplanned tuck ‘n’ roll? Or the contorted expression on your beloved’s face when sneezing?

If you missed the earlier post covering taking basic pictures on your iPhone, you can find that in this link. Otherwise, if you’re ready to discover how easy it is to take slow motion videos and photos, read on…

When to use slo-mo

Typically the slow motion function is used to capture and dissect something that normally moves quickly, and in slowing it down we are able to appreciate a quality we wouldn’t be able to at actual speed. This quality may be beauty, in the case of a hummingbird or splashes from a waterfall or fountain (see example below).

Or it could be something funny like your dog catching a treat:

Getting started with Slo-Mo

On your iPhone, open the Camera icon

At the bottom of the screen scroll to “Slo-Mo”.

Once you’re focused on your desired subject, press the shutter button (large circle in lower center). Don’t worry if you start shooting before the action begins, as you can easily edit out any boring start.

Press the shutter button again when you want to stop filming. To access your video, either immediately tap the icon in the lower left corner while in Camera mode (which is the last photo/video you’ve taken). Or go to your Photos app , where you’ll find it in “Recents”.

Now you’re ready to edit if desired. Tap the word Edit in top right corner of your screen. This will bring up the video in frame-by-frame version at the bottom of your screen. You will be able to choose from which frame you want the video to begin and from which it should end. You do this by sliding inward the < > arrows (see yellow circled in image below). Note you will want to “push” or slide them in the opposite direction as they are pointing in order to edit. So < gets pushed to the right, not the left.

Alternatively you can hit the “Play” button (solid triangle) and simply hit pause when the video reaches the place you want to start. Then push in the arrow to match where the vertical line is, which indicates where on the video the current frame shown is.

On the iPhone when you choose slo-mo and play it back, you’ll notice that the default is for the video to start at normal speed for a second or so and only then to slow down to slo-mo speed. You can adjust this as well. You’ll notice a series of vertical lines in a row, below the video still frames. See image below where underlined in yellow how you can see the difference in cadence from normal speed (lines closer together) vs slow motion (lines further apart). You can change where the video shifts simply by sliding either of the 2 longer lines (separating the change in cadence) to the right or left. By sliding the first one all the way to the left, the video will start in slo-mo. If you don’t like your changes, simply hit “Cancel” in lower left corner. Or to save your changes hit “Done” in lower right.

Once happy with your work and having saved it, you can share it by tapping the upload icon . Or if you prefer to save it for later and want it to be easier to find, you can hit the heart icon to add it to your favorite pictures file.

If you’d like to save a single frame from your video, the easiest way to do so is to find it by using the < > arrows as above, then take a screenshot and retrieve (and edit) that from your photos file. Instructions how to take screenshots can be found in our post here.

You’ll probably have noticed many other options in Edit mode. Go ahead and have a play with those, which can rotate images, adjust light, etc. We will cover more options in a future post.

To be sure to receive all posts, input your email and hit the “Subscribe” button below.

Thank you for reading, and let us know what you thought!

The Freedom of Paperless

Having just sorted through a few years of various till receipts and several old financial statements, I’m especially thankful to have embraced paperless some years ago. If you haven’t already done so, below you’ll find some objective reasons why you should consider it.

I still remember when first offered the option, I was dubious. Fair enough to have the opportunity to receive a monthly bank statement over email instead of an envelope with 5-6 pages, many of which were basically blank or just held the mailing address, so of no use to me. But how was I to be able to quickly scan through older months when I needed to confirm exactly when I had purchased the blender that just broke down? Or calculate how much I’d paid for energy over the course of a year, in order to find a better value provider for example?

It turns out that it would be easier to do these calculations when the statements are online! That’s right, I learned I could search my statements by choosing a relevant period of time (say last 12 months) and instruct the program to search for NPower, Bob’s Blenders or whichever provider I wanted. What used to take me realistically 10 minutes scanning through 12 paper statements now took less than a minute. And because the machine was searching (not my fallible human eyes), I felt confident nothing was missed.

An obvious advantage is freeing up space in your home or office. Keeping paper copies tends to mount up. And sure if you’re diligent, you can maintain a system of one statement in, one (old) statement out. But then you’ve got to be diligent about shredding the old paper statement. For me, that means crawling under a desk to access and plug in a small shredder. Too much trouble vs the alternative. You’ll feel mentally lighter, too, being able to clear out the space you used to need for all those files. Why not print some cherished photos instead and use the space for those?

And have you ever had accidental damage to your paper records? I have. Flooding after unusually heavy rains led to water damage, and the paperwork was illegible and many stuck together like glue. Of course, you can always request replacement copies from the financial institution, but I can assure you from firsthand experience, it’s not easy! Better to skip the problem.

And perhaps most importantly, don’t forget the impact on the environment of using paper statements. According to environmental organization The World Counts, paper makes up 26% of total waste at landfills. In addition, its production uses enormous amounts of water and energy and contributes directly to air pollution. To put it in perspective 42% of all global wood harvest is used to make paper, and producing paper takes twice the energy used to produce a plastic bag.

If that isn’t enough incentive, consider the cost savings. Going paperless saves your provider money in paper and postage. Often they offer to pass (some of) the savings onto you, their customer in the form of a fee reduction. Even if they don’t the more they need to spend to provide the product, the more you’ll pay to buy it. So either way you’ll save in the long run by going paperless.

If you feel uncomfortable making a huge leap, then feel free to try it out. Most banks will allow you to return to paper statements if you choose. And in some circumstances you may want to opt for a paper till receipt as proof of purchase (for ease of return of faulty goods, for example). But I’m sure like me, you’ll find going largely paperless to be satisfying and beneficial.

Our next post is covering more tips on using your iPhone camera. If you’d like this and future posts to come directly to your inbox, simply input your email address into box below and hit “Subscribe”. We promise to keep your details between us and never share.

The Basics of Taking Portrait Pictures on Your iPhone

With an iPhone in your hand and a few simple pointers learned below, you can take beautiful portraits of your favorite people, pets and objects.

Basics of Taking Pictures Using Portrait Mode

As mentioned in our previous post on the basics for taking photos on your iPhone, (see link here), Portrait mode does not refer to the orientation (ie landscape vs portrait) but rather this mode makes your subject pop and can give your pictures a dramatic look. When you take a photo in this mode, it keeps the subject in focus while making the background of the picture look artistically out of focus.

You can see the difference in the two photos below of the same woman. In the one on the left, you’ll notice you can still see the detail of the background, in this case particularly the statuary in the fountain. The woman seems to be part of the scene. On the right, however, the background is out of focus, ensuring the eye focuses primarily on the subject in the foreground.

Here’s another example with the background really blurred in order to focus on the woman in the foreground:

The subject of your focus doesn’t necessarily have to be a person. The Portrait mode will work equally well with pets (if you can get them to stay still long enough to capture them!) or objects. See below the example where the person is made part of the background through blurring whilst the phone (and his hand) are the focus of this shot.

Start by opening the Camera app.

Then using the menu on the bottom of the screen, scroll to “Portrait” mode (shown circled in image below).

On the bottom of the image on the screen itself, you’ll now see a sub-menu that will allow you to choose the type of light and how much blurring effect you’d like. Simply slide your thumb (or any finger) over the menu from left to right to see your options. See arrow on image below.

Let’s take a look at some of the options and what they’ll do for this cluttered desk I’ve chosen for the comparisons. 🙂 Immediately below is a picture taken in normal (not Portrait) mode, where you can clearly see all the clutter.

Here is the clutter with studio light vs with contour lighting. Remember to tap on the screen itself on the subject or subjects on which you would like the camera to focus. In both shots below, the focus has been chosen on the mug, so the rest of the clutter is blurry.

Perhaps it was due to poor ambient lighting when I took these or my own faulty vision, but personally I don’t see much distinction here between the two, can you? Perhaps the main subject (the mug) has a subtle yellow glow on the right (Studio Light)?

You will however be able to clearly see the effect on the same desk clutter of two of my favorite effects…Stage Light (left) and Stage Light Mono (right). These really “clean up” the clutter!

Here’s the same Stage Lighting effect using my dog as model. She is too shy for the stage unfortunately…

It’s fun to have a play around with the different features and effects in portrait mode, trying indoors and outdoors! You’ll discover you can take really interesting shots you might never have guessed were possible using your smartphone.

If you enjoyed this post, do let us know with a . To ensure you don’t miss our upcoming posts on Video, Slo-Mo and Time Lapse photos taken on your iPhone, be sure to subscribe! We guarantee your privacy as we don’t share your details with anyone.

Gransplain: Smart tech. Smarter you.

The Basics of Taking Panoramic Photos on your iPhone

Your iPhone makes it easy to take interesting photos beyond the standard options. For example, you can capture the entire sweep of your favorite beach or a stunning view from a vantage point. (If you’re looking for the basics on taking standard photos in your iPhone, you’ll find those in the previous post, with the link here.)

The Basics of Taking Photos Using Pano

With traditional film and digital cameras you used to need a special panoramic lens in order to capture “Panos” or panoramic images. This ability now comes standard with your iPhone.

As with all Photos, begin by opening your Camera app.

On the bottom of the screen you’ll see the menu of different photo/video choices. Select “Pano” (circled in image below).

A large white arrow and thin yellow line will appear in your main screen. These indicate the direction and path you should take when moving your iPhone (camera). This will always be left to right, so start your image on the far left of what you’d like to capture.

A message will appear to “Move iPhone continuously when taking a panorama”. If you move your camera too quickly, you’ll see a message to slow down, so it’s best to be slow and accurate. You should aim to keep the point of the white arrow on the thin, yellow line. Don’t worry about small transgressions which shouldn’t affect the outcome. However if you accidently mess up with a significant judder (it happens…), then it’s best to end that take and send it to the bin in order to start over. You are limited to taking the image holding the camera (iPhone) in the upright position vs landscape. But of course the resulting photo will be in landscape. 🙂

NB. simply ignore that embedded static image that appears in the lower left corner of your screen; it’s simply the previous image that you took.

Pano mode operates like a video in that you have to press the shutter button (large solid white circle, see image above) once to begin to capture the scenery (the solid circle will turn hollow with a smaller white rectangle in the center) and again when you’re finished (when the circle will be shown as solid white once again).

Your resulting photo will often appear in a pronounced arc especially if you are trying to capture something that’s somewhat arched (like a sea cove) along a straight line. See examples below of 2 photos taken of the same beach at the same time in regular photo vs pano. And below these, the full panoramic photo.

Here’s a helpful tip I only learned after having taken numerous panoramic pics on my iPhone… You don’t actually have to follow the yellow line to the end! So many times I lamented having captured the “boring” end of a cliff or having to capture some less scenic elements like a main road. Well you don’t have to! Simply end the picture wherever you wish by tapping the shutter.

If you’ve found these tips helpful, please hit the . And if you’d like to automatically receive further tips on taking photos using your iPhone (including our next instalments on Portrait, Video, Slo-Mo and Time-lapse photos), you can subscribe for free by dropping your email in the box below and hitting the “Subscribe” button. We guarantee privacy and won’t share your details with anyone.

Gransplain: Smart tech. Smarter You.

Taking pictures on your iPhone: the Basics

If you’re looking to learn the basics on taking nice photos using your iPhone, then you’re in the right place. The camera function on smartphones has made huge strides in the last decade, and you’ll find that you can take pictures that are as beautiful and clear or more so than you can with a stand-alone digital camera. And it’s just as easy if not easier once you learn where to find the buttons…

The first step is to tap the Camera icon.

This will open the camera function to the default settings. By this we mean:

  • Photo (vs Video, Panorama or other options)
  • Forward facing camera (you’ll take a picture of whatever is in front of the camera vs a selfie/yourself)
  • Not magnified or zoomed
  • Flash off (unless you have previously chosen flash set to “On” as default or set for the camera to choose if it is needed each time ie “Auto”)

We’ll go through how to change each of these settings should you wish a different option for a particular photo.

Choose the Camera Mode – what they are each for

  • Photo: as mentioned this is the default and will likely be the best option for the majority of photos you will want to take.
  • Portrait: this does not refer to the orientation (ie landscape vs portrait) but rather this mode makes your subject pop and can give your pictures a dramatic look. When you take a photo in this mode, it keeps the subject in focus while making the background of the picture look artistically out of focus.
  • Pano: short for “panoramic photo”. When you tap this option, a yellow line and conspicuous white arrow will appear across your screen. This is a guide showing you in which direction to make a slow sweeping motion across the scene you wish to capture. You must follow the orientation of the line, so don’t try turning the camera to landscape for example. You’ll find more tips below.
  • Video: as the name suggests, you will capture action as a video. This can be edited later, so don’t worry too much about starting the camera too soon or stopping it well after the action has ended.
  • Slo-mo: this mode is for taking videos of actions that you’ll want to see slowed down. As you often see in replays of sporting events, for example. Or you can use this mode for everyday occurrences you think would make an interesting slow-motion video, such as a dog catching a frisbee or a child doing a cartwheel.
  • Time-lapse: this is a series of many closely-timed photos that will capture an action, usually one that happens slowly, such as a sunset or sunrise (or a flower blooming if you’re really patient). The camera must be kept perfectly still for this, so plan to set it on a static object for the duration of the action. You’ll also need sufficient battery as taking so many pictures does use a lot of power.

Customizing in “Photo” Mode

The first choice to make is whether you are taking a photo of something in front of you or of yourself. The camera defaults to non-selfie, so you won’t need to change anything if this is what you are hoping to do.

To change from outward facing to selfie mode, simply tap the icon on the bottom right as circled in yellow below. This button toggles between the two modes, so tapping it once again will bring it back to conventional (non-selfie mode).

If you want to take a picture of yourself (with or without others), the advantage of selfie mode vs a conventional digital camera is that you can see what the camera sees and make adjustments accordingly (fix your hair, bring the camera closer or farther from your face(s), etc.)

Like most other modes, you can simply rotate the camera 90 degrees if you want to take the photo in landscape (wider vs taller) instead of portrait (taller vs wider).

In Photo mode (as with most other modes), you can easily get a close-up shot of your subject without having to move physically closer. Notice in the picture above the “2x” in the small circle just above the “Photo” mode? This shows that the person is taking a picture which has zoomed by 100%. When you see “1x” here this is the default and the lens has not been zoomed at all. You can easily change the zoom feature by tapping and holding down the “1x” icon in the circle. This will bring up an arc that looks like the protractor you may remember from Math class. Simply slide your thumb right or left along the arc to change the zoom from 0.5 (ie appearing further away) up to 5.0 (ie max zoom). Once you’ve found the right setting, release your thumb and take the picture.

You can also choose if you want flash on or off. If you see the option “Auto” and choose it, the camera will decide the best outcome based on the subject and light conditions. You will find the flash symbol at the top left corner, as seen in the picture above (shown here with the line through it so set to “Off”).

“Live” option: this will capture a fraction of a second of movement in your otherwise still photos. It can add some pop, but it can also be annoying. Have a play taking pictures with it on or off. Personally I find them annoying when flipping through the files of photos later. And then there’s the other drawback of Live Photos in that they take up more storage space on your device…approximately twice the space of a normal 12 megapixel photo. You can turn Live Photo mode on or off by tapping the icon at the top that looks like a sun (in above photo, second icon from left on top of screen).

Another handy option is the timer. If you tap the timer icon (see above, second icon from right on the top of screen), you will bring up the menu of options. The default is zero (ie the photo will be taken the moment you press the shutter button). There are options of 3 seconds and 10 seconds. This can be useful if you are setting up a photo then need a few seconds to jump into it and not look rushed. Again simply tap this again to get back to default.

As you may have noticed, there are many other advanced customizations you can make in terms of exposure, shape (cropping), etc. We will cover some of these in an upcoming post. If you’re keen to learn more, there are numerous video tutorials on YouTube.

One super simple and transformative tip before we cover other modes below. You can help the camera know the focus of the picture you are trying to take simply by tapping on the person or object on the screen itself. You’ll see one or more yellow rectangles highlight where you’ve tapped. This will bring them more into focus and potentially adjusting the light to frame them. It is especially transformative if you are taking a picture where the environmental light is not bright (eg dusk) or there are very light and dark elements in frame. Suddenly, with one tap your friends and family appear clear and bright rather than looking like shadowy figures in a criminal line-up.

In our next post, we’ll be covering the basics for the other camera modes: Video, Pano, Slo-Mo and Time Lapse. And in upcoming posts, we’ll cover how to access and file your photos on your smartphone as well as share with others. If you’d like to receive these automatically into your inbox, subscribe for free below by inputting your email address and hitting the Subscribe button.

Gransplain: Smart tech. Smarter you.

How to Buy a gift on Amazon

Amazon is now the largest retailer in the world and for good reason… they have an enormous breadth of merchandise and make browsing and buying easier than many other retailers.

With just a few pointers it’s easy to get started, find the perfect gift and have it delivered to your recipient.

Getting Started

On your computer or smartphone, type into the search browser: Amazon.com (or the appropriate version for your country, Amazon.co.uk, for example, if your recipient is in the UK).  Don’t worry whether you are logged in or not as the site will prompt you to log in if and when needed.

Just like when you are visiting a physical or “bricks and mortar” store, sometimes you will have an idea before you enter of what you’d like to buy.  The gift recipient may have given you hints or even a wish list.  Other times you intend to simply browse through the options, looking more closely at some of the items until you find one you think will make an appropriate gift.  The same will apply when shopping for a gift online at Amazon.  We’ll cover both situations here.

Browsing

In the menu, find “Find a Gift” option.  The menu choices do change with the seasons, so don’t worry if it doesn’t look exactly like the below.

Next you will focus your search by choosing your “type” of recipient. Below I’ve chosen the age group “6-8 years”. I’ve kept the gender as “Anyone” because I find Amazon sometimes has very narrow definitions of what a young girl or boy might like.

Next you can (but don’t need to) choose to narrow the search results by gift category if desired. In the case of gifts for 6-8 year olds, as you can see below, the types of categories include Arts & Crafts, Dolls, Games & Puzzles, Action Figures, etc.

Next you can narrow by price band (see drop-down menu circled below, right). This will be shown in the local currency of the site you’re on. Even if you decide not to narrow the search by price band, you can still choose to sort the search results by price (highest to lowest or lowest to highest). In children’s toys, the results are fairly straightforward, but when looking through results in Electronics, for example, when you view results by price “lowest to highest”, sometimes you’ll have to wade through a few pages of irrelevant results like spare chargers for iPads vs the iPads themselves.

Looking for something specific

If you already have an idea of what you’d like to buy, you can most quickly and easily find the item by using the “Search” function on the Amazon site. Here is what it looks like on a computer:

Or smartphone:

You can choose how the various results meeting your search query are shown to you by filtering results for example by relevance, price or customer review rankings. If you are looking for a laptop for example, if you choose to rank results by relevance, you will be presented with actual laptops before having to wade through any related products like laptop chargers or carrying cases. If you choose to rank by price (low to high) you will likely first need to scroll past lower-priced accessories before getting to the laptops themselves. I often search by price (high to low) then scroll ahead a few pages until I find my price range. That way I don’t have to guess where the actual laptops begin.

It’s a good idea to look at the customer reviews before committing to a purchase, however you may find it more difficult to find the price and type of item you’re looking for if you use the reviews as a search filter. Better to use another filter and then look at the reviews once you find one you like.

How to know you’re buying a quality gift on Amazon? 

Amazon and many other online ordering sites reduce some of the risk that comes with not seeing an item before buying.  They do this by maintaining a consumer rating system using a 5-star scale.   I find this especially important in situations where I am sending the gift directly to the recipient and will be unable to check the quality before gifting.  You will find the star rating on the quick view summary of each item.  The number in parentheses indicates how many people have rated the item.  So you can have higher confidence in a high rating if more people have tested it.  Anything over 36 is “statistically significant” or reliable.   A 5-star rating with fewer than 10 people have rated it is not worth paying attention as the manufacturer may be seeding the ratings.   (If no stars are shown this means simply that the product has not yet been rated by previous purchasers, which will be the case for a product recently added to Amazon.)

If you tick on the stars, you can see more detail including the rating in decimals (eg 4.7 vs 4.3, both of which look similar as a partially filled star), the distribution of ratings (how many people really hated it vs loved vs liked it) and the actual comments people made about it.  Often you will also see subcategories of ratings, for example “Quality”, “Value for Money”, etc.

So in the example below, we have a reassuring distribution of scores, with most people loving it and very few having been disappointed. 

You can tick on the individual scores (eg all the 1-star ratings) to learn why people gave it that score, by reading the individual comments.  Sometimes you’ll find the item broke quickly, was sized in a non-standard way (clothing) or other issues.  If the overall picture looks good, I tend to only dive deep into the ratings if I’m looking to buy something on the expensive side.

By way of example, below I’ve selected to view all one-star reviews so I can understand what the downside to this toy might be.  You can make your own judgment based on the type and frequency of comments. For example in the below, I see that for the few customers whose toy broke quickly, the manufacturer responded to their comment (see their response by selecting the comment, circled) and offered to make the situation right.  This gives me confidence.

Some people give greater credence to “Verified Reviews”.  These will have those words displayed right above the actual comment.  The system automatically verifies if the person writing the comment ordered the item from their Amazon account and if so, applied the “Verified Review” line.  Of course it may be that the commenter purchased elsewhere or received the item as a gift but choose to write their comment on Amazon.

Buying your chosen gift on Amazon

Once you have chosen a particular gift, check whether there are other choices to be made, for example colour or size (eg clothing). Often these are in a drop-down menu, and if you don’t make a choice, you will be sent whichever option is the default (eg size Small in black).

Now you will be given a choice to “Buy Now” or “Add to Basket”. If you do not have anything else you want to buy to send to the same recipient, then you can choose “Buy Now”. Otherwise choose “Add to Basket” in which case the item will be waiting for you in your shopping cart (the icon for which can be found in the top right corner of your screen), and you can carry on browsing or searching for your next item by using the search icon or browsing by category, as described above.

Before checking out, do a final check to ensure there are no nasty surprises in terms of shipping times or delivery costs. Nine times out of ten you will find everything is as expected – free shipping or an acceptable small charge and fast delivery times. However, do look out for unexpected delivery fees out of line with the item as shown below. These should come up inside the box on the left, assuming you have either already stated the destination postal code or are shipping within the country from which you are ordering (eg within mainland US for amazon.com or within the mainland UK for amazon.co.uk).

Surely you’ll find better options than paying $16.50 in delivery charges for an item costing $6.99! Bear in mind that delivery is often assessed on items individually, so these can quickly add up. Look for items that qualify for Free Delivery. The item will state clearly if it already qualifies on its own or if it will qualify when $X (often just $20/£20 or sometimes $10/£10 in the case of books) is reached for the total order to that delivery address. Unfortunately, ordering items to be shipped to separate addresses do not qualify as a joint order for free shipping.

How to Check Out

Once you’re done shopping, you can find your cart at any time in the upper right hand corner. Access check-out by tapping the cart icon (see below, circled).

Now it’s just a matter of carefully checking that you’re sending the item to the correct address, with the correct terms (shipping time and cost). Like other online retailers, Amazon will not accept responsibility if you have made a mistake on the address; they are accountable for getting it to where you have indicated on the order.

You can also tick the small box that asks if your order includes gift items. If you tick “Yes” then you will have the option to include a short gift note, for which there is no charge. This is typed on the delivery slip. It’s not a card, it’s not fancy but it is a good way to make sure it’s clear whom the gift is for, from whom and for which occasion.

It’s important here to double check the shipping terms. There are a couple areas where I personally feel Amazon is letting customers down. And both are at the check out stage, so watch out for the following:

  1. Often the shipping option will default to a premium one rather than the free or low-cost option you were promised. You will usually need to tick the free (longer time) shipping option, and the premium or express option will untick and the shipping charges will automatically recalculate in the total.
  2. Amazon loves to “encourage” you to sign up for a free trial of Premium (their subscription delivery and entertainment streaming service). By “encourage”, I mean they will already have ticked the box to you having agreed to sign up! And guess what happens at the end of the short free trial? That’s right, you will be charged monthly without warning. If you see that mysteriously a generous amount has been taken off your expected total, it’s possible that they have “assumed” you’ve agreed and offered a discount by way of gift card. So put on your strongest reading glasses and look for the option that says something along the lines of “No thanks, I don’t want to save (with XYZ incentive) by signing up to Premium”.

You will then be taken to a payments page, where you have a choice of payment methods. Once you’ve hit “submit”, a confirmation message with order number will appear at the top of the page. Don’t worry about writing down the very long number as they will also automatically send the confirmation details to the email you’ve given for your account. You can open your email in a new browser tab and check the confirmation has arrived. Don’t worry, your recipient will not be made aware of the gift until it is about to be delivered, and the delivery slip accompanying a gift will not include the price (unless you’ve chosen a gift card). If you’re looking for the easy way to order a gift card on Amazon, you can find a blog post on this subject in our Tech Tips.

Get our new tips directly into your email inbox each week by leaving your email address below and hitting “Subscribe”. We promise not to share your details with anyone else.

Turn Up the Volume!

I remember one time at a very buzzy tequila bar with my husband, I complained to him I couldn’t hear anything he was saying because the music was too loud. He laughed and pointed out a sign behind me that said “If the music’s too loud, you’re too old!”

Nowadays it’s more likely that it’s my music that I want to hear, but the ambient noise is too loud. Whether you’re trying to listen to your tunes whilst on a busy road or a buzzy bar or your hearing isn’t what it used to be, you can boost your volume with these easy adjustments to your iPhone.

If you’ve haven’t already maximized the volume on your smartphone using the volume up button, follow those easy instructions by clicking on this link.

If that’s not enough, here are work-arounds to allow higher volume and better clarity…

Increase Volume using iPhone’s Music App

This is the music program that comes standard with the iPhone, and you can find it in Settings (see image below). If you use Spotify, the instructions are very similar, and we’ll cover them separately below.

Select “Music”, then look for “EQ” (see circled image below).

Tap “EQ”, then scroll down to find “Late Night” (image below) and select it. Yes, this is counter-intuitive as you’d expect something called “Late Night” to play softer music, but that’s not the case. You’ll see that by default, the EQ is set to “Off”, which means you’re just using the speakers at a minimal level with no enhancements. Tap any other EQ setting to hear what it sounds like. You don’t have to have music playing on your phone to make a change, but if you do, you should immediately hear the difference. Tapping “Late Night” should increase the volume clarity by about 20%.

Adjusting the Volume when listening on Spotify

The steps mirror those outlined above, but first you need to open the Spotify app. As before, you’ll be able to compare the difference before and after adjusting the volume if you have music playing at the time, but it’s not necessary.

Open the Settings icon (wheel) at the top (see circled in below image).

Now scroll down to find “Playback” (circled, image below).

Choose “Equalizer” (circled, image below).

Scroll down to find “Late Night” and tick it (second arrow, image below).

With music playing, go ahead and experiment what the other options will give you.

Enabling Louder Volume by Turning off “Headphone Safety”

If you’ve found that listening to music through your headphones isn’t loud enough, Headphone Safety may be enabled. This is a feature that Apple uses to help protect your hearing. Keep in mind that this setting exists precisely to protect your hearing, so consider leaving it as is especially if you’re not having trouble hearing music through your headphones.

If you do decide to turn it off:

  • Return to the iPhone’s Settings menu .
  • Tap Sound & Haptics in the second group of settings.
  • Tap Headphone Safety.
  • Toggle the “Reduce Loud Sounds” switch to “Off”.

You’ll see a safety warning from Apple advising that they will send you a notification after 7 days to remind you that your Headphone Safety is switched off.

We trust that these steps will give you a better listening experience whether listening to your music on the Apple Music App, Spotify app and whether you listen aloud or on your headphones. Happy listening!

If you haven’t already subscribed, why not do so now by inputting your email address and hitting “Subscribe”? You’ll automatically receive the weekly updates directly into your inbox, and we promise never to share your email address.

Incognito Browsing

Why on earth would you ever want to browse incognito, or “privately” as it’s also called? Isn’t that only for people looking to do naughty or even illegal things online? No, not at all!

There are plenty of perfectly valid reasons you may on occasion want to search for something online and not leave a trail behind. We’ll look at some of the advantages of choosing an incognito browsing session as well as the incredibly easy way to do so.

What is Private Mode or Incognito Browsing?

At their most basic, these features promise that they won’t record visited sites to the browsing history, save cookies that show you’ve been to nor remember login details like passwords used during sessions. At the same time, private browsing won’t prevent Internet service providers and the proper authorities (as well as employers if you are using your company’s network) from being able to trace your steps. Meanwhile some of the larger advertising companies (ie Google) have been caught and sued for continuing to track your movements online so they can chase you with related ads.

So why bother?

You can improve your protection from advertisers and any curious person who may have access to your computer by both choosing private browsing and adding “anti-trackers” or advanced privacy features of your chosen browser. I have definitely noticed that opening a search on an incognito tab has eliminated being fed related ads.

It is also handy when you are trying to price compare, say flights. Airlines are notorious for bumping up the prices shown when they see you are a recently returning website visitor. Don’t believe it? Try simultaneous searching with a friend, one of you having checked before and one not. You’re likely to find as I have on multiple occasions, much lower prices shown to the new visitor.

Likewise there are many times you’d just like to find answers to your query, like your dog’s itching, without being then inundated with ads for pet insurance, dog food and the like. And those are ads with adorable dogs….imaging when you start looking up information for human ailments. Yikes. Better to do so incognito.

How to Browse Privately in Chrome

Chrome is by far the most popular browser with over 70% of the world using it, so we’ll start here.

The easiest way to open an Incognito window is with the keyboard shortcut combination, holding down 3 keys in the following order: Ctrl-Shift-N if you are using the Windows operating system.

If you are using a Mac instead hold these keys in order: Command-Shift-N .

Another way is to click on the menu on the upper right – it’s the three vertical dots (circled below) –  and select New Incognito Window from the drop-down list (see arrow below).

Here is what you’ll see and what Chrome promises it will and won’t still do in an Incognito search:

Type your search query as you would normally into the address bar (see blue arrow above). You can be sure you’re in private mode because the screen is dark, and you’ll see the word “Incognito” on the top right (underlined, above).

Once a tab in Incognito has been taken you to your desired website address, Chrome continues to remind you that you’re in Incognito mode by the dark background of the address bar and window title (see example below).

How to Browse Privately in Microsoft Edge

Edge is Microsoft’s browser and replaced “Internet Explorer” several years ago. It is the standard for Windows 10 and can also now be used with the Mac operating system.

On the keyboard, if using Windows, hold down these keys in order: Ctrl-Shift-N. If instead you are using a Mac computer, hold down these keys: Command-Shift-N to open an InPrivate window.

As with Chrome, an alternative way to get there is to click on the menu at the upper right – it’s three dots arranged horizontally this time– and choose New InPrivate window from the menu.

Edge is specific about what they will and won’t track in InPrivate mode, and the search page looks like this:

As before with Chrome, simply type your search query in the address bar as you normally would.

And there you have it, easy to search incognito. Don’t worry, you won’t be “stuck” in that mode. Simply open a new search tab using the “+” as you normally would in order to browse normally again.

If you would like to receive new tips for browsing and using your smart technology, simply drop in your email address, and you’ll receive our new tips automatically when they come out. And rest assured, we won’t share your details with anyone.