How Wobbly is Your Walk?

Exactly how goofy is your gait? And should you care? Besides affecting the wear and tear on our shoes, uneven or unsteady walking can make us more prone for a fall.

Identifying low steadiness may be indicative of higher likelihood of falling over the next 12 months and might be a good reason to check in with a medical professional. The good news is that with the Apple Health app on your iPhone, it’s easy to get a read on several important measures of your gait.

How does this feature of the Health App work? Firstly it should come as standard on later version of the iPhone. Look for this icon and ensure you’ve downloaded the latest software version (eg iOS 15) from Apple. The app works when you carry your iPhone in a pocket or other holder near your waist.

In the app’s own words, “This is an estimate of your stability while walking. iPhone calculates Walking Steadiness using your walking speed, step length, double support time and walking asymmetry data that’s stored in Health. This provides a sense of the way you walk.”

Set up the Free Walking Steadiness Measurement
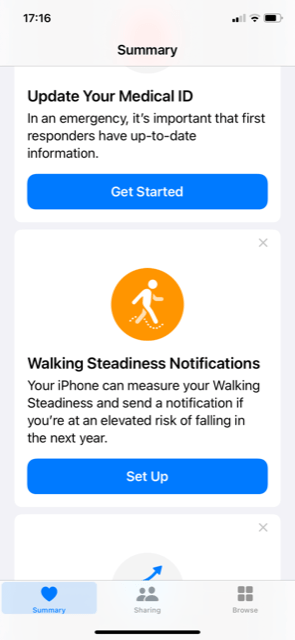
Tap the Health icon to open the app, and choose Walking Steadiness (see image below).

Fill in a few details about your age, height and weight (see below, left) and familiarize yourself with what the 3 ratings mean (below middle). NB for the competitive among us, unfortunately there’s no measurement better than “OK”, but we Super Steady Walkers know who we are, right? When you finish setting up, you’ll get a confirmation like that below, right.

Steady On

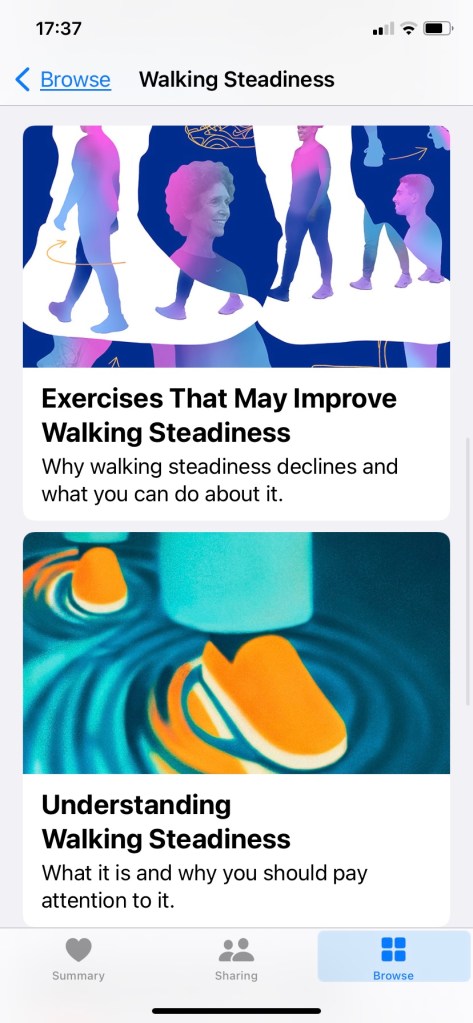
If you’ve set up notifications, you’ll also receive a warning when your steadiness is “low or very low”. But what can be done to improve matters? Of course the best course of action is to consult your doctor. And meanwhile, Apple has embedded some helpful exercises and other tips on improving your steadiness. Scroll down until you see the following articles and tap to open.

Halt, There’s More!

Walking Steadiness isn’t the only walking metric your iPhone can help you track.

In fact, it can also monitor your walking asymmetry as well as average walking speed, step length, double support time, and stair up-and-down speeds.

Walking asymmetry reveals whether you’ve got an even or uneven walking pattern. The good folks at Apple explain this: “In a healthy walking pattern, the timing of the steps you take with each foot are very similar. “Walking asymmetry is the percent of time your steps with one foot are faster or slower than the other foot. This means the lower the percentage of asymmetry, the healthier your walking pattern.”

They add: “Uneven walking patterns, such as limping, can be a sign of disease, injury or other health issues. An even or symmetrical walk is often an important physical therapy goal when recovering from injury.”

Another interesting metric is Double Support Time, which is how much of the time both of your feet are on the ground during a walk.

The lower the value, the more time you’re spending with your weight on one foot instead of two, which can be a sign of better balance. After all, it’s hard to stand on one foot when you feel unbalanced. Of course, It will vary depending on terrain. I certainly notice a difference when I walk in neighborhoods where tree roots have caused very uneven pavements or sidewalks.

You should be more focused on any changes in coordination, balance or strength that may be affecting your two-foot contact time.

And if you’re worried about you’re concerned with anything you’ve read on your Health App, it’s best to check in with your doctor.

Please let us know if you found this post helpful by voting thumbs up or down. And if you’d like to automatically receive weekly posts in your email inbox, simply subscribe below. It’s completely free and we promise to keep your details just between us.
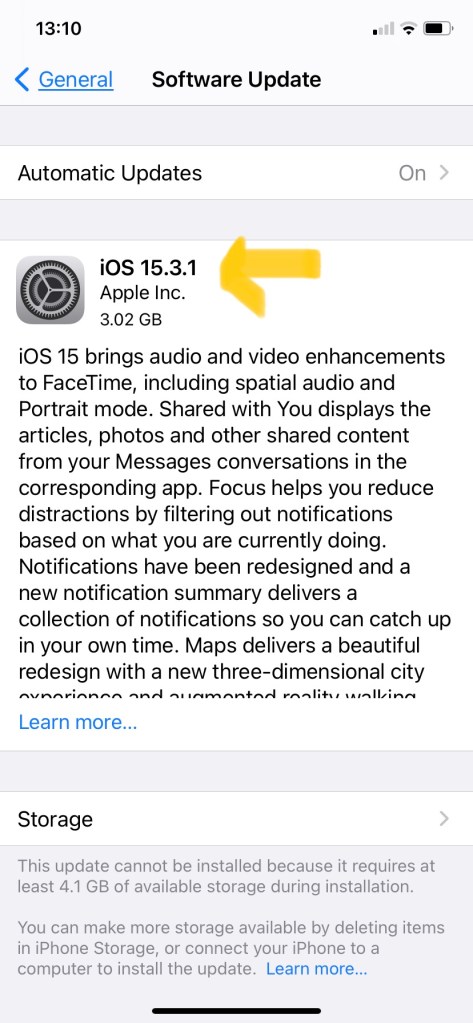
Gransplain.com

How to Check Your Home WiFi Speed

Going back a few years, I didn’t quite grasp what was all the kerfuffle over internet speeds. What did “fast” matter anyway when you were mostly using it to surf the web? Well things couldn’t be more different now, and like me, you’ll probably find that WiFi speed is very important in getting done the things you need to do whilst using the Internet. Including watching streamed media or having video meetings, which are now frequent activities.

What is Meant by Internet Speed Anyhow?

Internet speed is a measure of your connectivity, specifically how quickly you are able to upload and download whatever it is you are accessing using the Internet. You are paying for a certain “bandwidth” of connectivity, which will determine the range in speeds you can expect. So for example if you have 50 Mbps of speed, it should allow you to download (record) a typical 2 GB movie in a little more than five minutes. If instead you have opted for 1 Gbps, you could download that same film in 16 seconds.

And importantly, your bandwidth is shared if there are more people than yourself in your household. Whatever speed is promised in your agreed package is the total available across all devices connected to the Internet via WiFi. This includes laptops, tablets, smartphones connected to WiFi, plus other devices using Bluetooth like printers. In addition, if your WiFi is not secured with a password, neighbors could be taking some of your bandwidth by using your Internet connection. Always password protect your WiFi access.

Moreover, as is often the case (and has been several times for me), your broadband provider may not be providing a bandwidth that is within the range you’ve agreed by contract to pay for. Here you’ll find instructions how to check the true speed you’re getting via an objective speed checker.

Run a Speed Check

Actual Internet speeds can vary throughout the day because, unless you’re paying for direct Internet access (as might a business from a certain size) the internet usage by nearby households can also affect your speed. As long as your provider is providing to you a range that they’ve promised and charged for, you shouldn’t be concerned with these fluctuations. However you may find that in practice you’re getting significantly less than promised. First check the speeds for you’ve been paying. You may find this information on your monthly statement; otherwise check under your account information online or on your written contract if you opted for paper account records.

Now you will want to go to an objective speed checker that works in your area. This service is free. Those tied to a specific provider may make you input your contact details before revealing the results (so that they can hard sell you), but you can easily find a service where this won’t be necessary. You can Google “free broadband speed checker” or similar search terms to find options. Below are some suggestions. To get the most accurate read on the speeds you are actually experiencing, you should try a few times on different days and times.

In the US

  • Fast.com – This one immediately shows you your speed with no faff of inputting your data. See example of output below.
  • Speedtest.net One of the oldest on the market

In the UK

  • Fast.com – As above, it immediately shows you your speed with no faff of inputting your data.
  • Ofcom is the official regulator of the communications industry in the UK. Whilst they no longer offer their own speed checker, their site recommends approved checkers: “You can run a speed test using an Ofcom accredited price comparison site such as Broadband.co.uk, broadbandchoices.co.uk and Simplifydigital.”
  • However, on Ofcom’s site, you are able to check the different bands of speed available. The highest speeds are not available in all areas, with gaps especially in rural areas. You can check here and the output will look something like the below.

Help, I’m Not Getting What I’m Paying For

Note down the upload and download speeds from the read out and the date and time you ran the tests. Make sure you have to hand your broadband service account information and get in touch with them to say you’re not getting what you’ve been paying for. Be clear on what you want to achieve – for them to boost your speed or reduce your bill. You can even negotiate for a boost plus a credit for the time they’ve been under-delivering (or “a gesture of goodwill” as they may prefer to call it to avoid culpability).

Most service-oriented providers will believe you at your word, but if you suspect you may be dealing with one of bad faith, be sure to take a screen shot of the speed read-outs you’ve made. If you need a refresher on the easy ways to take a screenshot, you can read that on our post here. It may seem like a lot of faff to get the speeds you’ve paid for, but you’ll save so much time going forward not waiting for pages to load that time spent on the phone or via chat with your provider will be time well invested.

If you’d like to automatically receive weekly updates on other tips on getting more from the smart technology you already own, be sure to subscribe by typing your email below and hitting the “Subscribe” button. Do us a small favor and share this blog with anyone you think might benefit from carefully explained tips. We promise to keep your details just between us.

Let us know whether or not you found this post helpful by voting.

Gransplain.com

Teach a Man to Fish…

Give a man a fish, and you feed him for a day. Teach a man to fish, and you feed him for a lifetime.

Unknown

Whether you attribute these words to a Chinese Proverb, Maimonides or a Native American saying, they ring particularly true when it comes to learning modern day technology.

Next time someone tries to help you solve something by grabbing your smartphone off you or asking you to hand over your laptop, ask them instead to show you how. And then do it with your own hands.

Why? Muscle memory is very real. Skill learning and memory is quite different from other forms of memory, such as remembering capitols of the world or key historic dates. A broad range of areas of the brain seem to be responsible for skill memories, including areas in motor cortex, the part of the brain which sends signals to the muscle of the body; the basal ganglia, which is associated with initiation of movement; and the cerebellum, an area at the back of the brain which deals with adaptation.  

In a study, performed in Oxford, healthy adults had MRI scans before and after weeks of juggling training. These scans could detect changes in white matter, grey matter and the primary motor cortex. So quite literally, by practicing new technology hacks on your device, you can train your brain!

Then when you’ve got the hang of a tech trick, why not teach someone else? Teaching both cements your own learning and “feeds” another for a lifetime. Or potentially many, if they in turn teach others…

And on a personal note, today marks the 1-year anniversary of Gransplain. A personal project started in lockdown has kept me on a learning path, fishing for tech tips for myself and others. Thank you for having joined me during this process, and please take a moment to share Gransplain.com with someone you know who could benefit from easier adoption of technology.

How to Call Multiple People at Once on FaceTime

Want to use the conference call or video feature from your Apple device (iPhone or Mac)? It’s super easy to initiate a call with 2 or more people or even add people as needed once you’re mid-conversation.

If you are first looking for the basics of how to use FaceTime to make free audio or video calls, you’ll find this on a previous post here.

Once you’ve got the basics, you’ll be tempted to create a party on your phone, tablet or laptop by dialing in more contacts.

From your iPhone App

  • Open the app
  • Click the + symbol (without a circle around it) in the top-right corner
  • Type in the names or numbers of the people you’d like to talk to. If they’re in your contact list, their names will come up as you type, and you can click on each name to add them to the call. (See below left)
  • You can also click on the circle with a + inside it to open up your contacts list and select people there. Tap their name to open up the contact then tap their number to add them. (See below middle)
  • Tap the green video button to start a video call or the green audio button to start an audio call. (See below right)

Add Someone to an Existing FaceTime Call using the App

  • Tap the screen
  • Swipe up to pull up the menu
  • Tap “Add Person”
  • Tap + symbol to add someone from your contacts, or type in their name or phone number into the bar at the top and select your desired contact from the results
  • Tap “Add Person to FaceTime”

How to Start a FaceTime Call Using your Mac

You can also make FaceTime audio and video calls from your Mac, as long as you’re running macOS Mojave 10.14.3 or later. You’ll need to be logged in using your Apple ID as well.

  • Open up FaceTime
  • In the search bar, type the names, phone numbers, or email addresses of the people you want to speak with.
  • Click the video or audio icon, depending on what kind of call you want to make
  • You’ll have to press the video or audio button in the bottom-left of the screen to start the call
  • This will send the notification to the people you’ve selected. They’ll then need to click on that notification, which will take them to another screen, where they can press the button to join.
  • If the people you’ve contacted aren’t responding and you want to give them a nudge, on the bottom-left corner, click on the button showing a window with a sidebar. This will show you who has been invited to be a part of the call. Press “Ring” to automatically open up the call screen on their phone. They can choose to accept the call from there.

Add Someone to an Existing FaceTime Call using Mac

  • In the lower-left corner of the screen, click the button that looks like a window with a sidebar.
  • Click “Add Person”.
  • Type in the name, number, or email of the person you want to join.
  • Click “Add”.

Why not give it a try now? Imagine the delight when your loved ones get to catch up with not only you, but the other person(s), too!

If you’d like to get more tips like these directly in your email inbox, simply subscribe below. We promise to keep your details just between us.

Gransplain

A “Wayback Machine” for the Web

Ever wish you could somehow “retrieve” a public web page that has since been updated? Like going back via a time machine to see how site pages really were at a specific time in the past…would you believe me if I said this is possible?

It is possible. For some sites and given dates. Want to know the secret? Read on!

What is the Wayback Machine for the Internet?

The Internet Archive Wayback Machine is a service that allows people to visit archived versions of Web sites. Visitors to the Wayback Machine can type in a web address (URL), select a date range, and then begin surfing on an archived (old) version of the web. The Internet Archive Wayback Machine can make all of this possible for millions of websites, and according to their site, over 650 billion web pages!

Why on earth would I want to do that? Well for one, it’s a bit surreal to be able to visit a website just as it was in the past. It really is like virtual time travel. But beyond purely for the experience, there are concrete reasons why you might want to revisit a website exactly as it was in the past. Maybe you want to retrieve a relevant news article that’s been taken down from the media’s servers or perhaps you need to prove that you purchased something under different terms and conditions that those currently in force? Or maybe, like me, you’re miffed that the chatty gossip story you started to read but had to save for later has been taken down the very next day for “privacy concerns”, leaving you with unrequited curiosity as to what had been said about the poor woman whose sister booked her own wedding one week after hers (whaaat?). Whatever your motivations, you can find a previous version of popular public websites in just a few clicks.

How to Access Historical Website Files

Go to https://archive.org/web/. Don’t worry if you can’t remember this address, simply type “Wayback Machine” in your search engine (eg Google), and it should come up first or very near the top of the search results. The home page looks like this:

Type in the website URL in the box at the top (see blue arrow above). Then hit the “Browse History” button to the right of the text box. In my example I typed in mumsnet.com. (As with Google, you do not need to include “www.”) I then get back search results that show me a graph of all the snapshots that have been taken of my chosen site over the years. I can then choose a date for the version I’d like to see (see below, date circled).

Now before I show you the archived version of the site, I’m going to show you the relevant page of the site that’s live right now – where it shows that they’ve taken down the content. See below, first image. And now see the page I was searching for, once I went into the Internet Archive (“Wayback Machine”) and selected the date when the content had been live (see below, 2nd image). Success!

Other Practical Tips on Using the Internet Archive

I have more success when I type the homepage address into the Wayback Machine. If I’m looking for a subpage, I then use the archived (old) homepage to navigate to the page I’m looking for. The archive is not a static snapshot, so this works, although they won’t necessarily have captured every page of every site. For the above example, I put in mumsnet.com and only once it had come up on the selected past date did I then use it to navigate to the section I wanted (in this case “Talk” and then “Am I Being Unreasonable” subsections).

Be patient. It can take a hot minute to load the site pages, so be patient and don’t navigate away from the archive until it’s either brought up your site or told you it’s not available.

If you’re trying to prove a point to someone (eg that something actually did appear a certain way and you weren’t imagining it…), then take a screenshot of the archived page and share it with the disbeliever. If you need a refresher on how to do this, see our past post on how to easily take a screenshot from your computer or your iPhone.

If you learned something new today with this post, let us know with a “thumbs up” below. If you’d like to automatically receive new posts with tips how to use the technology you already own, then subscribe for free by entering your email address below. We promise to keep your details just between us.

Gransplain logo

Easy Picture Edits on Your iPhone (Part 1)

Whether you’re looking to simply crop photos or apply more creative special effects, you’ll find editing pictures on your iPhone is easier than you may have imagined. Let’s review two basics here.

How to Crop Images on Your iPhone

Select the photo or other image you’d like to crop by going into your picture files and selecting the photo. You can go straight into editing this image, but if you’re like me, you may prefer to proceed with an abundance of caution and copy the image first in order to retain the original “just in case” because once you hit “Done”, you’re stuck with the amended image.

If you’d like to retain the original and have a go on a copy, select the “upload” button 
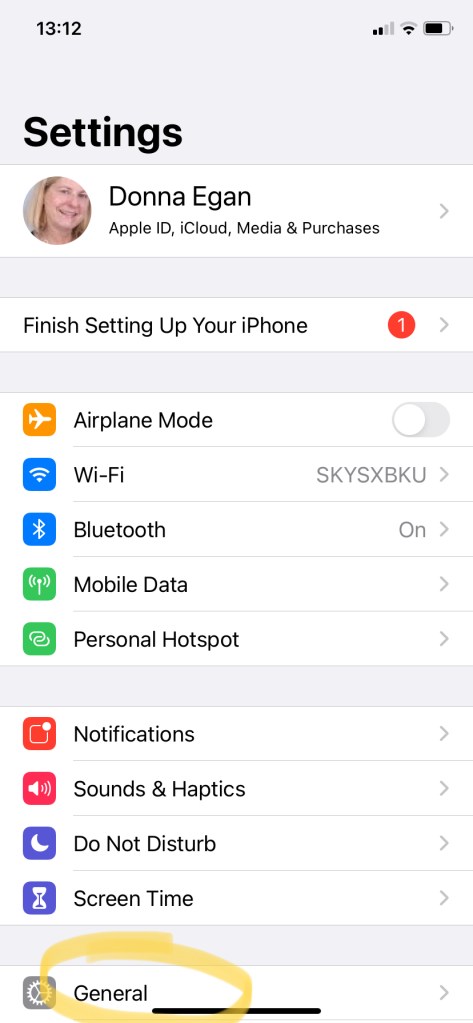
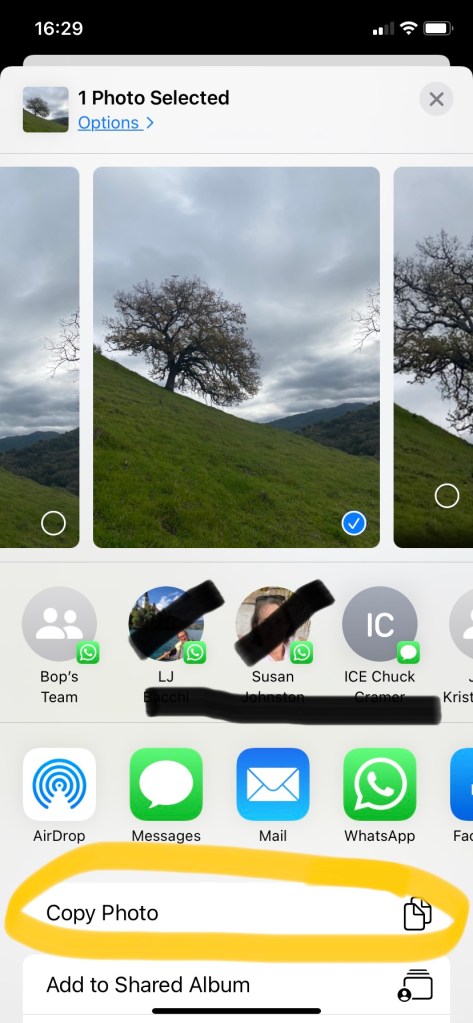
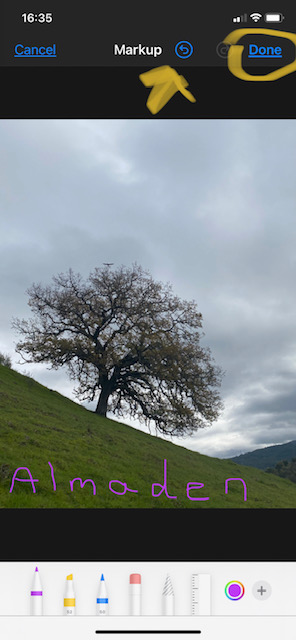
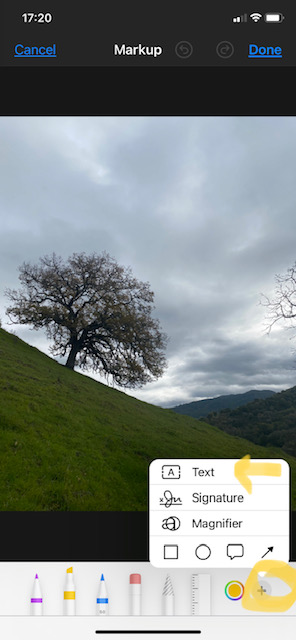
and choose “Copy Photo” (see below, names blotted out to protect my innocent frequent contacts). Now you can carry on with changes on the open picture.

Choose “Edit” (see below, left, circled). This will open up a number of options from magic wands to ying & yang icons. For now we’ll concentrate on cropping, so choose the crop icon (circled, below right).

Tapping the crop symbol will add moveable borders to all edges and corners of your image (see below, with arrows top and bottom). Simply slide the desired border or corner with a finger until you achieve the desired crop. Don’t worry, at this stage you can simply move it again if you didn’t get it right the first try. For this demonstration we’ll cut out the branches of the tree on the right as well as some of the grassy area.

Once you’re happy with the cropping, you can tap “Done”. If cropping is the only change you’d like to make, you truly are done, and when you view, access or share the photo, it will be the cropped version. If, however, you have a change of heart, instead of “Done”, you can start over by choosing “Reset” highlighted in yellow text at the top of your screen. See below.

How to Add Hand-Written Text to Your Image

In addition to or instead of cropping, you may want to make other adjustments to your image. Here, we’ll look at adding text, and we’ll show you other edits in a later post (so be sure to subscribe at the end of this post so as not to miss those). To add text, choose the ellipsis (three dots) in the top right corner when in Edit mode (see below left, circled). This will bring up the (for now, only) option called “Markup”, see below right.

Once you tap “Markup” a set of pen and eraser options will appear at the bottom of your screen (below, left). The default one will be shown as raised slightly above the other options. To change the option, simply tap a different one. Tapping the one already raised will instead bring up options in terms of thickness/intensity of that chosen marker. To change the color of the chosen marker, tap the color circle (see below, right).

This will bring up a lovely palette of color choices from which to choose (below, left). Once you’ve made your choice (we love purple!), that color will appear both on the pen nib as well as in the circle (below, right).

To add hand-written text, simply start writing using your finger or a stylus. You can undo (inevitable) mistakes by tapping the “undo or back-up” button once or multiple times in succession (see yellow arrow below). Once you’re happy, hit “Done” (circled below).

Adding Typed Text to Images on iPhone

If you find it frustrating to try to write neatly with a finger or stylus, the ability to add typed text is just another tap away! Next to the circle indicating which color is selected, you’ll find a “+” in another circle. Tap this to bring up a menu and choose “Text” option (see below, left). This will add a default small text box in the middle of the image that says, well, “Text” (below, right).

Now you can easily move and edit this text box. I prefer to move it first so that I can then choose a color and font size accordingly. To select a color, tap the palette (circled, below left). Guess which color we chose? That’s right, still purple! Presuming your desired message is not “Text”, tap the word to bring up the edit menu (see below, right).

This will bring up a keyboard below the image (see below, left). Type in your desired text. Next, choose your desired size font by tapping the circle with two “A’s” (below, right), and slide your finger along the scale. Here you can also change the font and centering. Don’t worry about the text being too big for the current sized text box as we’ll adjust that next.

To adjust the size of the text box to accommodate a larger chosen font, simply drag the edge out until it fits in the number of lines desired. See our finished product below. Tap the “Done” button at bottom right of screen. And now your edited image is saved and ready to share. If you need a refresher how to share images by text or other messaging app, see our recent post here. Or if you’re looking instead to attach your masterpiece to an email, you can find those easy instructions here.

Curious what those other Edit symbols do? Be sure to subscribe (for free) to Gransplain so as not to miss future posts on other useful and fun edits you can make to your iPhone photos.

If you know anyone who might benefit from these tips, be sure to share with them. You can do this by double-clicking the web address bar at the top of your screen, then right clicking to select “Save” then going to an email or text message and right clicking again to “Paste”. Then hit “Send”.

Gransplain

How to Delete a Text Message

If you’ve written a text message that won’t send for some reason (perhaps there’s no connectivity), it can be annoying if it goes out later once there is a connection but perhaps the message now doesn’t make sense. If you no longer want a message to go out, you can delete it. This is also the case for any existing message (read or not) you no longer want in your conversation string for any reason. The process is simple but not always very intuitive. Read on to see how easy it is once you know the steps.

  1. Open Messages.
  2. Locate the conversation that has the message you want to delete then tap on it to open.
  3. Touch and hold the singe message you want to delete.
  4. Tap the trash can (if shown) to delete the message. If no trash can is shown, tap “More…” See below, circled, left. Then tap Trash can (below middle).

5. Tap “Delete Message” to confirm (see above, right).

That’s it. Simple. You’ll be much more likely to remember this if you try it out now. Just choose a message that you don’t mind losing!

Don’t miss future tips by subscribing now for free. Simply add your email address below and hit the “Subscribe” button, and we promise to keep your details just between us.

Record and Share Voice Memos

There may be times when something important is being said to you, and you know you cannot take notes fast enough to capture the important points. A medical appointment is a good example. Using the voice recordings app that comes pre-loaded on your iPhone, you can easily capture the conversation without sacrificing active listening. This will also allow you to share the recording in a message or email.

A family member was recently hospitalized with up to 6 different specialist doctors assessing him per day. Each visit was just a few minutes and full of technical terms and numeric values like white blood cells and hemoglobin, heart rhythm, blood pressure, etc. not to mention lots of complicated drug names. It would have been impossible to capture and share with other interested parties (including the assigned nurse who was often tending other patients) without the ability to record the conversation and indicated actions and share immediately with other decision makers.

Even with a planned medical visit, it can make the process much less stressful if you know you can re-listen to the assessment later on so you can fully focus on answering and asking relevant questions instead of trying to capture notes. Let’s take a look at the easy steps to record, save and share a voice memo.

How to Make Voice Recordings on your iPhone

Before starting, it’s always advisable to ask permission from the person you will be recording. If you tell them why and how you will be using it, you’re more likely to get their agreement. Of course, there may be rare occasions where it’s not possible or appropriate to ask permission (you’re part of a large audience or someone is being verbally abusive), but with practice it’s really easy to record unobtrusively even.

Look for the Voice Memos icon as shown below, left as well as circled on the home screen, right.

Tap once to open, and you should see a screen with the names of any recordings you’ve already made as well as the red record button at the bottom. See it circled below. Tap this button once to start recording, and you’ll see the audio bars move. Tap the same button again to pause. You’ll then be given the chance to either tap it a third time to resume recording or tap “Done” to save the recording as is.

Once you’ve finished recording, the app will take you back to the list of your prior recordings with the one you just made at the top. It is now saved in your voice memo files, and the default name will be “New Recording 1” (or whichever number of recording you’re on). To customize the file name, simply tap on the title and the keyboard will appear at the bottom of the screen, see below left. Once you’re finished typing in your choice of title, simply hit the “return” button on the keyboard and the new title will replace the default. See below right.

Listening to Your Recordings

Highlight the recording you would like to review. The latest one should be at the top. This is very intuitive in that the play button is the standard triangle. You can also rewind or fast forward 15 seconds at a time by using the appropriate circles with arrows indicating the direction. These can be tapped multiple times at once to skip 30, 45, 60 seconds at a time or more. You can also send the recording to trash if you don’t need it.

How to Share Voice Recordings

To share your voice recordings, go to the desired file and tap the ellipsis (three dots) on the left under the file name. See below, left. This will bring up several options including sharing the file. It’s here that you can also edit it, for example, cutting out any irrelevant parts before sharing. We can cover that in another post, and for now we’ll skip right to the part where you can share this recording with others. Choose the share icon. (See below, right).

This will bring up the usual options where you can share the file. Remember that an advantage of sharing via WhatsApp is that all messages are encrypted, and you may appreciate the added security if you are sharing private medical information. WhatsApp will also be free. As mentioned in a previous post, sending files via text may or may not be free, depending on your service provider and package. We’ll use WhatsApp in this demonstration. You’ll see it appear in the options (below, left). Once you select it, find your recipient in the list. Once you tap them, the circle next to their name (or chat group name) will turn blue. The voice memo file will appear; look for the Send command in the top right (see below, right).

The file will have sent. You can open your WhatsApp program to verify. Unfortunately, the filename won’t appear, so you may want to add some context by including a note in the chat. Of course, you can do this before sending the voice memo if you wish.

Now that you know recording and sharing voice memos is super easy, you may want to use this for all sorts of situations like sending someone a recorded birthday message (with or without a song!). If you found this helpful, be sure to share with friends or family, and give us a “thumbs up” below.

So as not to miss a future post, be sure to subscribe for free below. We promise to keep your information just between us.

Gransplain

How to Get Started on Facebook

Like all forms of social media, Facebook (“FB”) can be a really good thing as much as it can be an unhealthy thing. On the positive side, it’s one of the easiest ways to stay connected to your friends and family. Due to their busy schedules, many people prefer to give regular quick updates, usually with pictures! So you can benefit from more and more frequent updates on your great nieces and nephews, lifelong friends on their travels, cute family pets and more.

Of course, you may have to wade through some artfully styled but still boring pictures of chile con carne or lemon sole with sugar snap peas, but the good news is that over time Facebook’s algorithm (computer programming) will show you more of what you interact with and less of the ones you don’t appreciate so much. More on that later. First if you don’t already have an account, here’s how you get started in a few easy steps. And if you’re already a firm fan of FB but know someone with whom you’d like to connect but they need help getting started, why not share this post with them?

How to create a Facebook personal account:

  1. Go to facebook.com/reg
  2. Enter the name you go by in everyday life. Unlike when you set up a new email address, you do not need to keep searching until you find an unused name (eg “SusanJonesTheDragon5521@gmail.com”). “Susan Jones” will do.
  3. Enter your email or mobile phone number. Double check you’ve typed it correctly before going to the next step because this is how you are going to link that name to you and not the other Susan Jones in Timbuktu.
  4. Select your gender and date of birth, and choose a password.
  5. Write down the password!! OK, this isn’t part of the official instructions, but I’m telling you as a friend who wants to save you lots of frustration later when you forget what you swore you’d never forget… Either do this where you keep other passwords or start a new entry on the Notes app that comes standard with your smartphone. (Later if you forget, you can go to Notes and type in “Facebook” in the search bar and the note where you wrote “Facebook pw”, or similar, will come up!)
  6. Tap “Sign Up”.
  7. To finish creating your account, you still just need to confirm your email or mobile phone number. You should not close the Facebook tab in order to open your email. Simply go to the other tab where your email is already open or open a new tab in order to open your email without closing FB. If you need a refresher how to open new tabs in Chrome, you’ll find that on an earlier post here. Open the email from FB and tap the button/link to confirm it’s really you/your email. And voila!

Keeping Control of Who Sees Your Posts

Notice I put this step right after opening your account rather than as a footnote. Why? Because you want to share your news and photos with your friends and family and not with random strangers or worse, scam artists. So do yourself a favor and set your security controls now.

Here’s how when using a computer:

  • On any Facebook page, click the (down arrow) or ellipsis (three horizontal dots) at the top right of the screen and select “Settings” or “Profile and Tagging Settings” then choose your desired “Privacy” setting on the left side of the screen.
  • In the “Your Activity” section, find “Who can see your future posts?” and click on “Edit”. See image below.
  • Use the drop-down menu to choose who can see your posts: the public (in other words, everyone), just your Facebook friends, some of your Facebook friends should see them or not see them (you can choose who), or just you (although why keep these to yourself?). Keep in mind that you can also change this setting for any individual post by looking for the “News Feed” line just below the “Create Post” box and clicking on the drop-down menu. I tend to keep my life simple and allow only friends (not the general public) to see any of my posts. I’ve never hidden posts from certain friends, but I could see how that could come in handy if you use FB to plan a surprise for someone with other friends.
  • Some advanced stuff: this is also the place where you can review each of the posts you’ve been tagged in (“named and shamed”) by other people, and choose whether to hide them. You can also go back in time to limit past posts so that they can now only be seen by friends.

Here’s how when using your smartphone or tablet:

  • On any Facebook page, find the settings icon . If you don’t see it, tap the ellipsis (three dots) on the lower right of the screen (on an iPhone) or the upper right (on an Android).
  • You can make the same choices as above. See below the screenshots of what this looks like on iPhone:

How to Find Friends

It’s easy to get started. Go to News feed and in the top left corner you should see “Search Facebook”. See image below.

Type in the names of your friends or family members (one at a time), using their everyday name. Some women include their maiden and married names in order to be more easily found, so if they have a less common maiden name, try that first. As FB is so popular, unless the person’s everyday name is very original, you will likely get several search results to look through.

To their credit, FB helps by showing you matches they think will be more likely to be the person you’re looking for based on both your profiles, including location. Once you have added a number of friends, if the person you’re looking to now add is friends with someone you’re friends with, FB will show their profile first. Much easier. If your eyes work better than mine maybe you can tell just from the tiny profile picture shown, great!

Otherwise you may have to do a little sleuthing and open the profiles one by one to look at their “About” information and/or recent photos to be sure you’re about to invite the right person to connect with you. For everyone’s security, FB won’t automatically connect you once you find the friend you’re looking for. Instead they will send that person a “Friend Request” that they can then approve or ignore. Be patient as not everyone checks their FB notifications frequently. I’ve had requests approved even months after sending them.

Likewise be sure to check your notifications when you log onto FB as the algorithm (computer program) will start to “suggest” you as a potential connection to people in your network (friends in common, same high school and graduation year, etc.), and they may send you a request to approve (or ignore, if it’s someone who was annoying then and probably still is today…)

Basics to Start Posting

Whether accessing FB on your smartphone or computer, right under your profile picture, you should see a box that says “What’s on your mind?” This is where you can start a new post with words, picture(s) or both. If you do not see that box, go to the News Feed – look for the house icon, and it should then be at the top of the screen. In future Gransplain blogposts, we’ll provide more tips on how to engage people with your posts (where they react and comment), but for now why not try out a few posts and see how you get on?

Troubleshooting (Just in Case….)

Here are some links to Facebook’s Help Center if you’re having problems logging in:

If you found this useful, please let us know with a “thumbs up”. And if you’d like to get future posts on using Facebook and other ways to get the most out of the tech you already own, be sure to subscribe for free by adding your email address and hitting “Subscribe”.