Video chat is useful in many ways beyond a social catch-up or the obvious business meeting. Because it eliminates the time and cost of transport while lowering any “disruption” an in-person visit might bring, video chat programs enable you to make a more frequent and greater impact on those you care about.
You may have already thought about ways you could help others by connecting remotely. Below are a few additional ideas. But first, if you’ve not yet got the hang of video chatting, here is a previous post on 3 easy steps to using FaceTime. Or if you prefer Zoom, you can get started in 5 minutes by following these steps.
How Can I Help?
Do you have a niece, nephew or grandchild who would enjoy a cooking lesson? You could walk them through how you make your famous chocolate chip cookies. Or if you want to take on a bit more and your student chef is mature enough, you could organize ahead so that they have available ingredients needed to prepare dinner for their household by following your steps. Much easier than a recorded online video in order for them to follow your instructions and see your example while also being able to have the “head chef” (you) check their progress. Moreover spending time with you in this way will be an experience they will long remember.
Speaking of students… is there a subject you’re strong in that could help out a pupil? Being available for them to ask questions and check progress can be invaluable for both the student and the busy parent. Many children benefit from having an “accountability partner” so they feel supported should they get stuck or simply to get them started on their tasks. Even if you’re stumped by “new Math”, they may profit from you supporting them to lay out the work to be done, helping them decide the order and time to devote to each piece of work and checking in with them at key stages.
For years people have played chess by phone or even snail mail. Why not try playing a card or board game over video chat? This can be an especially welcome treat for anyone who is housebound, whether due to ill health or foul weather. You’ll need to ensure you each have the same board game to hand and move both your own and their game pieces with each turn. Or choose a card game which allows you to each draw from your own deck. If you prefer jigsaw puzzles, having a companion to chat with makes it extra fun whether you’re working on the same version or different ones.
Whatever makes sense for you, planning an activity over video chat can take the pressure off both parties in thinking up new conversation topics and feeling like you’re putting tasks on hold to have a conversation. You will both likely find it more rewarding and keen to schedule the next session soon.
Thanks for reading. If you’d like to follow the blog to learn more tips on using the technology you already have, subscribe for free below by entering your email and hitting the Subscribe button.
Whether you’re looking to attach a photo to a text message or use another messaging app like Whatsapp or Facebook Messenger, adding a picture is easy. Here we’ll review the simple steps as well as help with troubleshooting just in case.
Adding a Photo to a Text Message
The first thing to do is decide if using text to send photos is the best option for you. Most, if not all, mobile phone service providers charge handsomely when you attach media, including photos. Depending on your phone’s operating system and the person(s)’ you’re messaging, your supplier may automatically convert text messages into MMS (multi-media messaging service), along with a hefty charge. As service charges vary, you’ll need to check with your supplier about any charges that apply to your plan.
Let’s look at situations when you are apt to get your text converted to a MMS, along with an extra charge:
You are not using iMessage and
your text includes a photograph, emoticon, GIF, video or sound clip.
your text is long, generally more than 160 characters. (Now you know why young people generally send lots of short texts about one subject rather than one long text.)
You use iPhone Messages but send a text to a non-iPhone user.
You send a text to an email address.
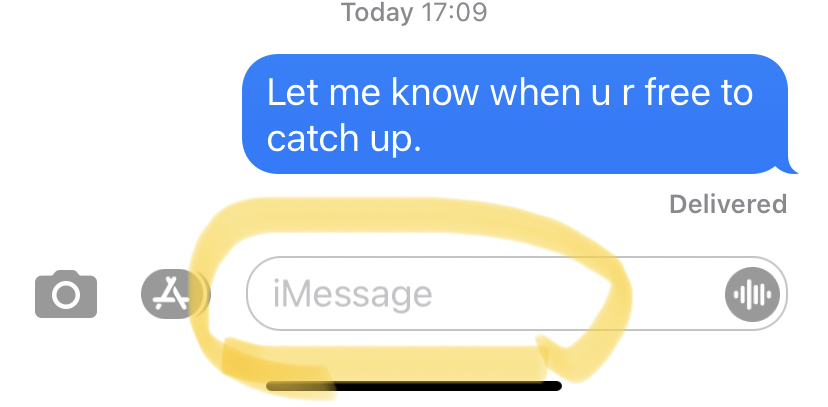
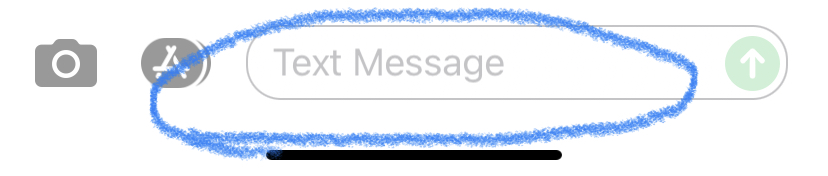
If you’re using an iPhone, you can first check if your recipient is as well, in which case when you send them a text, even one with a photo, it will use the default iMessage, which is a free iPhone-to-iPhone user service. How do you know?
Tap on your text app to open. Find your intended recipient and open the conversation string with them. Check at the bottom whether the blank message says “iMessage” (see below, left) in which case you will be using the free service. Or alternatively “Text Message” (see below, right), which would probably engender an extra charge added to your bill. Don’t worry, in the next section, we review how to use a free messaging service instead. If you do not have an existing chat history with your intended recipient, then you’ll need to either check with them if they are using an iPhone or you can use a different messaging service (eg Whatsapp, Messenger).
Starting in the text conversation string
Once you’re fine to go ahead, you can opt to start in the chat string with the recipient by tapping the camera icon (see to the far left of the yellow circle above). This will open your camera in preparation to take a new photo. If this is what you want to do, go ahead and take the desired photo. You’ll have the option to edit that if you wish. Once you’re happy with it, tap the “up arrow” in the blue circle, see below circled. This will load the photo and send the text automatically. See below right.
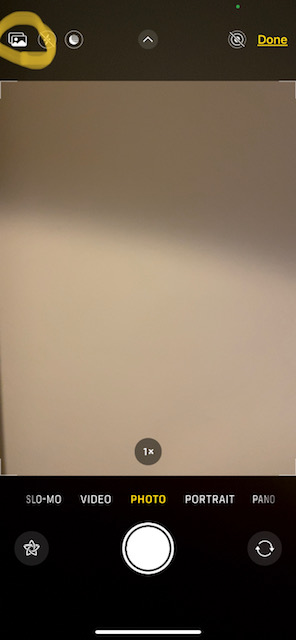
If you’re looking instead to attach an existing photo you have in your gallery (ie taken previously, downloaded or received from someone else), then after hitting the camera icon as above, instead of hitting the shutter, look for the photo gallery icon in the upper left corner of the screen. See below, left, circled in yellow. This will open your collection of saved images, and you can select the one or multiple ones you want to attach by tapping them. (If you don’t see the ones you want, swipe left until it appears. A blue tick box will appear in the lower right corner of the image(s) selected (see below, right).
Then simply close photos by tapping the “X” in the upper right corner. This will bring you back to your text message, where you will be prompted to add a comment (optional) or simply tap the “up arrow” to send. If you’ve attached the wrong photo, simply tap the small “x” in the upper right corner of that image to un-include it before sending.
Starting in your Pictures
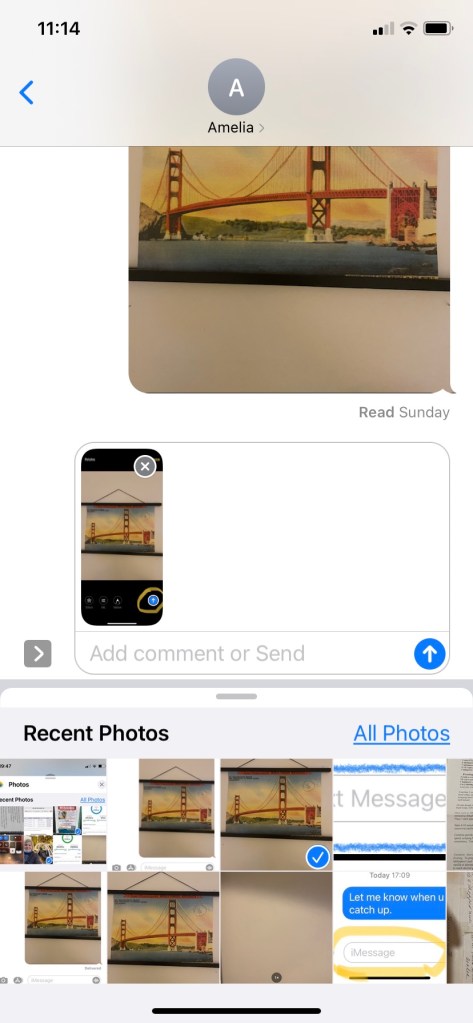
It’s often easier to start the process of sending photos by starting in the photo gallery or immediately after taking a picture. Why? Because they’re larger so it’s easier to identify which ones you want to share. This is super easy and starts off the same way as attaching pictures to an email, which we covered in an earlier post. If you’ve just taken the picture, tap the small image that is still sitting in the lower left corner of your screen. If it is no longer there, you can find it (and any others) in your photo gallery. Once you’ve selected the first shot you’d like to share, tap it and then tap the upload icon in the lower left corner. If you want to select multiple images to send in one go, you must still start by tapping the upload icon, and only then will you be given the chance to add other pictures. Tap any others you wish (scroll or gently swipe to the side to see more images), and you should see a blue tick box in the lower right corner of the ones you’ve selected. If you’ve made a mistake, simply tick that one again to de-select it. Once you’ve got all those you wish to share then you will select the mode in which you wish to send them. Your choices are found below the gallery. See an example below.
Directly below your gallery, you may be shown your recently or frequently used connections (circled in blue below). If you’re sending to one of those options, this will be quicker to tap it. Otherwise first choose the mode or platform you want to use (circled in yellow, scroll to the right if it’s not displayed) to open up the chosen app, then choose your recipient from within that app. If you don’t find your recipient, you will first have to go back to add them to your contacts within that app before returning and re-selecting pictures to send.
Once you’ve chosen your preferred communications app, eg Whatsapp, you’ll be shown a list of your contacts (individuals and groups), with the most frequently used ones at the top. You can scroll down to find your desired recipient(s) or alternatively start typing their name in the search box at the very top. Tap your choice, and you will see your picture along with an optional message box where you can add a message (as below):
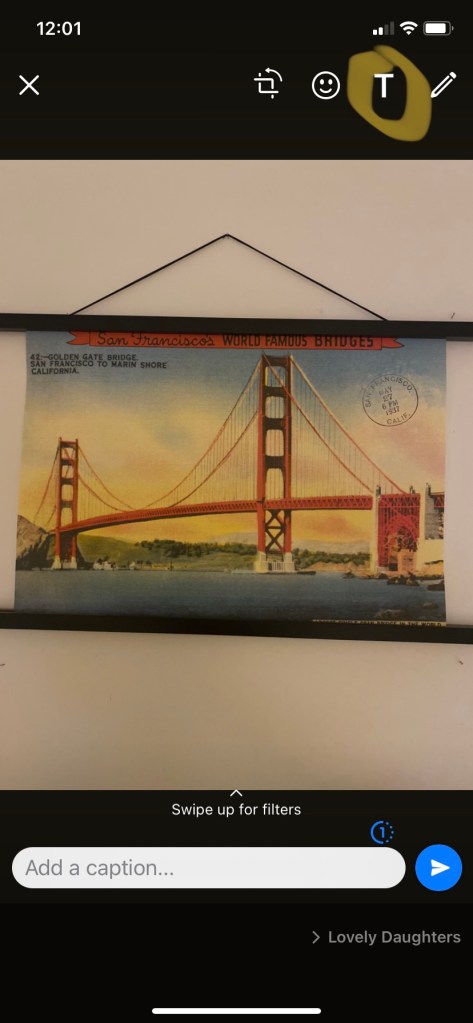
If you prefer to customize your picture, you can add typed or hand-written text as well as emojis. See “T” for typed text, circled above in yellow. This will bring up a cursor onto the middle of your image as well as a color scale. Choose your color and start typing (see below left). Don’t worry, you’ll have the opportunity to move the message off the middle of the image after you’ve finished typing it! To do so, select and drag it elsewhere on the image. Add any emoji if desired and then you can move it after it pops onto your image again by dragging. You can also rotate your image by selecting the icon to the left of the emoji icon. You can undo any mistake by tapping the “back arrow” as many times as necessary. See finished message below right.
Starting in your messaging app
Sometimes you may be in the middle of a conversation via your messaging app, and you want to include an image. Simply choose the camera icon to the side of the blank chat box. This will bring up your camera (and a few of the very recent pics). As before, if instead you want to attach an existing photo, tap the gallery icon in the lower left corner (appearance may vary depending on the app, but you get the idea) to bring up your picture collection. Proceed as before selecting and uploading.
As with any new skill, the best thing to do is practice to build muscle memory. Why not have a try now? Soon this will be second nature and you won’t have to think at all to access and share your pictures via messaging.
Let us know what you thought about this post with a thumbs up (or down).
If you’d like to automatically receive our new posts each week, simply subscribe for free by entering your email address below and hitting the Subscribe button. We promise to keep your information just between us.
In another life maybe I’ll come back as clever as a designer working at Apple, but for now I’ll try to make myself useful by explaining the brilliant features they’ve included in the design.
Light up in one tap from your locked home screen
When your screen is locked or showing your screensaver, you can still find your flashlight or torch by tapping the icon on the lower left corner of the screen. See yellow circled image below. If the screen is black, first simply tap anywhere on the screen to bring up your screensaver and the flashlight icon. I have found that I need to give a bit more than a “tap” but less than a “press” in order to engage/disengage the light. Something of a tap that lasts a fraction of a second longer than a normal one. You’ll see the circle enlarge momentarily and feel a slight vibration as you toggle the light on or off. Easy peasy.
Illuminate from your quick menu
If your screen is unlocked (you can see your menu of apps), it’s still easy to access your flashlight. It only requires one swipe + one tap. First access your quick menu by swiping downward from the far right corner of your screen (see below left, yellow arrow). This will bring up your quick menu (see icon circled in yellow, below right). As before simply give the icon a meaningful tap.
If you don’t find your flashlight torch on your quick menu, you can add it by following the steps outlined in last week’s post.
That’s it! This post was nearly as quick as finding your light. If you enjoyed it, please let us know with a “Like”.
If you’re not already a subscriber, do so for free and get each week’s tip into your mailbox automatically. And we’ll keep your information just between us.
Ever find yourself trying to read the small print on a menu or label and find you don’t have your reading glasses with you? Your iPhone can serve as a handy magnifier, enlarging the detail of whatever it is you need to see. Here we’ll show you how to access this feature more quickly than you could fish out your glasses even if you did have them with you!
Adding Magnifier to your shortcut menu
What is your shortcut or quick menu anyhow? It’s the subset of features included in your iPhone which you can quickly access when you swipe downward, starting from the top right corner of your screen. See image below, with the magnifier feature circled at bottom.
What if the magnifier is not already amongst the icons on your shortcut menu? No problem, you can add it with just a few simple steps….
Open Settings. Tap Accessibility (see first image below left, circled). Then find Magnifier (see below right, circled) and tap to select.
Toggle Magnifier on (see image below).
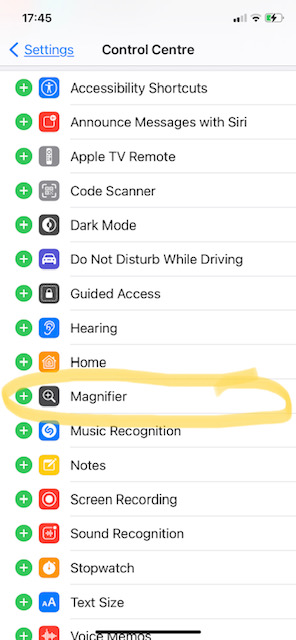
Once it’s on, go back to Settings and find and tap Control Centre (below left, circled). This will show you which features are already in your “Included Controls” ie already in your quick menu. You will find these at the top of the screen and indicated with a “- “sign meaning you can “un-include” them if you wish and which are not (found below, and marked with a + in a green circle, indicating it is not yet added but we are able to add by tapping the “+”.)
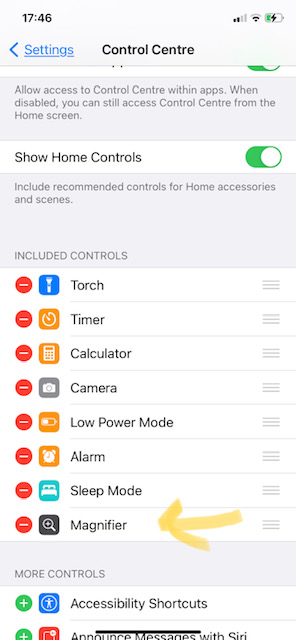
After we tap the “+” to add Magnifier, the Control Centre list will look like the below, and Magnifier will now be accessible in your shortcuts menu!
Accessing Magnifier once it’s added to shortcuts
Once it’s included in your shortcuts, you can either:
access it from anywhere by quickly clicking the Home button three times. The Home button is the raised button on the right side (edge) of the phone.
or simply swipe downward from the top right corner of the screen and tap the magnifier icon.
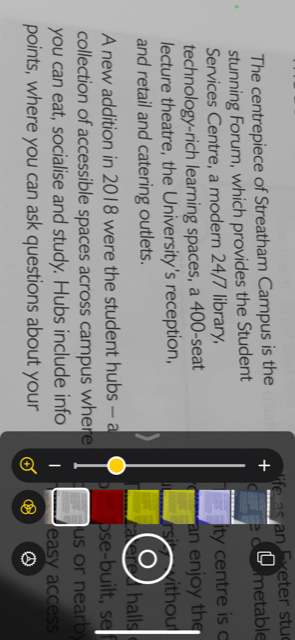
When your Magnifier is open, you can adjust the level of magnification by sliding the yellow dot to the right to increase it. See image below:
You will notice below the sliding bar, there are also several other buttons you can tap to customize how your chosen text appears on your screen. Perhaps the handiest tool to find here is the flashlight or torch, which unsurprisingly, turns on your flashlight at the same time as magnifying.
The half circle icon provides contrast and the three interlocking circles icon gives you several options with filters. You may find text easier to read with a different color filter. Here is what this looks like, with the basic screen on the left vs. applying a yellow background or reverse print. Other combinations are at your fingertips.
Cheats’ Method to Magnifying
Finally, this topic wouldn’t be complete without mentioning that you can always magnify what you need to see by opening your camera icon and using pinch zoom (touching your screen with two fingers and moving them further apart from one another) to magnify your subject. Of course this hack doesn’t allow easy access to the other features like flashlight, and it can be a bit harder to regulate the amount of magnification you prefer without the sliding scale of the Magnifier tool.
Whichever method you choose, as long as your smartphone is to hand, you’ve got a handy way to read small print even without glasses.
Let us know what you thought of this post by giving us a thumbs up or down.
If you’d like to receive future posts with simple instructions on getting more use out of your smartphone and other everyday technology, simply subscribe for free by putting in your email below and hitting the Subscribe button. We promise to keep your details just between us.
Today we’re taking a look at the top 10 of the top 20 influences on enjoying a happy, long life. If you missed the first two instalments, you can find them here and here. The top 10 are pretty straightforward, so we can easily cover them in one post.
10 – Drink More Water
The human body is made up of between 55 and 75 per cent water, and is in need of constant replenishment. Most people don’t get the recommended intake per day. Most people don’t even realize what’s appropriate for them and rely on feeling thirsty, which is not a good way to gauge. It’s important to get the right intake of water as this will greatly enhance digestion‚ nutrient absorption‚ detoxification, skin hydration‚ and many other aspects of better health. I’ve been inclined to drink even as I write this.
You can calculate the right amount for your body weight and activity level by using an online calculator, like the one here. Then you can use either a larger container with markings (mine shows me the time of day I should reach each marking – super motivating to get sipping!) or measure your favorite container and keep track of how many refills are needed. And remember, wine and other alcohol doesn’t count toward your water intake and can actually leave your body more dehydrated.
9 – Monitor Your Bowel Habits
Just when you thought there was at least one area without an app for it, you have to think again! Here is a list of 5 apps to help you keep track of your habits. Even if you don’t use technology here, do remember any noteworthy change in bowel habits such as an increase in constipation, or passing blood should be referred to a doctor immediately. It could be something simple like hemorrhoids, but you don’t want to bet your life to save some potential awkwardness.
8 – Have Regular Smears or Prostate Check-Ups
Cervical screening prevents thousands of deaths each year. Prostate cancer is one of the most common forms of cancer in men and is second only to lung cancer as the biggest cancer killer. However you prefer to book your appointment, with a phone or a booking platform, just book (and keep) your appointment.
7 – Regular Self-Examinations
For women this means regularly examining their breasts; males should regularly check their testicles for lumps. It is important to report any changes, such as a lump, to your doctor. More often than not, lumps prove to be benign, and these types of cancer are usually curable if they’re caught early enough. If you’re not sure what to look for, the Mayo Clinic site has good overviews for breast screening here and testicular screening here.
6- Drink Red Wine
Now that we’ve made it through the awkward part, we can head back to the fun parts of enjoying a long and happy life…. It seems that the research keeps changing regarding the benefits and harms of drinking. However recent studies show that drinking around one glass of red wine a day may have health benefits by protecting against certain cancers and heart disease, and can have a positive effect on cholesterol levels and blood pressure. Excessive or binge drinking, however, unfortunately doesn’t produce the same benefits. Nor do other alcoholic beverages. Although they can make you happy… Given you want to make that one glass count, you can make use of plenty of online review sites to see how other consumers and or experts have rated the bottle you’re considering. And there’s a nifty contraption called coravin that lets you extract as much or as little wine from a bottle with a cork without exposing it to air and thus starting the degradation process. It’s pricey, but when you consider over time the wine that won’t go to waste, it might be well worth it. You can find it here.
5 – Drink Tea
As much as we’d prefer to read that we should drink more coffee, deep down we know that’s not the case. But recent research studies reveal the antioxidants in tea (black or green tea) may inhibit the growth of cancer cells, support dental health, increase bone density and strengthen cardiovascular systems. According to a study published in Circulation: The Journal of the American Heart Association, heart attack patients who were tea drinkers decreased their risk of death by up to 44 per cent, as compared to non-tea drinkers. Beyond review sites, there’s very little here that tech can help with. It’s good enough to just put the kettle on!
4 – Boost your Sex Life
Having sex between three to four times a week is thought to reduce the risk of having a heart attack or stroke in half. During sex, the average person maintains their heart rate above 70 per cent of the maximum, and sex reduces stress, leads to greater contentment and better sleep. We’ll leave it to your own judgment how technology could help you in this regard, but if you are looking for a romantic partner, see tip # 18 here.
3 – Eat more Garlic
At this point you may be suspicious, like I am, that the order of these top tips isn’t necessarily scientifically ranked, but the evidence is clear that eating garlic is good for your health. This, along with lots of veg and fruit, is part of what’s knows as the “Mediterranean diet”. Garlic is sometimes even referred to as ‘nature’s antibiotic’. Regularly consuming it promotes a healthy heart and circulation by lowering blood pressure and cholesterol. It also helps fight infection and can boost immunity. There is strong evidence to suggest that garlic helps with the prevention of cancers of the digestive system, including the esophagus, stomach, colon and rectum. Those who don’t like the taste of garlic should try the odorless supplements that are available. Technology can help again by providing almost limitless access to free recipes. Simply try searching for “recipes with garlic” or similar.
2 – Adjust your Sleep Time
Did you know that life expectancy may be reduced by sleeping more than eight hours a night? Tell that to the teen in your life! A study found that people who get between six to seven hours sleep a night live longer than those who sleep eight hours or more, or less than four hours. Here technology can help in spades! Your smartphone likely already has an app included that when activated can track the time spent asleep. Your smartphone can also serve a gentle reminder when it’s time to shut off notifications, start winding down and eventually head to bed. There are apps you can install (many paid for) that can help you with relaxation either through guided meditation or by listening to a bedtime story read in dulcet tones (sometimes by your favorite actor even!). Many apps like Calm will offer a free trial.
1 – Laugh More
So laughter really is “the best medicine”, as the saying goes! Laughing appears to boost the blood flow by more than 20 per cent and researchers say it may reduce the risk of developing heart disease. Laughing has been found to help fight infections, ease pain, relieve hay fever, and even help control diabetes. And the positive effect of laughing is thought to last around 30 to 45 minutes! However, while children laugh on average 300 times per day, adults laugh fewer than 20 times in the same period.
How can we use technology to get more laughter in? Short of buying a tickling machine, we can use the suggestions made earlier to use technology like messaging or video calling apps to connect more frequently with our friends and family. Particularly those who make us laugh. If your circle isn’t very funny, you can always take a page from teens’ habits and check out TikTok or YouTube for funny videos. Or ask Siri (Apple’s voice command) or Alexa (Amazon’s) to tell you a joke. These are hit or miss, but they do change every day.
The original article which we’ve adapted to include technology is available here.
Never miss a post how technology can make your life easier and happier (and hopefully longer) by subscribing for free here:
Stuck for gift ideas for friends and family? Or want to avoid being gifted yet another pair of novelty socks? Here you’ll find ideas for gifts fitting nearly any budget that will help you get the most out of technology already owned.
Untether Yourself from Your Charger Outlet
Stay productive while you charge your smartphone battery. Ever find you have to choose between charging your phone which is on low battery and actually using it? I used to charge up my iPhone in one of two usual places but found I constantly needed to use it to look something up or send a quick text. So I had to traipse several times to where the plug was in order to make quick use of the phone.
I don’t want to exaggerate the difference these long charger cables have made to my productivity and sanity, but they really are worth their weight in gold. And the best part is, they are super economical. Plus they work with the wall plug that came with your phone as well as being able to charge from your laptop. The link above will show you the 10ft/3m versions, and there is also a slightly shorter version (6.6ft/2m) you can find here. If your recipient uses an Android phone, here’s a highly-recommended alternative. Either way, for the price of a stocking stuffer, you’ll have 3 long cables and the freedom to charge your smartphone from almost anywhere in your home or work.
Because they are different in appearance to the standard issue cable that came with the smartphone, in my case, this has been an added advantage as it circumvents arguments with family members over whose cable it is. So “they” (the teens) can’t justify mistaken identity and take it for walkies.
Put Yourself in the Best Light
If you thought ring lights were only for Instagram influencers, think again! With FaceTime, Zoom and other video chats becoming the norm even for social calls, having access to a ring light is indispensable, especially if the calls take place after dusk. I’m sure you’ve experienced the situation where either the person you’re chatting with or you yourself look like a suspect lying in wait in a dark alley. Or whose glasses frames have now cast a strange pattern on their face due to the up or downlighting. Well no more with the simple addition of a ring light.
Unless you are looking to become the next influencer sensation, there’s no need to invest eye-watering sums on the kit either. You can find a ring light perfectly fit for purpose for less than $50/£30. You’ll want to look for one that offers height adjustment and grips the smartphone. Even better if it offers brightness options, as I’ve found it makes a big difference depending on the natural or overhead lighting in making you look blue or yellow vs. having a healthy glow. They plug conveniently into your laptop or you can use your standard issue wall outlet charger. Here is one I’ve been happily using for over a year. If you’re happy to invest a bit more, here’s an alternative with more color options.
Turn your TV into the “Big Screen” with Chromecast
When my daughter unplugged this little piece of kit to take with her to university (she had paid for it, to be fair), I swiftly recalled how uninteresting TV can be without access to the premium subscription services like Netflix, Apple TV or Disney Plus. Especially with the dearth of new filming during the pandemic, suddenly it seemed we had nothing new we could agree upon to watch together. We had the choice of whatever we could find on terrestrial or cable TV (some days frankly not much) or we could repair to our own mobile devices to watch a program or film on one of the above subscription content services.
It didn’t take me long to order my own Google Chromecast device. What is Chromecast? It is a small piece of kit that plugs into any TV with an HDMI port (similar to the one at the side of your laptop) and communicates with your smartphone or tablet so that you can “cast” or stream what you play on the handheld device onto your TV. You don’t have to pay any subscription fees to use a Chromecast, although you’ll still have to pay for services like Netflix and Hulu to access them. Your phone or tablet then acts as a remote control to play, pause or stop the program or film. You will still use your TV remote control for volume control. And word to the wise, keep it to hand as the default volume for Netflix shows when streamed to the TV monitor seems to be considerably louder than standard TV volumes.
Installing Chromecast couldn’t be easier. It comes with instructions, but you’ll barely need them. It’s as simple as finding the available HDMI port (there’s a diagram on the instructions, and I simply looked for the port that matched the shape of the plug) and then connecting the other end into the wall socket. Then simply use your phone or tablet to connect the Chromecast device to your WiFi and select a program on your existing subscription service (eg Netflix). Once it starts playing, you’ll see an icon like this, usually in the upper left corner of your phone/tablet screen. Tap it, and it will show you the available places to which you can cast (eg “family room TV”). Tap the selection and within 30-60 seconds you should see the program starting on your TV. Success!
If you found any of the suggestions helpful, let us know with a “thumbs up” below. And never miss a post. When you subscribe, you’ll automatically receive our new post each week. Don’t worry, we’ll keep your details just between us.
Did you realize that with an iPhone, you can know which planes are flying over your head at any given moment just by uttering those 6 words? Not life changing, but pretty interesting. And it makes you realize just how much information we have access to now in the palm of our hand. Why not give it a try now?
If it didn’t work for you, below are simple steps to activate the voice response (Siri) on your iPhone to do this and other handy tasks.
As a first step, tap on Settings on your home screen. Find and open the Setting called “Siri & Search” (see screenshot below, circled in yellow).
When you select that, it will bring up a screen that looks like the below. If the green dot isn’t showing on “Listen for ‘Hey Siri'”, tap it once, and it will turn on (see below, yellow circled).
In order for Siri to calibrate itself, it will first issue you a series of phrases it would like for you to say. See an example below left. If it did not hear you clearly, it will ask you to repeat the phrase. (This happened to me as I had chewing gum in my mouth. Once I removed it, the rest of the phrases were understood just fine. Lesson learned…). You will then see a tick mark when Siri has understood, and you will be asked to speak the next example command. At the successful conclusion of 4 or 5 of them, you will see a completion screen (see below, right). Tap “Done”.
Now you can ask which planes are overhead. Remember to start with “Hey, Siri…” otherwise the program will not realize you are issuing a command to Siri rather that perhaps talking to your friend, Siri. Or just talking to yourself again, as most of us have been known to do on occasion…
You can know that Siri is working on the request when you see a moving “orb” near the bottom of your screen (see screenshot below). In a matter of a second or two, you should get the response. It will look something like the screenshot here. This was taken on a Sunday, so not many commercial flights, but this will look quite different on a busy weekday.
Now that you have Siri set up, why not use the program for simple tasks like the commands you spoke as part of the set-up? There are so many ways to get help using Hey, Siri. Here are just a handful:
Check the weather.
Send text messages.
Schedule a wakeup call.
Hear a joke.
Get sports updates.
Check email.
Translate into a foreign language.
Hear a bedtime story.
We’ll explore some of these and other options in future posts. Be sure not to miss out by subscribing for free today. Simply drop your email address in below and hit “Subscribe”.
If you missed the first part of the series, you can find that here. In this section we’ll continue exploring the top 20 factors that lead to a longer, happier life (from #15 to #11) and how technology might help us implement them.
15 – Exercise More
No prizes for guessing this would be included on the Top 20 list. But, perhaps like me you expected to see this higher up in the list? It turns out that while it’s important and provides many benefits to our physical and mental health, it’s not the number one thing we can do.
But what can it do? Exercise is known to reduce the risk of heart disease, high blood pressure, obesity, diabetes as well as osteoporosis. It keeps us flexible, which is important for continued comfort and mobility. Exercise also leads to better sleep and contributes to mental health by helping treat depression, relieve anxiety and general stress. With so many benefits, who’s to quibble where it belongs on the list?
Better to just get moving. There are plenty of apps for your smartphone which will not only track your progress but encourage you onwards. Two free apps I’ve used are Couch to 5K (pretty much does as it reads) and RunKeeper. The latter not only lets you know your progress (time, distance, route and pace), but you’re also able to store and share the stats from each of your runs, if you’re into that sort of sharing…
14 – Get a Pet – Particularly a Dog
Along with “Eat Chocolate”, this has to be one of my favorite influences for living a longer, happier life. Granted, chocolate can be a lot easier and less expensive than caring for a pet, but they do bring so much joy. So what is it about pet, and especially dog ownership specifically, that helps us? Firstly, dog owners are more active. Rain or shine, dogs need that walk at least twice a day. I can say first hand, if not for my dog on heavy rain days, I probably wouldn’t leave the house. Animals are also known to reduce anxiety both from the actual physical comfort from petting them and because they serve as a distraction and amusement, making us laugh. Spoiler alert…we’ll see “Laughter” further up the list on what keeps us healthy and happy.
How can technology help us here? The obvious answer is that we can research online which type of dog might be best suited for our lifestyle; some breeds or mixes need more walking and other stimulation than others. And of course, you can search for an available pet online, but please do avoid the marketplace sites like Craigslist as they are known hotspots for scammers (who take your deposit and have no intention of supplying a pet) or unscrupulous breeders who do have dogs but overbreed and generally keep the poor creatures in inhumane conditions. Buying from them will not save a dog but just create more incentive to carry on mistreating female dogs and their litters. The Internet is also my first port of call whenever my dog is acting unusually or may be feeling ill. Often the answer is simple enough to avoid a visit to the vet (but always do opt for the vet when your pet is seriously ill). Personally I also find the dog walk a perfect time to catch up on my favorite podcasts. Here’s a post on how to find a perfect podcast for you.
13 – Relax
Being in a constant or near constant state of stress takes a terrible toll on our bodies and minds. Taking time during the day to relax reduces blood pressure and helps reduce stress-related conditions, such as depression. Practicing yoga or meditation as simple as a few minutes of focused breathing can help reduce our stress levels. And thanks to technology, we’ve now got an abundance of apps, many of them with free versions, that can guide us in stress-reducing activities like yoga, mindfulness and focused breathing.
12 – No Smoking
How much is needed to say for this one? Don’t you want to be in good health to enjoy your grandchildren? Apps can come to your rescue, and you even have a choice on how you prefer to quit. Here’s one overview of top apps.
11 – More Friends
Research in the Journal of Epidemiology and Community Health says that socializing with friends is beneficial and their presence can actually help you live longer. Not only that, but having friends around in our later years can do more for life expectancy even than having family members around. Friends may encourage us to look after our health, and having them around helps reduce feelings of depression and anxiety.
A Harvard University study followed students for nearly 80 years to research longevity and happiness and found that “close relationships, more than money or fame, are what keep people happy throughout their lives. Those ties protect people from life’s discontents, help to delay mental and physical decline, and are better predictors of long and happy lives than social class, IQ, or even genes.”
So how can technology help? It’s easy to stay in touch with existing friends using messaging apps. I get a lot of joy and support from a friend group Whatsapp chat, which was super easy to set up. And platforms such as FaceTime and Zoom allow us to “meet up” virtually when we can’t be together in person. And if you feel you could benefit from “topping up” your friendship circle, there are now apps which focus on forging friends rather than just romantic dating. These vary by area, so you may want to search “friendship app” to get ones local to you.
If you’re keen to continue reading the top 20 factors influencing longevity and happiness, why not subscribe for free? We’ll keep your email address just between us, and you’ll get each post directly into your inbox.
At first it may seem counterintuitive. Sure, it’s clear how technology can save lives and help us monitor our health. But does tech make us happier? Or is it responsible for just the opposite?
The answer is that it can do either, and it’s up to us how we use it. Here I wanted to take an objective look at what scientific evidence shows are the top drivers for happiness and longevity and surmise how technology can potentially play a role. For some, the answer is glaringly obvious. For others it’s perhaps a stretch, but one worth making…
It turns out there are quite a few decisions we make that affect our happiness and longevity. In this post we’ll review #20 through #16, and in the next posts we’ll continue the countdown to #1. I found there to be a few surprises! Let’s see how this compares with your expectations. And if you’d like to source the original article which we’ve adapted including technology tips, you can find that here.
20 – Eat Chocolate
This may be 20th on the list, but it is one of my favorites! Why is it healthy? Chocolate contains both flavonoids and antioxidants. Flavonoids assists cardiovascular health, while antioxidants are believed to prevent or delay certain damage to our cells. Dark chocolate is considered best as it contains more than twice as many antioxidants as milk chocolate (and has fewer calories). Why it makes us happy should be obvious.
So how can technology help us get more of a good thing? Even dark chocolate is something we should enjoy in moderation. It’s fattening and let’s face it, it doesn’t come cheap, so you want to choose wisely. Try searching “consumer reviews of chocolate”. Find the results specific to your location. (No sense tempting yourself with a brand not available near you!) Because it’s a popular subject, you’re apt to find even major newspapers and consumer sites like Consumer Reports having reviewed chocolate, but also professional chocolatiers in articles like this in Business Insider.
19 – Be Optimistic
Researchers found that optimistic people decreased their risk of early death by 50 per cent compared with those who are more pessimistic. You may think that we can’t change how we are, but that’s simply not true. There are a number of ways we can train ourselves to be more optimistic. You’ll find recommendations here that include actions like using positive mantras (you can search online for ones specific to your situation), avoid trying to predict (ie worry about) the future, and avoid dwelling on the past. Hint: the present is the most positive “gift” you can give yourself.
18 – Happy Marriage
Married people tend to have better health than unmarried people. Why? Because they tend to offer encouragement, support, and protection from daily problems. They are also more able to handle stress better as a result. How can technology help if you don’t currently tick this box? If you are married but don’t feel you’re experiencing the support your relationship should afford, you can start your search for counseling online, looking for accredited programs and counselors in your area. Some sessions may even be available remotely. And of course if you aren’t married and would like to find the right partner, you probably already know that technology can help with that! And you wouldn’t be alone by a long-shot if you decided to give online dating a try. Between 2015 and 2019, nearly a third (32%) of romantic relationships in the UK started online. In the US, the figure is even higher (39%), according to research by Stanford University.
17 – Upgrade your Job
This one seems vastly unfair, but according to worldwide census data, how much you earn has a very big impact on longevity. Globally, with each rise in classification (low income to lower middle to middle, etc), you gain 3-7 years in average lifespan. So whilst someone belonging to the low income classification at birth has a life expectancy of just 62 years, their counterpart born into the high income class will live on average to 81, or 19 years longer!
The difference may be less pronounced in the most developed countries, but it is still shockingly high. For example, according to UK Government statistics, life expectancy at birth for males in the professional group was 7.4 years more than that for those in the unskilled manual groups. The gap between the social classes was smaller for women than for men, at 5.7 years.
So should we just accept our place and that of our offspring? Heck, no! Here’s where technology can really be instrumental. It used to be that you had to choose between a paying job or school/unpaid training. Although it requires a lot of effort, you can improve your skills with online training without giving up the job that pays the bills. And today even staying in the higher earning roles requires you to keep learning. There are a number of reputable sites providing online learning, including LinkedIn and Udemy.
16 – Eat More Fruit & Veg
Eating plenty of fruits and vegetables can help control blood pressure and cholesterol, ward off heart disease and stroke, and prevent some types of cancer. And eating more of these and less refined food and sugar will definitely lift your daily mood. Technology can help in a number of ways. The Internet is an endless source for delicious recipes. Serious meal planning used to take hours each week, but now you can quickly search for recipes using seasonal vegetables and fruit you happen to have to hand. There are also loads of diet apps that give you the encouragement you may need to get more servings of and a wider variety of vegetables into your meals.
Want to compare what the experts say to your beliefs on what leads to a long and happy life? Subscribe here for the upcoming instalments in the countdown to the top 20 drivers for a long and happy life!
How to attach a photo from a smartphone is one of the questions I get asked most frequently. Luckily it’s also one of the easiest things to learn! There are two ways to do this wholly from your iPhone, and the difference will depend which starting point you prefer. We’ll cover both.
Starting from the Photo
You can start the process by bringing up the photo itself. You can do so either by choosing the photo you just shot or by going into your photo library to find the photo you want to share. Sharing by starting with choosing the photo is the easier option when the photo has just been taken and it’s already on your screen or when it may be buried a bit deeply in a large photo library. In this case you can more quickly scroll through photos as they are shown in gallery format rather than one by one.
Tap on one single photo or video you’d like to share. In the lower left corner, you’ll now see the share button. If you are looking to share more than one photo at once, you must still select “share” as a first step.
Choosing “Share” will bring up a number of popular options. You will also see a blue tick mark in the lower corner of the photo you’ve chosen. This is your confirmation that this photo has been chosen (see yellow underline in image below).
If you do want to share more than one photo or video at once, you should choose the other desired ones now before selecting email as your desired vehicle for sharing. You can do this by swiping / scrolling right and/or left. (If the photo you’ve chosen is the most recent one you have on your photo roll, you will only be able to scroll left.) Choose any additional photos by tapping on them; you will see the tick mark added to the corner. If you change your mind and want to de-select one or more pictures, simply tap again and you will see the tick mark disappear on that photo. Now choose “Mail” (see yellow circle in image below).
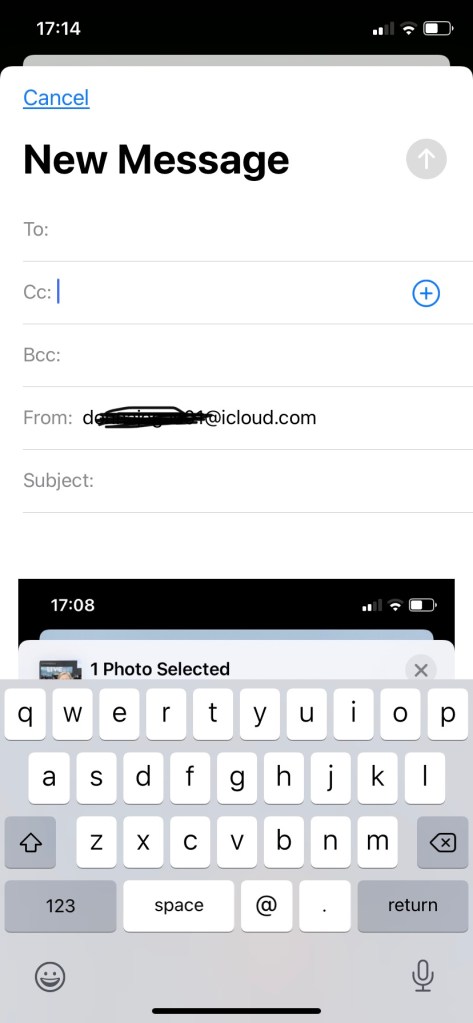
Tapping “Mail” will now bring up a new blank message with the photo(s) you’ve chosen already attached (see image below). Simply address the email, add any written message and hit “send” as usual.
Starting with an existing email
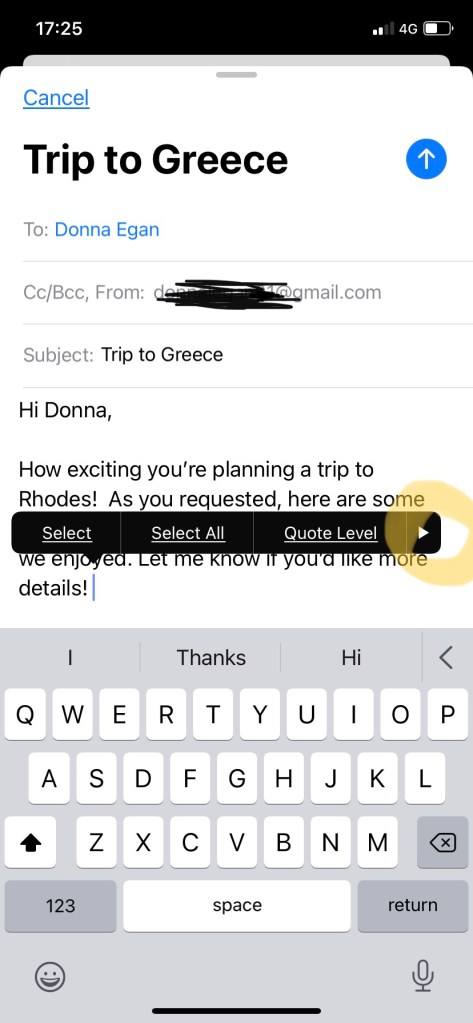
That’s all fine and good….until you find you want to add one or more photos or videos to an existing email. Perhaps it’s part of a chain and you don’t want to separate the pictures from the history of the conversation. In this case, you will be embedding the photo(s) into the body of your email. Start or continue your email as usual. Once you are ready, tap on the spot where you’d like your photo to appear ie in the body of the text or perhaps at the bottom of your email. A black menu bar will appear with several options shown (see image below, left).
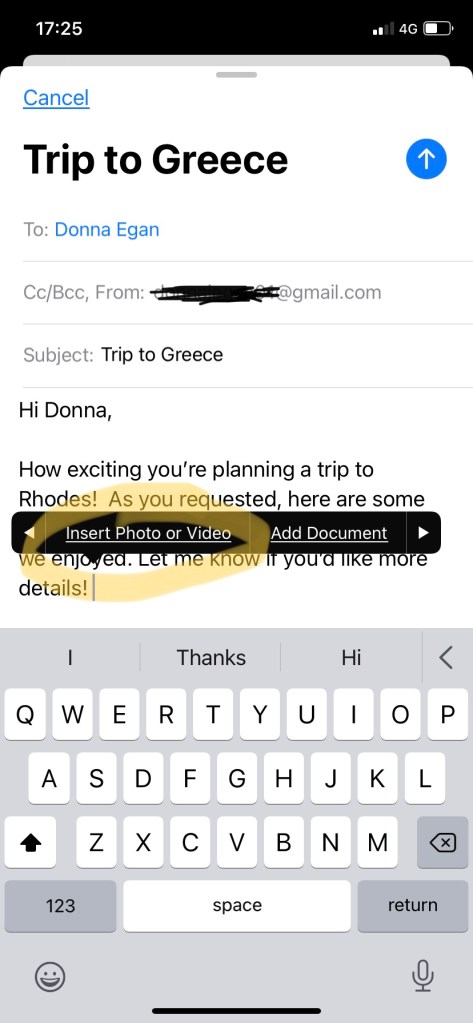
You will need to scroll using the arrow on the right of the options (circled below, left) in order to select “Insert photo or video” (see this circled in image below, right).
Once you tap “Insert Photo or Video”, your picture library will appear at the bottom of your screen (see below, left). Tap one or more images you’d like to insert and they will appear where in the email you had selected (see below, right). If you want the pictures to appear in different areas, say you are writing a description, inserting the corresponding picture then writing a separate description before you want an additional picture, then you will need to repeat the above process each time. (Or you can cut and paste the text afterward, but this can be fiddly on a small smartphone screen.)
Which size photos should I send?
Once you have selected your pictures, you may have noticed you were prompted to choose the size (Small, Medium, Large). This corresponds to the file size rather than the dimensions as they will appear in your email. A “larger” file size will give more pixels and therefore greater clarity but it will also “weigh down” your email (a larger file may take longer to receive) as well as your recipients’ storage space. Unless you are sending a photo that needs to be professional finish ie to be enlarged or for display printing, you should be fine choosing small or medium. This is also the case where the photo is destined just to be appreciated on the screen either staying in the email or shared on social media.
Now that you’re a pro at inserting photos and videos into an email, don’t deprive your friends and family of seeing your best shots. Why not have a try now?
Thanks for reading. Let us know what you thought above, and if you’d like our future posts to come directly to your inbox, simply input your email address into box below and hit “Subscribe”. It’s free and we promise to keep your details between us.


 in the lower left corner. If you want to select multiple images to send in one go, you must still start by tapping the upload icon, and only then will you be given the chance to add other pictures. Tap any others you wish (scroll or gently swipe to the side to see more images), and you should see a blue tick box in the lower right corner of the ones you’ve selected. If you’ve made a mistake, simply tick that one again to de-select it. Once you’ve got all those you wish to share then you will select the mode in which you wish to send them. Your choices are found below the gallery. See an example below.


 Tap Accessibility (see first image below left, circled). Then find Magnifier (see below right, circled) and tap to select.