How to Add Stickers to Your iMessages

What are Text Stickers?

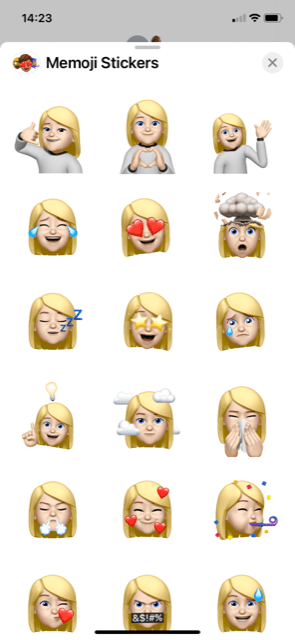
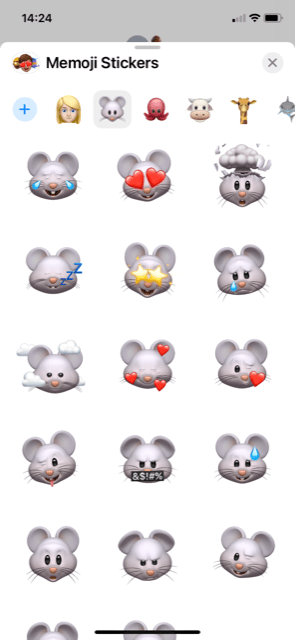
Stickers are similar to Emojis except they’re often more detailed and somewhat more adaptable. They can be nearly any image and some have cute messages integrated into the image.

Adding Sticker Functionality for Texts on iPhone

You may find you already have pre-loaded some free sticker packs. (The above examples were free.) Otherwise you can download sticker sets you choose through the iMessage App Store (not iTunes). It is easy to access through iMessage.

1.Open iMessage on your iPhone.

2. Open a chat and select the “A” icon to the left of the text box. (See below, left.)

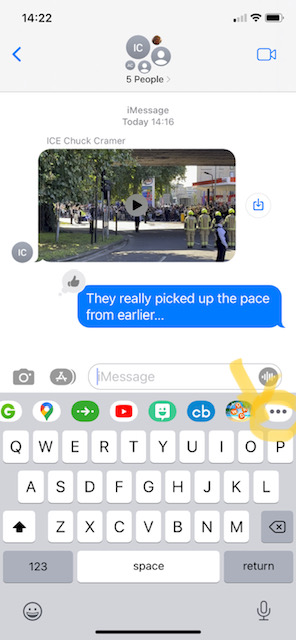
3. Select the icon of three gray circles. You may need to scroll down or over to locate it. (See above, right.)

4. Select the “+” icon to go to the iMessage App Store.

5. Select the stickers you want to add and install them with the side button. As mentioned, some packs are premium and require payment. iMessage App Store will use the same payment method you set up for iTunes, so you merely need to agree to the transaction itself.

How to Apply a Sticker to a Text on iPhone

1. Open a new message.

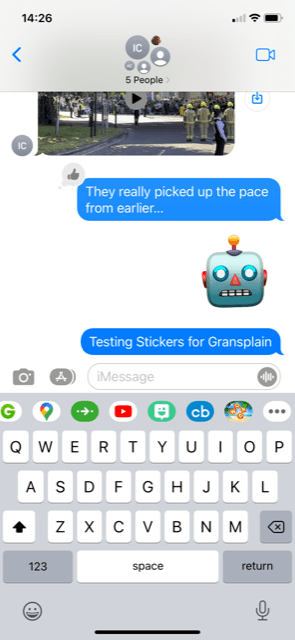
2. Select the dropdown menu next to the chatbox and then the “A” icon. (See above, left.)

3. Select the three gray circle icon to access your stickers. (See above, right).

4. Select the desired sticker (you may need to scroll over to see all options) and add it to the message.

5. Select the blue “up” arrow to send it. Or type out the rest of your message as desired and send as usual. See below (left with blue arrow, right once sent).

    Do you prefer to add the sticker as an overlay instead? Tap and hold your sticker and drag and drop where you want it to appear in the message. If you want to overlay a sticker on top of an image, add that first and then go to stickers and follow the above instructions to drag and drop where desired.

    In future posts, we’ll cover how to use stickers in a Facebook Messenger text. By subscribing below, you’ll automatically receive this and other useful tips for the technology you already own. It’s free and we’ll never share your data with anyone.

    Gransplain.com

    How to Turn on Grammar Check on Your iPhone

    Using Auto-Correction to improve grammar can be a two-edged sword. Sometimes the bot’s idea of what you’re trying to say is funny at best and infuriating at worst. But there’s no denying that it can help prevent some embarrassing errors. You might as well look smart while using your smartphone….

    How to Turn On (or Off) Auto-Correct on Your iPhone

    Open the Settings app .

    Tap General > Keyboard. (See below, left)

    By default Auto-Correction should be on. If it’s not, turn on here whichever functions you wish to be included. You can pick and choose and always change back later if you’re finding something unhelpful.

    It’s that simple. If you found this quick tip helpful, please let us know below.

    Don’t miss out on your free subscription on weekly quick tips and tricks for using the technology you already own.

    Gransplain.com

    How to Check Spelling & Grammar on your Computer

    You may already have automatic grammar and spelling check set up when using a program like Word. If you’re not sure, you can quickly try purposefully writing an incorrect word or sentence and see if a colored underline appears or a pop-up box suggesting an edit.

    How to Turn Automatic Proofing On or Off

    If you’d like to change the on or off status of spelling and grammar check simply follow these steps:

    In Word, OneNote, PowerPoint, Publisher, or Visio: On the File menu, click Options (on your left margin at bottom), and then click Proofing.

    In Outlook: On the File menu, click Options, and click Mail, and then click Spelling and Autocorrect.

    See example below from Word.

    How to Access Proofing in Other Programs

    Automatic spelling and grammar checking is not available in Access, Excel, or Project. However, you can manually start a spell check by simply pressing F7 (function key on top row).

    There are add-on tools you can also use if you want more in-depth guidance on grammar and diction. Grammarly is the best known of these, and they do offer a free version. One of the other advantages of Grammarly is that it works across a wide range of programs, as shown below (image from their site).

    That’s it, and whichever program you choose to use should help you with the rest.

    Never miss out on a tip or trick for using the technology you already have (or free ones you don’t), by subscribing below.

    Gransplain.com

    Never Say Buy (more Storage)

    You’re on your iPhone trying to send a photo or download a new podcast and you get the dreaded surprise that the action cannot be taken as you’ve run out of storage. Oops. It just happened to me this week. It seems to always happen when you’re in the middle of something important. Have no fear, there’s a super quick fix to do a mini “Marie Kondo” on your smartphone storage that will get you fully functioning again in 3 minutes.

    How to Check your Remaining and Used Storage

    Go to Settings .

    Scroll down to General and tap to open.

    Now scroll down midway to iPhone Storage and tap. You’ll get an image like that below. The yellow arrow shows where you can see how much of your storage you’ve used and how much there is in total. The difference is how much you have left. So in the example below, I have (paid for) 64GB and used 58.6GB. You’ll start getting messages and having actions blocked a bit before it’s fully used. (I’d already freed up about 5GB of storage before taking this screenshot.)

    How to Identify What’s Hogging Your Storage

    Right under the grey numbers, you can see in a bar graph which types of things are taking up your storage. On the above, Apps (in red) are taking the lion’s share with over half. The phone’s operating system itself is second, but we don’t want to touch that. Photos, including videos, come third.

    Toward the bottom of the screen, you’ll see in rank order (largest to smallest) the particular apps that are responsible for taking up your storage. In my case it was painfully clear to be Overcast, which I use to store and listen to my favorite podcasts. I have a lot of favorites! Time to see what’s what. If you tick on the program (Overcast in this case), you’ll get a break-down. See below.

    So with the App itself taking up only 5.7MB while the data stored within it (the actual podcast recordings) taking up 18.63GB (equalivalent of 18,630MB vs 5.7 for the app itself), it’s clear that there is a lot of opportunity to pare down the content without needing to delete nor offload the app itself.

    How to Reduce Amount of Storage Being Used

    Exit Settings and go to your Homescreen to find the App that’s hogging your storage (Overcast in this case). Open it and go to individual content pieces. Of course if you want to delete an entire program, that will be even faster, but we’ll assume here you want to keep it.

    Identify individual programs you no longer need to keep, such as those already listened to. Remember in the case of podcast/films/videos that sit on platforms like Overcast, YouTube, Netflix, you can go back and search for it from the source and bring it back (assuming they don’t stop supporting it). On each individual program you want to erase, simply swipe left and tap the bin icon, usually in red, as shown below.

    Check the New Storage Reading

    In the case of podcasts, programs and videos, it won’t take that many erased in order to start to see progress on the amount of storage freed up. Deleting individual still photos may take more unless they are very high resolution. To check your new storage figures, go back to Settings>General>iPhone Storage (as above). Hopefully you should see a lower 1st number ie amount of storage you’re using. With just 3 or 4 podcasts erased, you can see below, we’ve freed up 0.6GB. Even if we’d started at close to maximum capacity, that would be enough freed up to allow us to send a few pictures or download another podcast. So just taking us 3 minutes or less to solve the issue.

    Best Practice

    Naturally, it would be best to avoid the dreaded “Storage Full” message in the first place. It would be healthy practice, in the spirit of Marie Kondo recommendations, to stay on top of things by doing a little at a time. Perhaps once a week during a non-driving commute or waiting in a line, you could take 2 minutes to do the above. I’ll pledge to do the same.

    Avoid missing out on the next post by subscribing below for free. We never share your data.

    Gransplain.com

    How to Share an Existing Document or Folder

    Last week we showed the simple steps to create a new shared document. If you missed it, you can find that here. In this post we’ll cover how to share an existing document as well as an entire folder.

    The main benefits of sharing are that others can contribute their knowledge directly without making you an intermediary and moreover you avoid the need to repeatedly update people who need to see changes you or others have made. The changes can automatically be seen whenever they open the document(s) anew.

    You may have thought shared documents are really only useful in business or education. But this habit also streamlines collaboration for situations involving personal business and planning for fun! I’ve found it extremely useful in coordinating with family members in planning care and wellbeing of other family members.

    It’s also a great way to divide the “work” of researching a joint vacation. Different people can agree the areas they’ll look into (eg accommodation, excursions, meal reservations) and report back onto a shared folder or individual document so that everyone is literally “on the same page” and can make informed decisions.

    Share a Single Document (File)

    On a computer, go to Google Drive . (See last week’s post if you need a prompt how to find it.)

    Click the file that you want to share.

    Click “Share” or “Share Share“.

    If the document you’d like to share is not already in Drive, you can add it by ticking “New”. See below, circled in yellow.

    This will show a drop-down menu. For a single file, choose “File upload” (see below, hightlighted in grey).

    Once in Google Drive and you choose “Share”, as before (see previous post) you can choose with whom you want to share and which level of access you want to set.

    Share the Contents of an Entire Folder

    Simply choose the folder that you’d like (instead of file). Some points to bear in mind when you share a folder… the files and sub-folders inside are updated with the new sharing settings. Depending on how you shared the folder, the people whom you shared with will have access to the files inside according to the levels of access you give as follows (source: Google):

    Editor: People can open, edit, delete or move any files within the folder. People can also add files to the folder.

    Commenter: People can make comments and suggestions on files in the folder, but can’t change or share items in the folder with others.

    Viewer: People can see the folder, and they can open all files within the folder.

    If you’ve found the posts on getting started on shared documents/folders useful, let us know with your vote below:

    And if you haven’t yet subscribed and would like to get helpful tips for the tech you already own directly into your inbox, you can add your email and subscribe for free today.

    Gransplain.com

    Creating a Shared Document

    Ever wish you could have a space where you can collaborate with others to gather, update and share information without having to keep re-sending updated versions by email or other means? There is, and it’s easier than you think. With Google Shared Documents, you can easily create a document and allow others to view or edit it or alternatively do so with an existing document. In this post, we’ll show you the steps to take to create a shared document from scratch.

    How to Create a New Shared Document

    On your computer, in a new window, go to docs.google.com/document/.

    In the top left, under ‘Start a new document’, click Blank New. (See yellow circle below).

    This will open up a blank Word document (see below). As with any standard Word doc, you can start by typing or pasting from elsewhere what you’d like.

    How to Share Access to your Google Doc

    At the top on the far right, you’ll find the “Share” button. Tap this to get a pop up window prompting you to choose with whom to share your document. There are 2 ways to do so. 1) Start to type in their email address in the top (see yellow arrow below left). You’ll be prompted with commonly used email addresses. Or 2) Create (“copy”) a link which you then share with your recipients by email or message (see yellow circle below right).

    Now choose the “level” of sharing you’d like for the chosen recipient(s). You’ll see from the image below, you can choose that they simply view it, add comments, which you can then review before choosing to integrate (accept) or reject or they can have full editing privileges. A great feature of Google Shared docs is that you can always find and revert to an earlier version if you find that someone with editing privileges has somehow messed up the document.

    You have the option to include a covering message along with the notification that you’ve shared the document XYZ with them. I find this helpful to allow me to explain what I would like the recipient(s) to do with the document and by when.

    Click “Done”. The person(s) you’ve shared with will now get an email notifying them. Whenever they open the document, they’ll always see the latest version.

    Help! Where’s my Shared Document?

    Overall using Google Docs is easy and very intuitive. However one of the aspects I found least intuitive is where to find the document once it was shared! I know I’m not alone in this as I get asked all the time where to find a document I’ve previously shared with someone.

    Initially the document will appear as a tab alongside any Internet pages you have open. Once it’s closed, you can easily find it again.

    Go to Google Drive. You can find this by tapping the 9 dots (top right of screen) when in any other Google app (gmail, calendar, etc). Look for “Drive” in the drop-down menu. Tap that and your documents kept in Drive should appear, and simply double-click the one you’d like to re-open.

    In the next post, we’ll cover how to turn an existing document into a shared Google doc.

    If you’d like to receive that and other updates directly into your inbox, be sure you’re subscribed. It’s free and we won’t share your data with anyone else.

    Gransplain.com

    Getting the Most Out of Your Smartphone, Laptop and Tablet Batteries

    One of our most popular posts focused on tips to assess your smartphone battery and keep it at its peak. If you missed it, you can find those tips here.

    Getting More from a Single Charge

    There are a number of ways you can help maximize the longevity of the charge on your iPhone or Android smartphone battery.

    • Use your WiFi instead of mobile data. Double good idea if you pay for your data above and beyond your package.
    • Turn off Bluetooth and GPS when not needed.
    • Lower your screen timeout. This is how long your screen stays illuminated before going to resting (dark) mode. See if 30 seconds meets your needs. You can always adjust it higher if it doesn’t allow for the time you need.
    • Instead of turning your tablet off then powering it back up, set it to rest mode.
    • Check which of your apps use the most power so you can turn off those you don’t need.
    • Disable auto-sync for apps you don’t use often. Delete or offload any apps you no longer use.
    • Turn on airplane mode (Data and WiFi off) when you’re working offline and won’t need connectivity.
    • Change your email settings to “sync less often”.
    • Lower your screen brightness. The easiest way to do this is by swiping down from top right corner of your home screen. Find the brightness control (sun icon) just to the right of the middle of your screen. Slide your finger downward until you can still comfortably see the screen but it’s emitting only the brightness needed.
    • Disable push notifications and location tracking.
    • Block ads during web browsing. A great idea for many reasons!

    Getting More over the Life of Your Battery

    In addition, there are several things you can do to extend battery life.

    • Keep your device out of the hot sun, other extreme heat or cold. It’s best to keep it between 42 and 85 degrees Fahrenheit (6 and 29 degrees Celsius).
    • Don’t allow your device to reach 0% battery charge. Try to keep it at proper charge levels — somewhere between 40% and 80%. The 20% warning (red battery symbol and pop up message) should help you control this.
    • Turn off your device at least once per week. Hands up if you’re guilty of forgetting this advice (me)!
    • Allow your laptop to discharge regularly by unplugging while using it for awhile. Keeping it perpetually on charge will erode the battery life over time.

    With a little investment in time, you’ll find you can extend the health of your batteries as well as cutting down on landfill waste.

    If you’d like to receive weekly tips directly into your email inbox, you can subscribe below. It’s completely free and we don’t share your details.

    Gransplain.com

    Using Google Maps to Track Friends

    Does that sound ominous or nefarious? We’re not talking about surveillance but rather using technology for good. In this case sharing your location with a friend so that you can more efficiently meet up or so that they can confirm you’re safely enroute home when you’re traveling alone. If you want to track someone or want them to track your whereabouts with Google Maps, you’ll need to use Google’s live location sharing feature.

    How to share your location on smartphone or tablet

    1. If you want to share with someone who has a Google account, add their Gmail address to your Google Contacts.
      • Find Contacts in your Google menu. Look for 9 dots at top right of your screen (see 1st image below with yellow arrow). Tap it to get drop down menu and choose Contacts (circled below).
      • If they’re not already in your contacts, use the “Create Contact” button to add them (third image below, circled).

    2. Then open Google Maps 
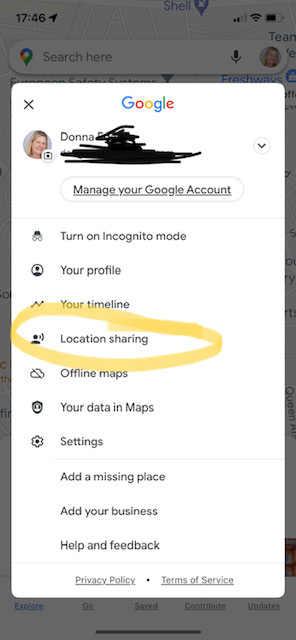
on your phone or ipad, tap your profile picture, and then choose Location Sharing.

    3) Next, tap the Share Location button. This will bring up the conditions under which your location will be shared:

    4) Choose for how long and with which friend(s) you’d like to share. The default is one hour, but you can easily adjust this up or down as desired.

    5) If, for example, you’re trying to meet up with each other or you are concerned with their safe arrival somewhere, after choosing the friend(s), you can also request that they share their location with you (circled below). You can also stop sharing your location (see arrow below), which you should do once not needed in order to avoid extra battery and/or data usage.

    Subscribe for weekly updates on how to get more from the technology you already own. It’s free and we’ll keep your data just between us.

    Gransplain.com

    Control and Convenience

    Most of us tend to want a couple things from their technology – convenience of doing things easier and faster and a sense of being in control of the tech rather than feeling confused by it.

    To that end, there have been 3 topics readers have found most valuable here.

    1. How to maximize their smartphone’s productivity by getting more out of the battery… each charge as well as with the battery life overall. If you’d like top tips on how to assess your battery performance and get more done with every charge, you can find top tips here.
    2. Stop losing time searching for important information you received awhile back in a text or Whatsapp message. It’s easier than you think once you know this simple trick.
    3. And who hasn’t been frustrated when typing out a message and seemingly being unable to put the cursor where you need it to correct something? It’s almost as if the cursor is mocking our attempts. You can easily show it who’s boss (you are!) with this quick tip.

    If you’d like to continue receiving additional tips and tricks to increase convenience and a sense of control over your everyday technology, you can subscribe below. No catch.

    Gransplain.com

    Save Memory and Time with One Tab

    Do you tend to keep open many browser tabs (website pages) at any one time? Perhaps like me you are working on several projects at once and prefer not to have to go back and fetch the pages helping you do so every time you toggle between tasks.

    In last week’s post, we showed how to bookmark all open tabs at one time. For those who need to do this frequently, there is a faster way – with One Tab.

    What is One Tab?

    One Tab is a free Chrome (browser) add-in or extension that saves up to 95% memory and reduces clutter. Want to know more?

    The OneTab extension converts all the open tabs to a single tab of bookmarks. This reduces Chrome’s memory use from a typical 1-2GB, to around 100MB. If you’re operating near capacity, this can make a difference in your computer reaction time.

    How to Use One Tab

    Go to One Tab site. You can use the link above or type http://www.one-tab.com. There follow the easy prompts to install the extension. It takes only a few seconds.

    Once installed, you will then be able to find it (and any other Chrome extensions you have installed) simply by tapping on the icon in the shape of a jigsaw puzzle piece at the top right of your screen.

    Likewise, it’s easy to remove One Tab if you wish…just right-click the icon and select “Remove from Chrome”. If your computer is running slowly and you think that may be due in part to the many browser tabs you have open, simply go into your Chrome extensions and tap “One Tab”. Immediately the tabs will consolidate into a single tab, identifiable on the tab by the One Tab icon . Here I have a confession… with my imperfect vision and the small size on the tab, I thought this was actually a “V” and wondered what that had to do with the name. Now I see it’s a funnel, which makes more sense!

    Tap on the tab with that icon, and you will see a very easy-to-scan vertical list of all the tabs you have just consolidated with the extension. So much easier than hovering over each open tab to see which one contains the information you’re looking for at the moment.

    Individual links on the OneTab page can be restored by clicking on them, or they can all be restored by clicking “Restore All” (see below). 

    If you choose “More” (see last option on right, above), you can name the group of tabs, for example, with the date or project name.

    It doesn’t matter if you close the OneTab tab or close the browser because the extension will keep the aggregated set of tabs, and the latest stack is loaded when you restart the browser. Simple.

    If you’d like to get weekly updates from Gransplain, simply subscribe for free below. We won’t be sharing your details with anyone else.

    Gransplain.com